background image

8

Use Instructions

DO NOT turn the handle if the Grain Mill is empty. This will
damage the milling head.

Now that you have assembled your Grain Mill properly, read through
ALL of the following instructions before you start the grinding
process.

The first time you use the Grain Mill be sure to dispose of the first
2-3 cups of grain which has been ground as it may contain impurities
from the manufacturing process.
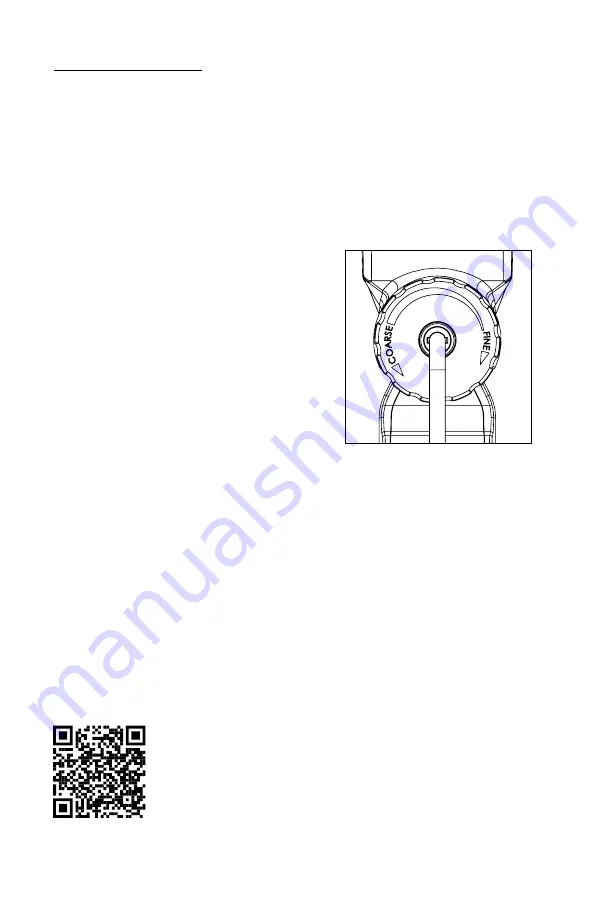
1.

Before you put grain into the hopper,
select the desired coarseness you
want for your flour by turning the
adjustment knob, clockwise for fine and
counter-clockwise for coarse (see
diagram at right).

2. Never use tools to tighten the

adjustment knob, as it will damage
the mill.

3.

For best results, adjust the knob clockwise to the finest setting, just
until the knob is snug, then turn the knob counter-clockwise 1/2 turn
to prevent over tightening and possible damage to the milling cone. As
you grind, you can adjust the knob counter-clockwise, for a coarser
texture, if that is what is desired.

4.

Once you have your adjustment knob set, pour grain into the hopper.
The Grain Mill holds 2 cups of grain, which yield approximately 3 cups
of fine flour, depending on the grain.

5.

Turn the handle clockwise to begin grinding.

6. *TIP

- If the grain mill is grinding too coarse, you can adjust it to be

finer by turning the handle counter-clockwise 2-3 full rotations while
tightening the adjustment knob towards the fine setting.

Optional Electric Motor is available at VKPbrands.com

Scan to see The Grain Mill Assembly & Use Video:
VKPbrands.com/videos.php?v=the-grain-mill-use

Summary of Contents for Kitchen Crop VKP1248

Page 1: ...Instruction Manual THE GRAIN MILL ...

Page 2: ...l enjoy the natural wholesome flavors of home ground ingredients prepared fresh and free from all the preservatives and additives contained in commercially processed foods The Grain Mill will serve you well for years to come Caring well for The Grain Mill will help it last so be sure to read through all the instructions contained in this manual before using your product for the first time The basi...

Page 3: ...1248 5 Body 3 VKP1248 7 Clamp Assembly 4 VKP1248 6 Handle 5 VKP1248 4 Milling Cone and Shaft Assembly 6 VKP1248 3 Milling Ring 7 VKP1248 2 Adjustment Knob All replacement parts and optional motor are available on our website VKPbrands com 2 3 1 3 4 5 6 7 Optional Electric Motor is available at VKPbrands com ...

Page 4: ...l damage the milling teeth Avoid contacting moving parts Never put fingers near the milling cone shaft while the Grain Mill is being operated as that could cause serious injury Using tools to tighten the adjustment knob will damage the Grain Mill and void the warranty Tighten the adjustment knob only by hand Do not operate the Grain Mill without the clear plastic hopper in place Never operate the ...

Page 5: ...ishwasher Helpful Tips 1 The first time you use The Grain Mill be sure to dispose of the first 2 3 cups of grain which has been ground as it may contain metal residue from the manufacturing process 2 We suggest always starting The Grain Mill adjusted to the finest setting However if you started grinding on a coarse setting and need to adjust back to fine then turn the handle counter clockwise for ...

Page 6: ...de as it will go by turning counter clockwise Then push the clamp assembly forward into the slot on the mill body so the body and clamp assembly sit flush with the edge of the surface Twist the clamp screw clockwise until it is tight and The Grain Mill is securely in place see mounting diagrams below Mounting surface is too round or oddly shaped Mounting surface is too thin Mill body and clamp ass...

Page 7: ...ighten Place the hopper on top of The Grain Mill by sliding it from the front making sure it is pushed all the way back Insert the milling cone and shaft assembly through the front of The Grain Mill body Push the handle into the shaft on the back of The Grain Mill by lining up the tabs on the handle with the grooves in the shaft Place a shallow bowl or pan in front of The Grain Mill under the mill...

Page 8: ...mill 3 For best results adjust the knob clockwise to the finest setting just until the knob is snug then turn the knob counter clockwise 1 2 turn to prevent over tightening and possible damage to the milling cone As you grind you can adjust the knob counter clockwise for a coarser texture if that is what is desired 4 Once you have your adjustment knob set pour grain into the hopper The Grain Mill ...

Page 9: ...tter what I do See p 7 for proper assembly instructions and p 8 for Use Instructions Be sure to read all steps carefully If the problem persists contact customer service at 866 257 4741 I am trying to grind X and it doesn t seem to be working Contact customer service at 866 257 4741 When I turn the handle very little or no flour comes out Carefully follow the Use Instructions on p 8 and make certa...

Page 10: ... pan and let cool on a wire cooling rack For Basic Rolls Form dough into 2 inch balls place onto a greased baking pan and let rise for 15 minutes Bake in oven at 350 F for 20 30 minutes or until rolls are golden brown Remove from oven and let cool For Cinnamon Rolls Roll dough out on a floured surface into a rectangle Pour c butter onto dough and sprinkle with any of the following toppings Cinnamo...

Page 11: ...11 Notes ...

Page 12: ...tment All warranty claims must be accompanied by a proof of purchase and are only valid if the appliance has been operated within the U S or Canada and used for its intended purposes These products are for household use only Items Not Covered Return shipping costs or returned items lost in transit Damage to the product due to accident misuse abuse negligence or if the appliance has been altered in...

Reviews: