Contents:
Page
Installation of the valve flaps
2
Installation of the hood for
recirculating air mode
2 - 3
Installation of the hood for
exhaust air mode
4
First ensure that the power supply is secure. This must be set up by a qualified specialist.
Caution! Before installing the hood, first install the valve flaps as described below:
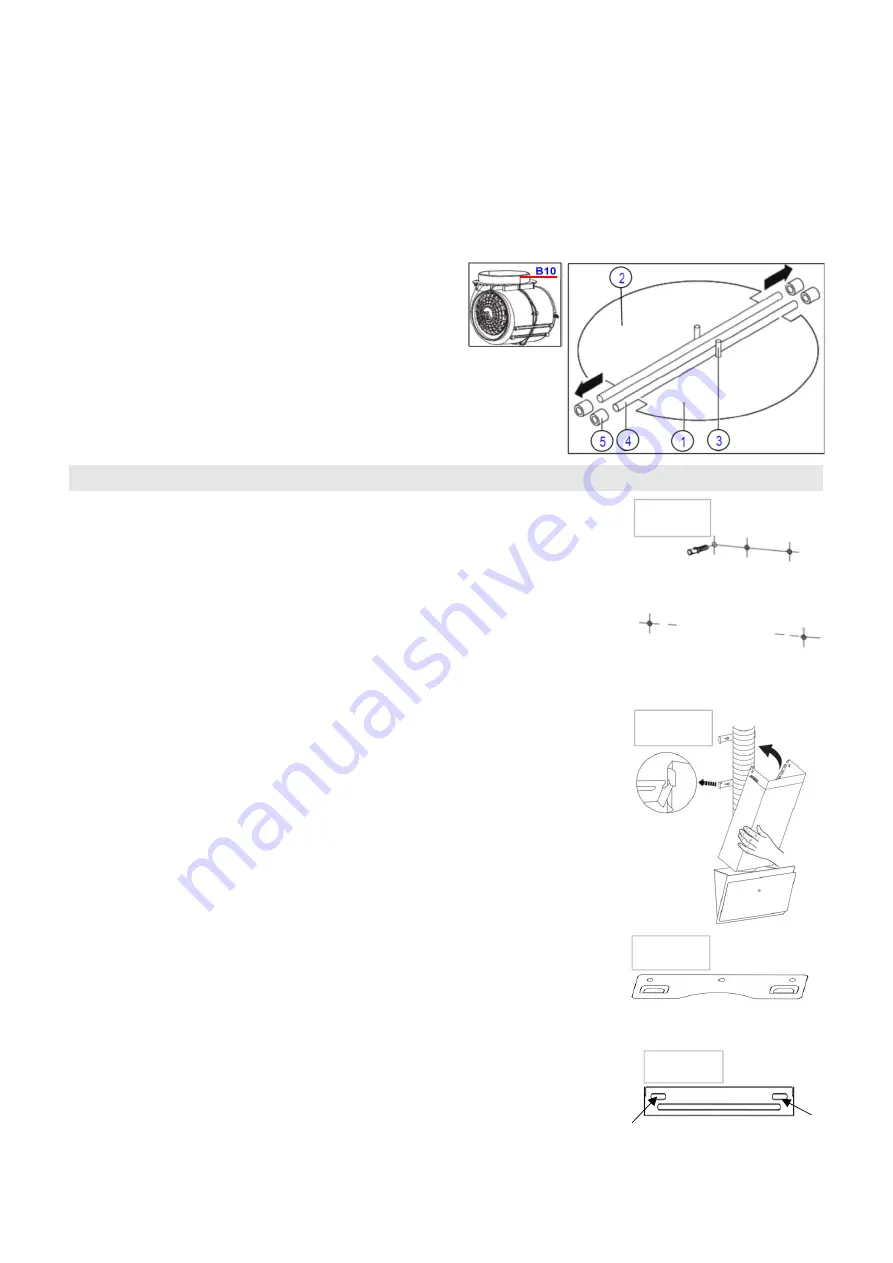
Installation of the valve flaps:
If the valve flaps are not factory-fitted:
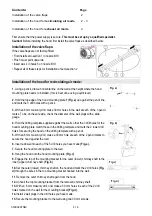
• First install semi-section 1 in nozzle B10
• Pins 3 must point upwards;
• Insert axis 4 in holes 5 on nozzle B10;
• Repeat all of these steps for installation of semi-section 2
Installation of the hood for recirculating air mode:
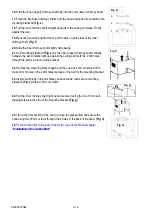
6. Insert a dowel into each of the 5 drill holes you have made (Fig. a).
7. Secure the hood mounting plate to the wall.
8. Hang the hood onto the hood mounting plate. (Fig. c)
9. Engage the top of the mounting bracket for the outer (lower) chimney shaft to the
inner (upper) chimney shaft. (Fig. b)
14. Install 2 wall plugs in the drill holes you have made.
1. Using a pencil, draw a horizontal line on the wall at the height where the hood
mounting plate needs to installed. (this is best done using a spirit level)
2. Hold the top edge of the hood mounting plate 1 (Fig. e) up against the pencil line
and mark the 3 drill holes with a pencil.
3. With an 8 mm masonry drill, make 30 mm holes in the wall at each of the 3 pencil
marks. To be on the safe side, check the diameter of the wall plugs with a slide
gauge.
4. Hold the drilling template supplied against the wall so that the 3 drill holes for the
hood mounting plate match those in the drilling template and mark the 2 lower drill
holes for securing the hood on the drilling template with a pencil.
5. With an 8 mm masonry drill, make a 30 mm hole at each of the 2 pencil marks to
secure the hood against the wall.
10. Set the outer (lower) chimney shaft on the hood and mark the 2 drill holes (Fig.
d) through the bores in the top mounting bracket hooked into the wall.
11. Remove the outer chimney shaft again from the hood.
12. Unhook the top mounting bracket from the removed chimney shaft.
13. With an 8 mm masonry drill, now make a 30 mm holes in each of the 2 drill
holes marked on the wall for the mounting bracket (Fig. d).
15. Secure the mounting bracket to the wall using two 30 mm screws.
Fig. b)
Fig. d)
Fig. a)
Fig. c)
fi190920TNM
2
/
4


