background image

VMAC 

– Vehicle Mounted Air Compressors


VMAC Technical Support:


1-888-241-2289 

VMAC Knowledge Base: www.kb.vmacair.com  

81 

WHASP Tank Replacement 


Read the 

“Maintenance and Repair Safety” section prior to 

performing any work on the system (beginning on Page 38). 
Wear appropriate Personal Protective Equipment and follow 
all industry standard safety practices.


Remove the WHASP Tank shroud. 


Remove the battery. 


Drain the compressor oil from the WHASP Tank (Page 48). 


Disconnect the 3/4 in and 1/2 in hoses from the WHASP Tank. 


Disconnect the PTFE tubes from the WHASP Tank. 


Disconnect the electrical connectors from the fan and compressor 
temperature switches.  


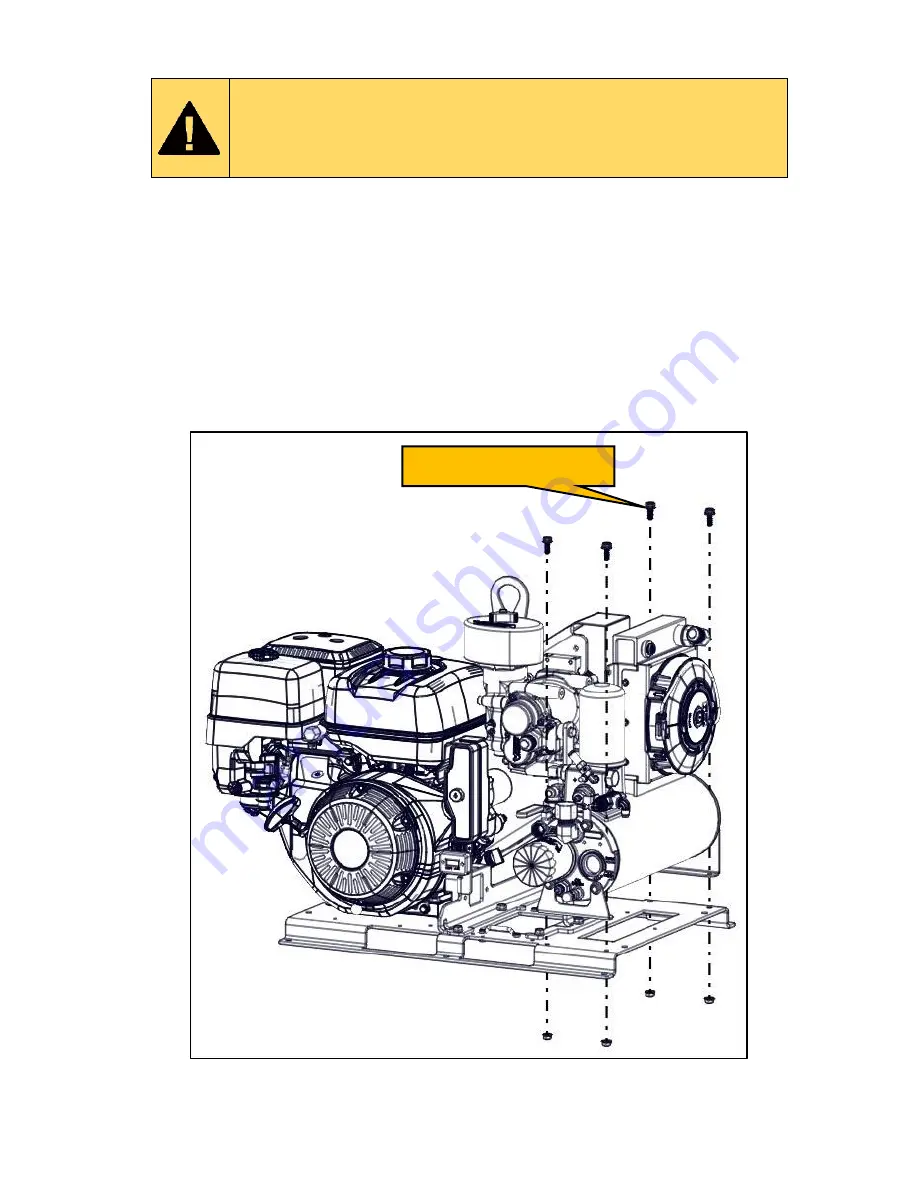
Remove the 4 fasteners from the bottom of the WHASP Tank mounting 
brackets. 


Remove the WHASP Tank.  


Figure 70 

– Remove WHASP Tank 


Install the WHASP Tank in the reverse order.  


Remove fasteners (4x) 

Summary of Contents for G300003

Page 1: ...Gas Engine Driven 30 CFM Air Compressor Installation Owner s and Service Manual G300003...

Page 2: ......

Page 3: ...gine Driven 30 CFM Air Compressor 24 Starting and Stopping the Engine 25 Recommended Accessories 30 Air Receiver Tank 31 Setup Performance Testing and Adjustments 32 Engine rpm Adjustment 33 Accessory...

Page 4: ...appropriate mechanical training knowledge and experience Follow all safety precautions for mechanical work Any fabrication for correct fit in modified vehicles must follow industry standard best prac...

Page 5: ...the failure of any person to properly adhere to the procedures set out in this manual or standard safety practices Safety should be the first consideration when performing any service operations If t...

Page 6: ...tifunction Power Systems and other products as defined by VMAC provided that i the purchaser fully completes and submits a warranty registration form within 3 months of purchase or 200 hours of operat...

Page 7: ...d the safe reliable operation of the equipment Always use genuine VMAC and or Honda replacement parts The procedures described in this service manual are effective methods of service and repair Some p...

Page 8: ...ojection Should this occur there is potential for serious injury or death Operate the compressor in a well ventilated area free of flammable vapors dust or other combustible materials Do not refuel th...

Page 9: ...hoses under pressure could separate suddenly fly out and cause serious injury or death If equipped the air receiver tank must be drained before servicing any components in the compressor system Never...

Page 10: ...erates anytime the engine is running Avoid contact with the compressor hoses or engine during operation Keep hoses and wiring away from hot sharp or moving components Use only approved hoses and repla...

Page 11: ...e components and identify them using the included IPL on page 82 Hose Information The hoses used in VMAC compressor systems have a specific inner liner that is compatible with VMAC compressor oil Use...

Page 12: ...n muffler to discharge system pressure on shut down Temperature safety switch in compressor 15 A fuse protects the OEM electrical system located inside the OEM key start enclosure 15 A fuse protects t...

Page 13: ...k where the mixture is cooled and the majority of the oil separates from the air and settles into the reservoir tank below the cooler first stage separation The cooled oil then passes through a high p...

Page 14: ...arge valve Use a Filter Regulator Lubricator FRL to regulate downstream pressure to the tools System Pressure Unload Internal system pressure is controlled via a mechanical unloader valve When downstr...

Page 15: ...32 F may result in excessive engine cranking while starting the engine failing to start belt slippage and engine stalling Use the optional A500044 Cold Climate Kit or store the system indoors and sta...

Page 16: ...plied with the system VMAC P N 1901066 Failure to follow the information supplied in the Honda Owner s Manual may result in poor engine performance or engine damage Hot Environment Recommendations Ens...

Page 17: ...when calling in for technical support Figure 3 Figure 3 Serial number plate and location Support and Parts To order parts contact a local dealer or contact the sales team Dealer locator http www vmac...

Page 18: ...time that the engine is running the compressor is being driven System Components Front WHASP Tank Rotary screw compressor Key start Hour meter 12 V battery Honda GX390 gasoline engine Unloader valve D...

Page 19: ...ssors VMAC Technical Support 1 888 241 2289 VMAC Knowledge Base www kb vmacair com 17 System Components Back Lifting eye Belt shroud Fuel fill Exhaust shroud Figure 5 System overview Lifting eye Fuel...

Page 20: ...ases or decreases engine rpm based on air demand reduces fuel consumption when no air is needed Automatic system pressure unload with manual override when the system is unloaded engine speed can be re...

Page 21: ...air filter are easily accessible for service the VMAC Remote Oil Drain accessory can help facilitate servicing the engine and compressor oil P N A500043 There is adequate access to cool fresh air for...

Page 22: ...supply of cool fresh air to cool the engine and allow proper fuel combustion Ensure there is a minimum of 6 in of clearance between the engine air intake the recoil starter area and any other componen...

Page 23: ...ompressor in an enclosure will limit access to cool fresh air restrict the escape of hot air from around the unit and have an adverse effect on cooling engine performance and reduce the unit s duty cy...

Page 24: ...the Compressor External dimensions with the base plate Locate a suitable mounting position for the Gas Engine Driven 30 CFM Air Compressor Place the unit in its intended location and check for cleara...

Page 25: ...30 CFM Air Compressor Figure 11 Drill 6 holes in the surface that the Gas Engine Driven 30 CFM Air Compressor will be mounted to Use a minimum of 6x 3 8 in or M10 fasteners Ensure washers are used in...

Page 26: ...elief Valve Page 44 Inspect the compressor air filter Page 45 Inspect the engine air filter See the Honda Owner s Manual Check the engine oil level and condition See the Honda Owner s Manual Check the...

Page 27: ...ecessary on warm days or when the unit has already been running To start a warm engine ensure the choke is open by confirming the lever is all the way to the right 2 Turn on the fuel by moving the fue...

Page 28: ...sing the starter for more than 5 seconds at a time will overheat the starter motor and may damage it 5 Once the engine is running gradually open the choke by moving the choke lever to the right as the...

Page 29: ...oke may not be necessary on warm days or when the unit has already been running To start a warm engine ensure the choke is open by confirming the lever is all the way to the right 3 Turn on the fuel b...

Page 30: ...9 Key switch 8 Once the engine is running gradually open the choke by moving the choke lever to the right as the engine warms up Figure 20 Figure 20 Choke 9 Once the engine has reached normal operatin...

Page 31: ...e valve 2 Ensure the system has built to full system pressure factory setting 150 psi and the compressor is unloaded 3 Allow the engine to run at low idle for at least 10 seconds 4 Turn the key to the...

Page 32: ...ase through VMAC See the Accessory Product section of this manual on page 34 for more information Pressure Gauge While not critical to system performance a pressure gauge is important for fine tuning...

Page 33: ...the System Pressure Unload section on page 12 for more information If this happens the regulator on the inlet valve may need to be adjusted See page 68 for instructions An air receiver tank provides...

Page 34: ...he discharge fitting on the WHASP Tank Install the VMAC test tool at the system outlet with the 30 cfm 1 8 in orifice Ensure that the ball valve on the test tool is closed Start the compressor system...

Page 35: ...ssues caused by unauthorized engine rpm adjustment will not be covered under warranty Lowering the engine rpm will decrease the cfm output and will cause the engine to stall while increasing the engin...

Page 36: ...Gas Engine Driven 30 CFM Air Compressor Cold Climate Kit Remote Control Panel Part number A500042 Remote control panel with a 10 ft 304 8 cm extension for key switch hour meter choke and unloader val...

Page 37: ...eceiver tanks are used for lowering compressor duty cycle and removing water from compressed air Recommended for optimum operation of VMAC Hydraulic Air Compressors VMAC Diesel Driven Air Compressors...

Page 38: ...e due decal 400 Hour or 1 Year Service Kit Part number A700220 Includes 4 L VMAC high performance compressor oil oil filter air filter spin on oil separator safety valve muffler and next service due d...

Page 39: ...every 30 days for at least 30 minutes to prevent impact damage and premature bearing failure in the compressor due to vibration from the vehicle Regularly running the system will also help to vaporise...

Page 40: ...ntain the system Genuine VMAC replacement parts are designed to work with the high pressure and heat generated by the compressor Substituting genuine VMAC replacement parts will void the warranty and...

Page 41: ...alve shroud removed for clarity Gently pull up on the ring on the pressure relief valve to confirm the system is depressurised Figure 25 Do not use the pressure relief valve as a means of depressurisi...

Page 42: ...41 2289 VMAC Knowledge Base www kb vmacair com 40 Disconnect the negative battery terminal Figure 27 Figure 27 Negative battery terminal Disconnect the spark plug wire Figure 28 Figure 28 Spark plug w...

Page 43: ...nspect pressure relief valve Every 12 months or 400 hours Service Kit P N A700220 Change compressor oil Change compressor oil filter Change compressor air filter Change coalescing filter Change pressu...

Page 44: ...flood the sight glass window and make the system appear empty Inspecting and Adding Compressor Oil Ensure the vehicle is parked on level ground and that the compressor system is depressurized and coo...

Page 45: ...st Visually inspect the blowdown muffler for evidence of corrosion or loss of functionality Ensure the muffler allows the blowdown to depressurize the system To test the blowdown system and muffler Tu...

Page 46: ...ery 400 hours or 1 year whichever interval occurs first Inspect the pressure relief valve for signs of corrosion or loss of functionality To test the pressure relief valve functionality Visually inspe...

Page 47: ...he filter cover retainer knob the air filter cover and the air filter element Immediately cover the compressor opening with tape or with a clean cloth to prevent contamination Do not use compressed ai...

Page 48: ...onents show cracks chipping impact damage or any other indications of physical damage replace the component If the damage indicates possible misalignment check the pulley alignment If the pulleys are...

Page 49: ...s not a suitable replacement PTFE Tubing must be cut to length using the proper tubing cutter Side cutters and other tools tend to leave sharp edges and crush the tubing To properly insert the PTFE in...

Page 50: ...ll the system Overfilling the system with oil can flood the sight glass window and make the system appear empty Inspect the blowdown muffler Page 43 Inspect the pressure relief valve Page 44 Replace t...

Page 51: ...and inspect it for damage The surface must be free of old gasket material and smooth to ensure a good seal Figure 36 Figure 36 Compressor oil filter Apply a thin coat of compressor oil to the rubber g...

Page 52: ...ng oil until the level is correct Reinstall the fill cap Start the engine and check for oil leaks Allow the system to build to pressure factory setting 150 psi and for the engine speed to decrease to...

Page 53: ...l the system Overfilling the system with oil can flood the sight glass window and make the system appear empty Replace the blowdown muffler Page 43 Replace the pressure relief valve Page 44 Replace th...

Page 54: ...and inspect it for damage The surface must be free of old gasket material and smooth to ensure a good seal Figure 39 Figure 39 Compressor oil filter Apply a thin coat of compressor oil to the rubber g...

Page 55: ...material and smooth to ensure a good seal Figure 41 Apply a thin coat of compressor oil to the rubber gasket on the new coalescing filter Spin the new filter onto the threaded nipple until the gasket...

Page 56: ...ls and instructions refer to the Honda Owner s Manual supplied with the system VMAC P N 1901066 Failure to follow the instructions in the Honda Owner s Manual could result in poor engine performance e...

Page 57: ...CFM Air Compressor from all downstream customer supplied equipment If the Gas Engine Driven 30 CFM Air Compressor is still within the warranty period contact VMAC prior to commencing any diagnostics o...

Page 58: ...table components Unloader valve manually activated Manually disengage unloader valve Excessive leakage through blowdown muffler Replace blowdown shuttle valve Plugged or dirty compressor air filter Re...

Page 59: ...PTOM POSSIBLE CAUSE CORRECTIVE ACTION Compressor overheat Low compressor oil level Check oil level with equipment on level ground Wrong compressor oil used Flush and replace with VMAC approved compres...

Page 60: ...ttle actuator failure Replace actuator SYMPTOM POSSIBLE CAUSE CORRECTIVE ACTION Blowdown does not function Scavenge tube frozen plugged or obstructed Clean or replace tube Blowdown muffler plugged or...

Page 61: ...plug gap Replace spark plug Engine air intake restricted Remove restriction replace air filter Engine exhaust system plugged or restricted Clean or replace exhaust spark arrester Fuel bowl filter plug...

Page 62: ...2 or equivalent is required For testing and diagnosis install the 30 cfm 1 8 in orifice Figure 42 A700052 VMAC Air Test Tool PTFE Test Tool A PTFE test tool can be constructed and used to test the unl...

Page 63: ...nce air pressure at the ball valve and unloader valve downstream pressure reaches 150 psi the throttle actuator closes the throttle reducing engine speed to idle Downstream pressure opens the discharg...

Page 64: ...62 Figure 46 Throttle actuator Throttle Tube A 1 4 in PTFE tube shown in blue connects the discharge valve and unloader valve to the throttle actuator via a 1 4 in PTFE union Figure 47 Figure 47 Throt...

Page 65: ...module removed for clarity Pressure Control Tubes A 1 4 in PTFE tube shown in green connects the discharge valve to the lower fitting on the side of the compressor inlet valve This provides the syste...

Page 66: ...on the side of the compressor inlet valve This provides the system air pressure factory setting 150 psi to operate the inlet valve regulator which works in tandem with the discharge valve Figure 50 F...

Page 67: ...de open Once downstream pressure reaches 150 psi it will actuate the unloader valve which opens the discharge valve The PTFE test tool gauge will indicate 150 psi and air pressure from the discharge v...

Page 68: ...ator rod should move to the right and the engine rpm should decrease If the throttle actuator rod does not move diagnose or replace the throttle actuator 3 When the system pressure indicated on the VM...

Page 69: ...urize and may cause a compressor oil leak Air pressure generated by the compressor is controlled mechanically via the inlet valve poppet When the inlet valve poppet is open the compressor will build a...

Page 70: ...ressure 150 psi is reached This is due to the interrelation between the unloader valve discharge valve and the regulated inlet valve A quick test to confirm this is to lightly tap the discharge valve...

Page 71: ...VMAC Vehicle Mounted Air Compressors VMAC Technical Support 1 888 241 2289 VMAC Knowledge Base www kb vmacair com 69 Electrical Components and Testing Figure 56 VMAC electrical harness schematic...

Page 72: ...age fuse may damage components and will void the warranty A 15 A fuse protects the Gas Engine Driven 30 CFM Air Compressor s fan electrical system The fuse holder is located in the wiring harness next...

Page 73: ...utes Once the switch reaches 88 C 190 F resistance on the switch should drop to 0 Compressor Temperature Switch If the compressor s oil temperature exceeds 140 C 284 F the thermostatic switch located...

Page 74: ...hanical training knowledge and experience Follow all safety precautions and industry standard best practices Read the Maintenance and Repair Safety section prior to performing any work on the system b...

Page 75: ...al Support 1 888 241 2289 VMAC Knowledge Base www kb vmacair com 73 Pull the battery out of the front of the unit once it is clear disconnect the positive battery terminal Figure 61 Figure 61 Battery...

Page 76: ...ry standard safety practices Remove the 5 fasteners from the belt guard and remove the belt guard Figure 62 Remove belt guard Using a 3 8 in drive remove tension from the drive belt Remove the belt an...

Page 77: ...om 75 Remove the bolt from the side of the compressor Figure 63 Figure 63 Remove compressor Remove the compressor pulley Figure 64 Figure 64 Remove compressor Remove the 4 bolts securing the compresso...

Page 78: ...sors VMAC Technical Support 1 888 241 2289 VMAC Knowledge Base www kb vmacair com 76 Lift the compressor up and away from the belt guard to remove it Figure 65 Figure 65 Remove compressor Install the...

Page 79: ...ger bolts are 55 mm long and the shorter ones are 50 mm long Ensure the bolts are installed in the correct position Installing the inlet bolts in the wrong location could severely damage the compresso...

Page 80: ...ng any work on the system beginning on Page 38 Wear appropriate Personal Protective Equipment and follow all industry standard safety practices Disconnect the electrical connector on the fan Remove th...

Page 81: ...age 38 Wear appropriate Personal Protective Equipment and follow all industry standard safety practices Fan Switch Replacement Disconnect the temperature switch from the harness Remove the temperature...

Page 82: ...hroud Disconnect the temperature switch from the harness Remove the temperature switch from the compressor discharge cap Apply Loctite 567 thread sealant to the new temperature switch and install it i...

Page 83: ...ndustry standard safety practices Remove the WHASP Tank shroud Remove the battery Drain the compressor oil from the WHASP Tank Page 48 Disconnect the 3 4 in and 1 2 in hoses from the WHASP Tank Discon...

Page 84: ...7 1520627 14 BOLT HHCS FL PL M8 X 1 25 X 20 18 1560515 14 NUT M8 X 1 25 FL PL 19 1200996 1 BRACKET LIFTING 20 1520629 2 BOLT HHCS GR10 9 PL FL M10X 1 5X 16 21 1200994 1 BRACKET ENGINE PLATE 22 3501371...

Page 85: ...141 1 LABEL WARNING REFUELING 56 4400346 1 LABEL SYSTEM ID PLATE 57 4401277 1 LABEL G30 58 4401278 1 LABEL OPERATING INSTR G30 59 4400964 1 LABEL SPECIALTY WARNING 60 1500651 2 RIVET 1 8 GRIP RANGE 0...

Page 86: ...VMAC Vehicle Mounted Air Compressors VMAC Technical Support 1 888 241 2289 VMAC Knowledge Base www kb vmacair com 84 Figure 71 Kit Pack List...

Page 87: ...ONN STEEL 90 6 JIC 8 ORB 4 5830004 1 O RING VITON 3 1 8 ID X 1 8 5 5000158 1 ELBOW BRASS 45 DEG NPT POLY 1 8 1 4 6 1540530 2 BOLT SHCS M8 X 1 25 X 55 G12 9 PLT 7 1540550 2 BOLT SHCS M8 X 1 25 X 50 G12...

Page 88: ...O RING 40D SIL 1 3 8 ID X 3 16 5 A700049 1 FILTER KIT ASSEMBLY 5 1 1500077 4 SCREW BUTTON HEAD 10 32 X 3 8 5 2 1500519 1 ROD THREADED 1 4 X 2 62 5 3 1500676 1 KNOB PLASTIC 1 4 20 5 4 1550221 1 NUT HE...

Page 89: ...DRAIN 15 4900175 1 CONN STEEL 6 JIC 8 ORB 16 4900117 1 JIC 90 DEG STEEL SWIVEL 3 8 3 8 17 4900035 1 NIPPLE STEEL STR THRD 3 4 16 18 4900106 1 PLUG STEEL 5 ORB HEX VITON O 19 9200039 1 OIL FILTER VR 3...

Page 90: ...rt 1 888 241 2289 VMAC Knowledge Base www kb vmacair com 88 Item Part Qty Description 38 3550983 1 ASSEMBLY SWITCH THERMAL 88C 39 5000047 1 BUSHING BRASS 3 8 X 1 4 40 1520590 4 BOLT HHCS M6 X 1 0 X 14...

Page 91: ...ation Company Name _____________________________________ City _____________________ State Province ______________ Installation Date _____ _____ _____ Day Month Year Owner Information Company Name ____...

Page 92: ...VMAC Vehicle Mounted Air Compressors VMAC Technical Support 1 888 241 2289 VMAC Knowledge Base www kb vmacair com 90 This page intentionally left blank...

Page 93: ...he engine and compressor must be serviced as per the manufacturer s specifications for the warranty to be considered valid Maintenance and Repair Records 200 Hour or 6 month service P N A700219 Date H...

Page 94: ...www kb vmacair com 92 600 Hour or 18 month service P N A700219 Date Hours Performed by Address 1 Address 2 Notes 800 Hour or 24 month service P N A700220 Date Hours Performed by Address 1 Address 2 No...

Page 95: ...ww kb vmacair com 93 1200 Hour or 36 month service P N A700220 Date Hours Performed by Address 1 Address 2 Notes 1400 Hour or 42 month service P N A700219 Date Hours Performed by Address 1 Address 2 N...

Page 96: ...l Support 1 888 241 2289 VMAC Knowledge Base www kb vmacair com 94 1800 Hour or 54 month service P N A700219 Date Hours Performed by Address 1 Address 2 Notes 2000 Hour or 60 month service P N A700220...

Page 97: ...This page intentionally left blank...

Page 98: ...This page intentionally left blank...

Page 99: ......

Page 100: ......

Reviews: