VMAC - Vehicle Mounted Air Compressors
VMAC Technical Support: 888-241-2289
VMAC Knowledge Base: kb.vmacair.com
12
•
Prior to installing the VMAC pulley, ensure any surface rust or
dirt inside the OEM pulley has been removed.
•
Do not use an impact tool to tighten pulley bolt. Use a torque
wrench and follow the recommended torque values.
•
Do not remove the OEM stretch belt. The VMAC crank pulley
may have to be removed during stretch belt service.
☐
Remove and discard the OEM washer from the OEM Crank Pulley bolt.
☐
Scrape the clear coat (or any corrosion) from the inside front face of the crank
pulley hub and ensure the surface is clean.
☐
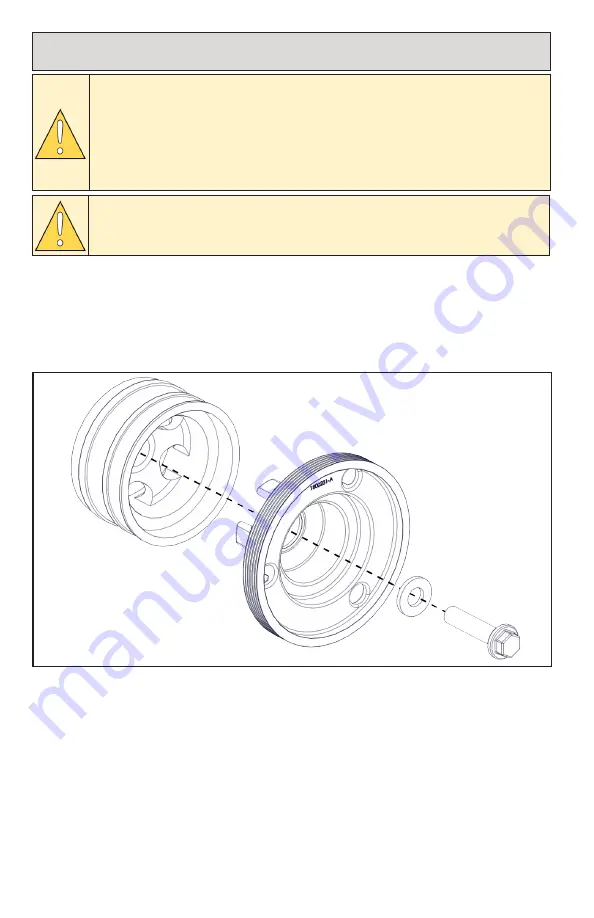
Insert the VMAC pulley into the OEM crank pulley and rotate the VMAC pulley
counterclockwise until the tabs seat inside the spokes of the OEM pulley.
☐
Install the OEM fastener with the supplied washer (Figure 7).
Remove and discard the OEM washer from the OEM Crank Pulley
bolt. The VMAC washer must be used.
☐
Use a counter rotating tool (VMAC P/N# 5900252 / 5900254 or Mercedes
P/N# A1260) to stop the pulley from rotating, and torque the main fastener to
147 (ft
•
lb).
Figure 7 — Crank pulley installation
Installing the Pulley


