background image

22 


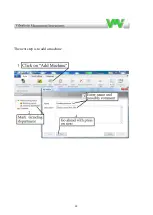
The next step is to add a machine   


Summary of Contents for VIBER X2 Pro

Page 1: ...VIBER X2 Pro An instrument for analysing and trending Manual Ver 1 0 English...

Page 2: ...2...

Page 3: ...g Battery 10 5 0 How to interpret vibration levels 10 6 0 ISO standard 10816 312 11 7 0 Vibration analysis 12 8 0 Recommended bearing condition levels 13 9 0 Trend View 14 9 1 Create a measurement pro...

Page 4: ...condition monitoring checks easy to use and reliable for status analyse The VIBER X2 Pro instrument has the following features Accurate measurements for 4 selectable frequency ranges Gives high reliab...

Page 5: ...the measurement is above the warning set level Red LED lights when the measurement is above the danger set level LED s idicato r A complete delivery is VIBER X2 Pro machine condition analyzer Accelero...

Page 6: ...6...

Page 7: ...of the highest peak 2 400 Hz 2 400 Hz 6 1600 6 1600 Hz 11 3200 Hz 11 to 2000 Hz 10 1000 Hz 10 to 1000 Hz Reliability is reduced when measuring Displacement with accelerometer and double integration F...

Page 8: ...for a short while If even in this condition the voltage remains low the instrument will shut off in 20 sec This message appears only if the Auto shut off setting is enabled The user may cancel the shu...

Page 9: ...evels User with no previous experience we recommend to use the ISO 10816 3 standard The standard normally calls for a measure in velocity based on mm s RMS To better understand what this measure means...

Page 10: ...tandard Iso Standard 10816 3 classifies machines differently depending on whether they are flexible or rigid fixed mounted This reflects the location of the machine s rigid resonances related to the m...

Page 11: ...etc Increased nois level try to investigate the reason Plan an action during next regular stop Keep the machine under observation and measure at shorter time intervals than before to detect a deterio...

Page 12: ...dered as consumed If vibrations of other causes occur eg flow pressure shock gears and within the frequency range it may also give high gBC values without damage to the bearings A high gBC value can a...

Page 13: ...oject depending on how many directions are measured on every bearing and the number of bearings That amount is equivalent to number of measuring points in a route If only one direction is measured at...

Page 14: ...manual we show an example of how to build a measurement project or database with two grinding machines Grinding machine 1 and Grinding machine 2 For both machines we measure Vibration Bearing conditio...

Page 15: ...15 You can also click on the symbol that shows a white sheet of paper to create a new project...

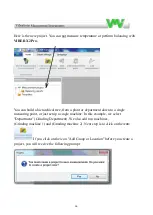
Page 16: ...department down to a single measuring point or just set up a single machine In this example we select Department Grinding Department We also add two machines Grinding machine 1 and Grinding machine 2...

Page 17: ...17 Assign the project a name by clicking on the green W...

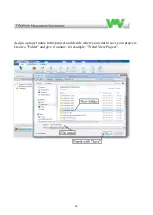
Page 18: ...18 Assign a project name to the project and decide where you want to save your projects Create a Folder and give it a name for example Trend View Project...

Page 19: ...rement group or location icon Select Department for our example In other cases choose the option that suits The top level of the project Database is usually a building or department which must be adde...

Page 20: ...20 Enter a name for the department proceed with a click on Next...

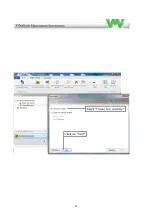
Page 21: ...pe of measurement you want to do Measuring Project or Balancing reports In our ex We choose Measurement Projects because we will perform trend measurements You can not perform balancing with VIBER X2...

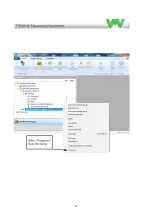
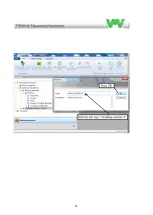
Page 22: ...22 The next step is to add a machine...

Page 23: ...23...

Page 24: ...24...

Page 25: ...rk Grinding machine 1 drag the line to see Slot and Data The next moment is to add a measurement point usually a bearing In this example we want to measure two bearings in three directions for each ma...

Page 26: ...26 You can skip the allocation of Slot number and at a later time perform an automatic sorting of storage slots locations Auto Assign see pages 35 37...

Page 27: ...27 The next dialog box allows you to select alarm levels manually or from a standard table In the example we choose the default...

Page 28: ...28 Temperature is not measured with VIBER X2 Pro...

Page 29: ...29...

Page 30: ...30 Thus Grinding machine 1 is finished To create Grinding machine 2 you can now make a copy of grinding machine 1 and then edit it...

Page 31: ...31...

Page 32: ...32...

Page 33: ...33...

Page 34: ...34 Now we need to assign Grinding machine 2 slot number Storage locations...

Page 35: ...35...

Page 36: ...36 Thus the first project is finish and you can now start measuring on the machines and then transfer measurement data to Trend View...

Page 37: ...Route Plan and edit a project We recommend that the route plan be printed out and used every time you make measurements Make a route plan based on how often the measurement is done such as week month...

Page 38: ...38 When selecting Route plan a list appears to the right in the picture that can be printed out...

Page 39: ...l weekly monthly etc Mark the machines according to the printed list Each new measurement performed on the same machine must be stored in the same slot number memory cell as the previous measurement B...

Page 40: ...ent and the vibration storage table appears on the instrument display If you want to place the measurement value in slot number 1 confirm with the green key If you want to move the measurement value t...

Page 41: ...ee below 1 Connect USB 3 5mm plug cable to the instrument Serial data connector and the USB side to the computer s USB input You must verify that the correct serial port is selected by the computer If...

Page 42: ...Pro instrument must be on and upload must be selected from the function menu confirm with the green key A rotating symbol appears on the screen In this mode you continue in Trend View by clicking Nex...

Page 43: ...43 Wait a while and the transfer procedure will start...

Page 44: ...not store times when the measurement was performed but only time for the transfer you have to change the date manually If you want to save the times when the measurement was performed select Timestamp...

Page 45: ...45 Here shows all vibration data from the first measurement Note Temperature is not measured with VIBER X2 Pro...

Page 46: ...46 Data is transferred to the project...

Page 47: ...nsmission of measurement data for Grinding machine 1 is now complete In order to see a graph showing the trend at least two 2 measurements at different times must be performed and transferred to the p...

Page 48: ...48 After the second measurement for the same machine the new measurement values are stored in the same Slot places as before in our case 1 2 3 for vibration...

Page 49: ...o see a Graph double click the vibration direction you want to see The graph below shows measurement data after three measurements those blue marked in horizontal direction and after three data transf...

Page 50: ...hows the graph is automatically adjusted according to the number of measurements performed To change the window view use the toolboxes in the chart header Properties can be used to change units in the...

Page 51: ...resentation RMS Peak Peak Peak Note 2 Analysis Five highest peaks can be displayed VMI Trend Viewer Software included for PC Frequency range of peak detection Frequency range 2 400 Hz 6 1600Hz 11 2000...

Page 52: ...are frequency dependent Note 4a Over 0 15 gBC Note 5 Capacity of the batteries can vary depending on hardware revision Max 2300 mAh storage temp 20 to max 60 C Note 6 Operating temp min 0 C to max 50...

Page 53: ...d service Centre The limited two year warranty and remedies contained herein are in lieu of all other warranties expressed or implied including any warranty of merchantability and any warranty of fitn...

Page 54: ...54 VMI International AB Sweden WWW vmiab com...

Reviews: