background image

Vibraon Measurement Instruments

Manual Ver. 2.9

Refers to 

VIBER  X3™

 rev: 1.6-1.7

Software 4.7-4.8

VIBER X3™


VIBER X3™ 


Manual 

Ver. 2.5


Summary of Contents for VIBER X3

Page 1: ...Vibra on Measurement Instruments Manual Ver 2 9 Refers to VIBER X3 rev 1 6 1 7 Software 4 7 4 8 VIBER X3 VIBER X3...

Page 2: ......

Page 3: ...n 4 3 Scope of supply 5 4 Instrument keypad and LED s 6 5 Setting Menu and Functions 7 6 Screen descriptions 8 7 Warning messages 14 8 How to interpret vibration levels 15 9 Vibration analysis 17 10 B...

Page 4: ...ts 2 Vibration Measurement Instruments Our X series of hand held instrument VIBER X1 VIBER X2 VIBER X3 VIBER X5 Manual Viber X1_121002 indd 2 10 3 12 9 26 AM VIBER X1 VIBER X2 VIBER X3 VIBER X5 Our x...

Page 5: ...switch for double safety This is especially important when the machine is remote con trolled VMI takes no responsibility for any accidents on people and machines VMI and our authorized dealers will ta...

Page 6: ...es or conveyors and similar applications Listening to bearing sound while comparing the displayed BC value Fast and easy fault analysis screen displaying the five highest peaks with amplitude and freq...

Page 7: ...eter 1 m transducer cable Extension tip magnet Battery charger Head phones Data storage with VMI Trend View software installation instructions and user manual Printed manual for instrument and softwar...

Page 8: ...ENU and ACCEPT Green key 1 Save key for Route measurement or Balancing measurements 1 Hold key 4 Arrow white keys 3 Leds Green LED lights when any key is pressed Yellow LED lights when the measurement...

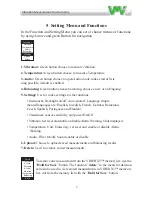
Page 9: ...ench German Romanian Czech Spanish Portuguese and Finnish Transducer sensor sensitivity and power On Off Vibration Set level and enable or disable Alarm Warning Units displayed Temperature Unit Emissi...

Page 10: ...ion Screen the measuring unit is temporarily changed When the MENU key is pressed the Analysis Settings menu is shown Select an item with the UP and DOWN arrow keys Change the settings of the selected...

Page 11: ...k or P P Range 2 400 Hz 6 1600 Hz 11 3200 Hz 10 1000 Hz Alarm ENABLED or DISABLED Warning Default value 6 00 Keep key pressed to auto repeat Danger Default value 11 0 Keep key pressed to auto repeat L...

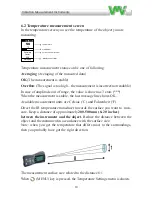
Page 12: ...pproximately 200 500 mm 8 20 inches between the instrument and the object Reduce the distance between the object and the instrument in accordance with the surface size Note when you get the temperatur...

Page 13: ...hard 0 94 Transformer paint 0 94 Concrete 0 93 Brick mortar plaster 0 93 Porcelain 0 92 Steel oxidized 0 79 Cooper oxidized 0 76 Steel heat treated surface 0 52 Copper 0 04 Aluminium bright 0 04 Emis...

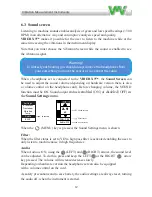
Page 14: ...d is disabled In this way the instrument can continue to run for a while longer without the need of charging the batteries Sound volume Filter status Sound status Filter When the filter status is set...

Page 15: ...audio off when it is not used When the battery voltage is beginning to be too low and headphone set is plugged in the instrument will be automatically reset When the instrument is reset as default the...

Page 16: ...OFF The instrument can still work but only for a short while If even in this condition the voltage remains low the instrument will shut off in 20 sec Battery charge should not be terminated before the...

Page 17: ...ount of break down energy causing mainly wear and fatigue in the machine or the structure The instrument measures the total RMS vibration value in the frequency range This RMS value is the average sum...

Page 18: ...es stiff body resonances related to the basic running speed of the machine For instance a machine supported by rubber or spring have resonances at low running speeds The machine starts vibrate at cert...

Page 19: ...estigate the reason Plan an action during next regular stop Keep the machine under observation and measure at shorter time intervals than before to detect a deterioration trend if any Compare vibratio...

Page 20: ...much higher vibration level will occur To identify measure the vibration levels in three perpendicular directions at the bearings If you find a measurement with at least three times higher level than...

Page 21: ...aring being damaged A high bearing condition value can also be acquired if the bearing is poorly lubricated or is overloaded e g by misa lignment or large belt forces Compare this value with the beari...

Page 22: ...nd The listening of bearing sound is an old method Sound analyzes of low speed bearings and gears can sometimes be much faster and even more reli able than just BC value With the VIBER X3 you can both...

Page 23: ...ave the highest vibration caused by unbalance Use this measuring point for all following measurements If you need to leave the place during the balancing proce dure disconnect the accelerometer BNC co...

Page 24: ...something else A balancing round will often be a good approach and a first attempt to find the reason for increased vibration If the balancing attempt is not successful the cause can be loose rotor p...

Page 25: ...e it The balancing requires 5 starts test runs Test drives 1 5 1 Test drive 1 measures the unbalance before action 2 Test drive 2 with trial weight 3 Test drive 3 with trial weight 4 Test drive 4 with...

Page 26: ...and trial weight symbol Rotor symbol has indicator for the trial weights pla cement The symbol for the sample weight has question marks before the weight is selected Move the marker to Trial weight a...

Page 27: ...the revolving portion of a di ameter or angle by switching with the green button VIBER X3 shows when trial weight placement as an angular me asurement or the length of a circular arc The diameter shal...

Page 28: ...ns in the direction of zero 0 as position 1 and others Item 2 and Item in the direction towards the rotation Calculating the angle The instrument calculates the angle of the balancing weight The runs...

Page 29: ...d of the machine is displayed Wait if possible until the stabilization indicator has gone down to zero or else try to save as stable value as possible press the green button to save Turn off the machi...

Page 30: ...de under which file should be saved Confirm with the green button Test run No 3 Move the test weight from Item 2 to the calculated distance in our example 272 3 mm calculated from Item 1 towards the d...

Page 31: ...Audio Balancing Settings Upload Delete Balancing report Balancing results Weight 0 0 g Angle 0 0 Improvment 0 0 Acceleration 0 000000 g rms Speed 0 000000 mm s rms Displacement 0 000000 um rms Balanc...

Page 32: ...f only one direction is measured at each measuring point choose the di rection with the highest vibration After the measurement the data can be uploaded to the computer In the computer you can store a...

Page 33: ...e icon on your desktop or choosing VMI Trend Viewer in the toolbar 11 2 Set up the measurement project Set up the new project by clicking Add measurement group or location De pending on internal set u...

Page 34: ...rking Depart ment or another of the top level alternatives The top level of the database is usually a building or department which must be added to a measurement project the database Thereafter write...

Page 35: ...easurement points and measurements Then select the measurement point in the same way usually a bearing In this case we want to measure two bearings in three directions for each machine Also tempe ratu...

Page 36: ...nt is also set Example In the storage table for vibration measurements Horizontal Storage slot 1 Vertical Storage slot 2 Axial Storage slot 3 In the storage table for temperature Temperature Storage s...

Page 37: ...e computer Measuring point and direction See also Route Plan The appearance of the window is now The same procedure are made for the second machine In order to expand the project with additional grind...

Page 38: ...Vibra on Measurement Instruments 36...

Page 39: ...Vibra on Measurement Instruments 37...

Page 40: ...Vibra on Measurement Instruments 38 Expand all measurement points in the tree and we can now see that we must assign measuring points for grinding machine 2 slot number...

Page 41: ...Vibra on Measurement Instruments 39...

Page 42: ...easurement Instruments 40 Bearing condition is stored in horizontal direction on each bearing If you don t measure this direction you must choose one of the directions you measure change direction in...

Page 43: ...Vibra on Measurement Instruments 41...

Page 44: ...and reminder where the measuring points are located Right click in the Measurement Project at the actual location Department Building i e and choose Route Plan print out a list this helps a lot when m...

Page 45: ...rument s serial data connector it is the same as the headphone jack and to the computers USB connector You need to verify that the correct serial port is selected by the computer otherwise correct the...

Page 46: ...Vibra on Measurement Instruments 44 Click on next...

Page 47: ...Uploading it is possible to set times and storage slots during the uploading process Adjust the table by ticking the boxes that belong to the machine that the data comes from If you need to set dates...

Page 48: ...Vibra on Measurement Instruments 46 Click on next...

Page 49: ...nstruments 47 Screen shots showing where data is stored in VIBER X3 It takes three memory locations to store the three directions of measurement horizontal vertical and axial How to find these menus a...

Page 50: ...rmed a new series of measu rements repeat transmission of measurement data to the PC as the previous example Data for the first series of measurements is stored in the database and the data for the se...

Page 51: ...Measurement Instruments 49 To view a chart double click on the measurement direction you want to see Screen shots showing where the data is stored in VIBER X3 How to find these menus are described on...

Page 52: ...ou want to study To view the measured data just double click on the measurement in the project tree The window showing the measures are automatically adju sted to the values that are shown For changin...

Page 53: ...he vibration or Bearing condition we advise you to measure and monitor that machine or Bearing with shorter intervals If there has been a remarkable change in the vibration or Bearing condition we adv...

Page 54: ...e included for PC Frequency range of peak detection Frequency range Note 3 2 400 Hz 6 1600 Hz 11 2000 Hz 10 1000 Hz Storage capacity 100 measurements can be stored Three point balancing 10 balancing r...

Page 55: ...in accordance with the target surface Capacity of the batteries can vary depending on hardware revision Max 2300 mAh storage temp 20 to max 60 C Operating time depends on backlight volume level and ba...

Page 56: ...e to indicate that the purpose is to make repairs and indicate the original invoice number and date of shipment to you if possible Warranty exclusions Damage not resulting from a defect in material or...

Page 57: ...centre The limited two year warranty and remedies co tained herein are in lieu of all other warranties expressed or implied including any warranty of merchantability and any warranty of fitness for a...

Page 58: ...Vibra on Measurement Instruments 56...

Page 59: ......

Page 60: ...VMI International AB Gottorpsgatan 5 SE 582 73 Link ping Phone 46 0 13 474 37 00 E mail info vmiab com www vmiab com...

Reviews: