Vibraon Measurement Instruments
27
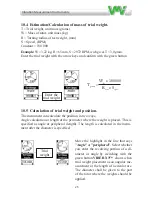
Measure the diameter and scroll down to "Dia" (diameter) and press the green button. Enter
the value of the line: "Dia =?". Choose numbers with the up / down arrow keys. If the
diameter is 130 mm enter the value and confirm with the green button.
Viber-X3 ™ now calculates the distance to the periphery of the three test points.
Remember these three points on the machine part with a pencil or marking tape. Mark
the positions in the direction of zero (0) as (position 1) and others (Item 2) and (Item 3)
in the direction towards the rotation.
.
Calculating the angle
The instrument calculates the angle of the balancing weight. The runs to 0 °, 120 °, 240
°, indicated that the test weight should be placed at these angles
Preparations of first test drive
Scroll to the bar at the bottom that has
a left and right arrow symbol, t jerk the right arrow
key * to display the screen for measurement.
the left arrow key, allowing you
provide ongoing balancing, if it happens, you can go back through the menu to the ongoing.
2. Balancing
1)
Start the machine, initial run
10.8 Balancing
1) Start the machine, initial run
VIBER-X3™
measures and cal-
culates the five largest amplitudes
in the spectra. To reduce noice and
disturbance the signal is filtered.
Check that the machine’s base speed is shown on the ”RPM” If not scroll
using the up / down arrows until the speed of the machine is displayed. Wait,
if possible, until the stabilization indicator has gone down to zero, or else try
to save as stable value as possible, press the green button to save. Turn off the
machine. Prepare the next measurement by stepping forward with the right
arrow key.
2) Test run No:1
Install the selected sample weight (in our example.
3.0 grams) in the selected position (Pos.1). Start
the machine, wait until it is stable measurement,
preferably with the stability indicator is 0. Check
that the speed is the same as last time, save with
the green button. Turn off the machine. Prepare
the next measurement by stepping forward with
the right arrow key.
VIBER-X3™ measures and calculates the five largest amplitudes in the spectra. To
reduce noice and disturbance the signal is filtered.
Check that the machine's base speed is shown on the "RPM" If not scroll using the up / down
arrows until the speed of the machine is displayed. Wait, if possible, until the stabilization
indicator has gone down to zero, or else try to save as stable value as possible, press the green
button to save. Turn off the machine. Prepare the next measurement by stepping forward with
the right arrow key.
2)
Test run No:1
Install the selected sample weight (in our example. 3.0 grams) in
the selected position (Pos.1). Start the machine, wait until it is
stable measurement, preferably with the stability indicator is 0.
Check that the speed is the same as last time, save with the green
button. Turn off the machine. Prepare the next measurement by
stepping forward with the right arrow key.
3)
Test run No: 2
Moving the test weight from (position 1) to the calculated distance (in
our
example. 136.1 mm) to the direction of rotation (Item 2), or if the angle
calculation made to 120 °. Then do the same as the sample measurement
1.
3) Test run No: 2
Moving the test weight from (position 1) to the calculated
distance (in our example. 136.1 mm) towards the direction
ofrotation (Item 2), or if the angle calculation made to 120 °.
Then do the same as test run No: 1.
Stability
indicator
Measurement scale
in example: V=mm/s
Summary of Contents for VIBER X3
Page 2: ......
Page 38: ...Vibra on Measurement Instruments 36...
Page 39: ...Vibra on Measurement Instruments 37...
Page 41: ...Vibra on Measurement Instruments 39...
Page 43: ...Vibra on Measurement Instruments 41...
Page 46: ...Vibra on Measurement Instruments 44 Click on next...
Page 48: ...Vibra on Measurement Instruments 46 Click on next...
Page 58: ...Vibra on Measurement Instruments 56...
Page 59: ......


