background image

4

USER MANUAL

IMPORTANT INFORMATION BEFORE 
FIRST USE

1. Foreword


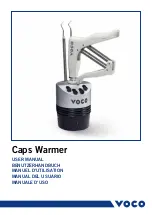
Thank you for purchasing this Caps Warmer. Please read this user manual 

  thoroughly and follow the instructions when operating the device. In addition, please  
  keep this user manual in a safe place close to the device for future reference. 


Intended use


This device is intended for warming composite Caps, used in dentistry, to increase 

  flowability and improve working properties.

2. Before first use

  Connect the base to the mains (100 - 240 VAC, 50/60 Hz) with the universal adapter. 
  Make sure the power plug is fully seated inside the base receptacle and place the  


  Caps tray on the base. After pressing the operating button, the indicator light on the 
  right glows yellow to indicate that the device is connected to the mains. The base is    
  equipped with a cover plate with non-stick coating which directs the heat to the tray.

3. Use

  1.) Place the Caps you wish to warm in the recesses provided. For optimal warming, 
   

ensure that the Caps Dispenser, with the inserted, unopened Cap, is securely posi-  


tioned with the Cap facing downwards (in the direction of the groove). Individual 


Caps warm up most efficiently when they are inserted in the recesses provided  


with the Cap pointing in the direction of the central axis so that the wall of the  


Caps has the largest possible area of contact with the wall of the recess. 

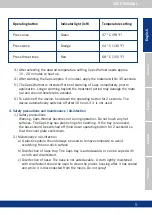
  2.) Caps Warmer has three temperature settings. Select the desired temperature by 
   

pressing the operating button repeatedly. Depending on the clinical situation and


the desired consistency, the 54 °C (130 °F) or 68 °C (155 °F) temperature setting  


is recommended. 


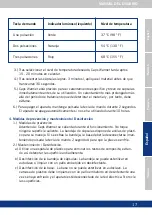
The indicator light on the left shows the selected temperature as follows.

Français

Español

Italiano

English

Deutsch

Summary of Contents for Caps Warmer

Page 1: ...Caps Warmer USER MANUAL BENUTZERHANDBUCH MANUEL D UTILISATION MANUAL DEL USUARIO MANUALE D USO ...

Page 2: ...2 ...

Page 3: ...3 CONTENT USER MANUAL 4 BENUTZERHANDBUCH 8 MANUEL D UTILISATION 12 MANUAL DEL USUARIO 16 MANUALE D USO 20 ...

Page 4: ...ted to the mains The base is equipped with a cover plate with non stick coating which directs the heat to the tray 3 Use 1 Place the Caps you wish to warm in the recesses provided For optimal warming ensure that the Caps Dispenser with the inserted unopened Cap is securely posi tioned with the Cap facing downwards in the direction of the groove Individual Caps warm up most efficiently when they ar...

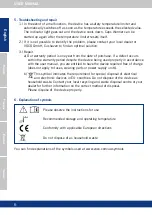
Page 5: ... Caps Warmer becomes hot during operation Do not touch any hot surfaces The Caps tray has plastic rings for handling If the tray is removed the base should be switched off hold down operating button for 2 seconds so that the cover plate cools down 2 Maintenance disinfection a A plastic spatula should always be used to remove composite to avoid scratching the non stick surface b Disinfection of Cap...

Page 6: ...perly in accordance with the user manual you are entitled to have the device repaired free of charge does not apply to fuses wearing parts or power supply units b This symbol indicates the requirement for special disposal of electrical and electronic devices in EU countries Do not dispose of the device as household waste Contact your local recycling and waste disposal centre or your dealer for fur...

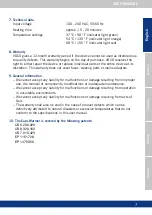
Page 7: ...y does not cover fuses wearing parts or mains adapters 9 General information We cannot accept any liability for malfunctions or damage resulting from improper use the removal of components modifications or inadequate maintenance We cannot accept any liability for malfunctions or damage resulting from operation in unsuitable environments We cannot accept any liability for malfunctions or damage res...

Page 8: ...llleuchte gelb und signalisiert die Verbindung zum Stromnetz Die Basis ist mit einer antihaftbeschichteten Deckplatte ausgestattet die die Wärme zum Aufsatz leitet 3 Betrieb 1 Platzieren Sie die zu erwärmenden Caps in die hierfür vorgesehen Aussparungen Für ein optimales Erwärmen achten Sie darauf den Caps Dispenser mit dem eingesetzten geschlossenen Cap mit der Kappe nach unten in Richtung der Nu...

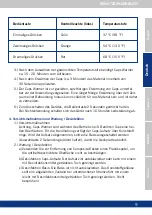
Page 9: ...ird während des Betriebs heiß Berühren Sie keine hei ßen Oberflächen Für die Handhabung verfügt der Caps Aufsatz über Kunststoff ringe Wird der Aufsatz abgenommen sollte die Basis ausgeschaltet werden Auswahltaste 2 Sekunden gedrückt halten damit die Deckplatte abkühlt 2 Wartung Desinfektion a Verwenden Sie zur Entfernung von Composite Resten einen Plastikspatel um die antihaftbeschichtete Oberflä...

Page 10: ...emäßer Verwendung gemäß Benutzerhandbuch innerhalb der Garantiezeit ein Defekt auftritt besteht das Recht auf kostenlose Reparatur gilt nicht für Sicherungen Verschleißteile und Netzteile b Dieses Symbol verweist auf die gesonderte Entsorgung elektrischer und elektronischer Geräte in EU Ländern Gerät bitte nicht im Hausmüll entsorgen Informieren Sie sich beim Recycling oder Entsorgungszentrum Ihre...

Page 11: ... übernehmen keinerlei Haftung für Fehlfunktionen oder Schäden die aus nicht bestimmungsgemäßer Verwendung Entfernung von Bauteilen Änderung oder mangelhafter Wartung entstehen Wir übernehmen keinerlei Haftung für Fehlfunktionen oder Schäden die auf den Betrieb unter nicht geeigneten Umgebungsbedingungen zurückzuführen sind Wir übernehmen keinerlei Haftung für Fehlfunktionen oder Schäden die durch ...

Page 12: ...roite s allume en jaune et signale la connexion au réseau électrique La base est équipée d une plaque de recouvrement revêtue d une couche anti adhésive qui conduit la chaleur vers le porte capsules 3 Fonctionnement 1 Placez les capsules à réchauffer dans les emplacements prévus à cet effet Pour un réchauffement optimal veillez à positionner fermement le distributeur conte nant la capsule encore f...

Page 13: ... toucher les surfaces chaudes Pour le maniement utilisez les anneaux en plastique prévus à cet effet sur le porte capsules Si le porte capsules est retiré mettez la base hors service pour cela appuyez sur la touche de commande pendant 2 secondes afin que la plaque de recouvrement refroidisse 2 Maintenance désinfection a Pour éliminer les résidus de matériau composite utilisez une spatule en plasti...

Page 14: ...rmément au manuel d utilisation pendant cette période une réparation gratuite peut être demandée sauf pour les fusibles pièces d usure et blocs d alimentation b Ce symbole renvoie à l élimination distincte des appareils électriques et électroniques dans les pays de l Union européenne Ne pas éliminer l appareil avec les ordures ménagères Se renseigner auprès du centre de recyclage ou d élimination ...

Page 15: ...ns toute responsabilité en cas de dysfonctionnement ou de dommages résultant d une utilisation non conforme du retrait de composants d une modifica tion apportée sur l appareil ou d une maintenance insuffisante Nous déclinons toute responsabilité en cas de dysfonctionnement ou de dommages dus à des conditions ambiantes non appropriées au fonctionnement de l appareil Nous déclinons toute responsabi...

Page 16: ...a base está equipada con una placa con revestimiento antiadhe rente que conduce el calor hacia la bandeja 3 Funcionamiento 1 Coloque las cápsulas que se van a calentar en las entalladuras previstas al efecto Para lograr un calentamiento óptimo asegúrese de que el dispensador de cáp sulas con la cápsula insertada y sin abrir esté firmemente colocado con la tapa hacia abajo orientado hacia la ranura...

Page 17: ...lienta durante el funcionamiento No toque ninguna superficie caliente La bandeja de cápsulas dispone de anillas de plásti co para su manejo Si se extrae la bandeja la base debería desconectarse man teniendo pulsada la tecla de mando 2 segundos para que la placa se enfríe 2 Mantenimiento Desinfección a Utilice una espátula de plástico para eliminar los restos de composite evitan do así deteriorar l...

Page 18: ...iempre que el aparato se haya utilizado correctamente conforme al manual del usuario tiene derecho a una reparación gratuita no cubre los fusibles las piezas de desgaste ni los adaptadores de corriente b Este símbolo hace referencia a la eliminación específica de aparatos eléc tricos y electrónicos en los países de la UE No elimine el aparato junto con la basura doméstica Consulte en el centro de ...

Page 19: ...res de corriente no se incluyen en la garantía 9 Indicaciones generales Declinamos todo tipo de responsabilidad por fallos de funcionamiento o daños originados por un uso incorrecto por extracción de piezas constructivas modifica ción o mantenimiento deficiente Declinamos todo tipo de responsabilidad por fallos de funcionamiento o daños originados por el servicio bajo condiciones ambientales inade...

Page 20: ...umina di giallo per indica re la connessione all alimentazione La base è dotata di una copertura antiaderente che dirige il calore verso il supporto delle capsule 3 Funzionamento 1 Posizionare le capsule che si vogliono riscaldare negli appositi alloggi Per il riscaldamento ottimale assicurarsi che il dispenser di capsule con la capsula inserita e non aperta sia posizionato in modo sicuro con il t...

Page 21: ...a caldo Non toccare le superfici calde Per la manipulazione il supporto delle capsule dispone di impugnature in plastica Se si rimuove il supporto la base deve essere spenta tenendo premuto il tasto di funzionamento per 2 secondi in modo che la piastra di copertura si raffreddi 2 Manutenzione disinfezione a Usare sempre una spatola in plastica per rimuovere i resti di composito così da non graffia...

Page 22: ...vo è stato utilizzato correttamente in accordo con le istruzioni d uso il dispositivo sarà riparato gratuitamente questo non si applica ai fusibili ad altre parti soggette a usura o agli alimentatori b Questo simbolo indica il requisito per lo smaltimento specifico di dispositi vo elettrici ed elettronici nei paesi UE Non smaltire il dispositivo con i rifiuti domestici Contattare il centro di smal...

Page 23: ...adattatori di corrente 9 Informazioni generali Non possiamo accettare alcuna responsabilità per malfunzionamenti o danni causati da uso non corretto rimozione di componenti modifiche o manutenzione inadeguata Non possiamo accettare alcuna responsabilità per malfunzionamenti o danni causa ti da utilizzo in ambienti non adatti Non possiamo accettare alcuna responsabilità per malfunzionamenti o danni...

Page 24: ...VC 60 009001 E1 1217 V VOCO GmbH Anton Flettner Straße 1 3 27472 Cuxhaven Germany Freecall 00 800 44 444 555 Fax 49 0 4721 719 140 info voco com www voco dental Last revised 12 2017 Made in the USA ...

Reviews: