background image

11

Getting Connected

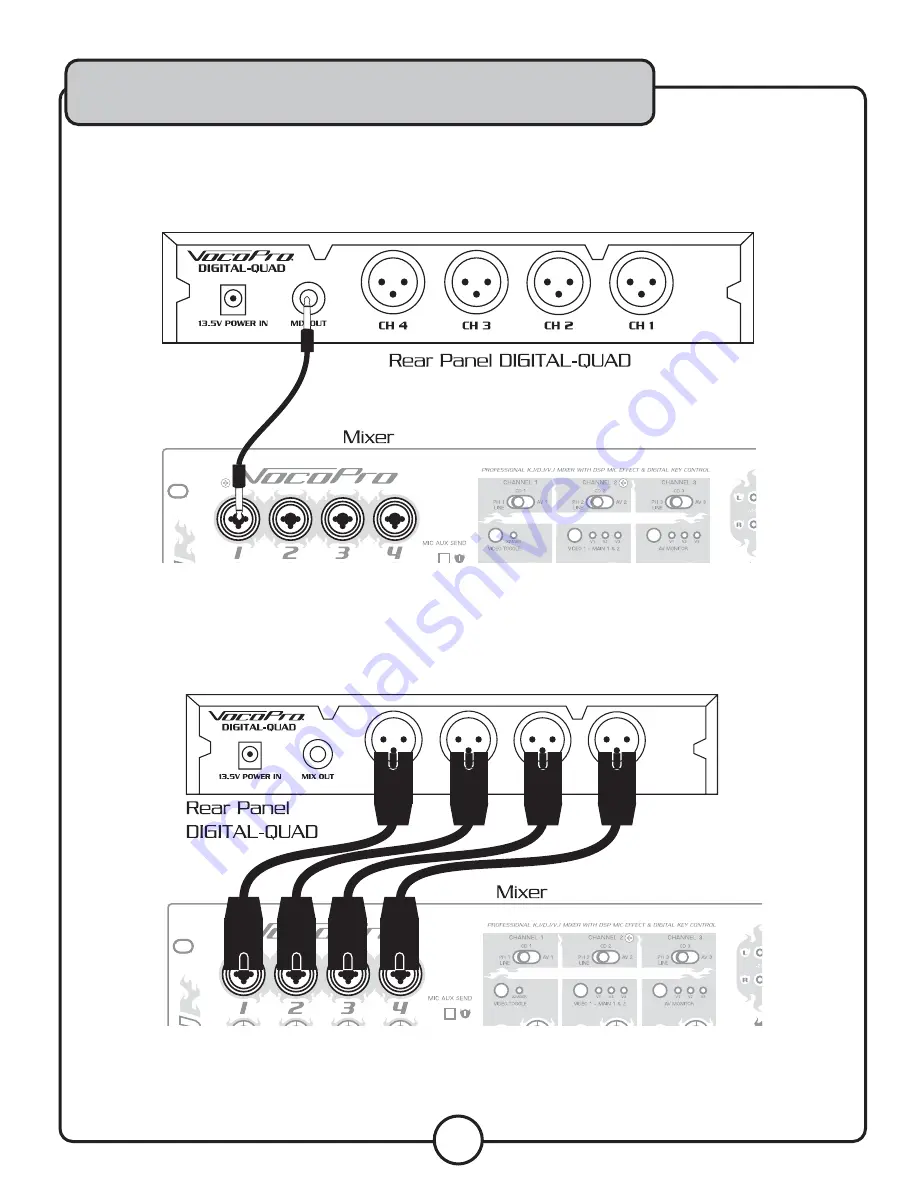
TO CONNECT TO A MIXER

UNBALANCED 1/4”

1.  Connect unbalanced 1/4” cable (included) to the unbalanced output from the Digital-Quad receiver.
2.  Connect the other end of the 1/4” cable to a microphone input channel on a mixer/amplifier.

BALANCED XLR (OPTIONAL)

1.  Connect 4 balanced XLR cables (not included) to the balanced outputs of the Digital-Quad receiver.
2.  Connect each end of the XLR cables into individual microphone input jacks on a mixer/amplifier to be used 

(ex. Mic 1, Mic 2, Mic 3, Mic 4).

Note: Example illustrated is for clarity only. For ease of operation, attach the channel 1 output to the channel 1 input, channel 2 
output to the channel 2 input, channel 3 output to the channel 3 input, and the channel 4 output to the channel 4 input on a mixer.


Summary of Contents for Digital Quad Conference

Page 1: ...o w n e r s m a n u a l Digital Quad Conference ...

Page 2: ...ctions 12 Commonly Asked Questions 14 FEATURES Utilizes the Sparsely Used 900MHz Frequency Band 24 Bit Digital Technology Delivers a Clean Professional Quality Signal Individual Digital Microphone IDs Eliminates Channel Cross Talk Wide Frequency Response 50 20 000 Hz Ensures Natural Sounding Vocals Warranty 1 Year Unit Dimensions 8 375 W x 1 25 H x 5 25 D ...

Page 3: ...Keep it in a safe place for future reference 2 Install your unit in a cool dry clean place away from windows heat sources and too much vibration dust moisture or cold Avoid sources of hum transformers v motors To prevent fire or electrical shock do not expose to rain and water 3 Do not operate the unit upside down 4 Never open the cabinet If a foreign object drops into the set contact your dealer ...

Page 4: ...LW WKHUH 3D DWWHQWLRQ WR WKH GLIIHUHQW OHYHOV LQ YDULRXV UHFRUGLQJV 7DNLQJ D PLQXWH WR GR WKLV QRZ ZLOO KHOS WR SUHYHQW KHDULQJ GDPDJH RU ORVV LQ WKH IXWXUH IWHU DOO ZH ZDQW RX OLVWHQLQJ IRU D OLIHWLPH 8VHG ZLVHO RXU QHZ VRXQG HTXLSPHQW ZLOO SURYLGH D OLIHWLPH RI IXQ DQG HQMR PHQW 6LQFH KHDULQJ GDPDJH IURP ORXG QRLVH LV RIWHQ XQGHWHFWDEOH XQWLO LW LV WRR ODWH WKLV PDQXIDFWXUHU DQG WKH OHFWURQLF QG...

Page 5: ...ncluding amplifiers that produce heat 10 Power Sources The appliance should be connected to a power supply only of the type described in the operating instructions or as marked on the appliance 11 Grounding or Polarization Precautions should be taken so that the grounding or polarization means of an appliance is not defeated 12 Power Cord Protection Power supply cords should be routed so that they...

Page 6: ...ro 1728 Curtiss Court La Verne CA 91750 Toll Free 800 678 5348 TEL 909 593 8893 FAX 909 593 8890 VocoPro Company Email Directory Customer Service General Information info vocopro com Tech Support techsupport vocopro com Remember Our Website Be sure to visit the VocoPro website www vocopro com for the latest information on new products packages and promos And while you re there don t forget to chec...

Page 7: ...7 Getting Started WHAT S IN THE BOX 4 Digital Quad Conference Mics Digital Quad Receiver 2 Antennas Power Adapter 1 4 Cable ...

Page 8: ... microphone to the base transmitter Match Pins and slotted groove of the Female XLR on the microphone to the pins of the Male XLR on the transmitter base and press down firmly Tighten sleeve on the Microphone s XLR connector by turning clockwise ...

Page 9: ...n the correct direction according to polarity 4 Close battery compartment lid Caution To Avoid Battery Leakage Be sure to insert batteries correctly and follow the microphone and battery manufacturer s instructions Never mix old batteries with new batteries Never mix alkaline standard carbon zinc or rechargeable batteries Always remove exhausted or dead batteries from the Digital Quad Conference R...

Page 10: ...Speak into the microphone and verify that the AF LED light flashes for the corresponding connected channel Your Digital Quad Conference is now connected to your Digital Quad Play Microphone Placement Aim the microphone toward the desired sound source such as the talker Do not aim the microphone toward a loudspeaker Place the microphone within 20cm 40cm 8 16inch of the person speaking DIGITA L QUA D...

Page 11: ...4 balanced XLR cables not included to the balanced outputs of the Digital Quad receiver 2 Connect each end of the XLR cables into individual microphone input jacks on a mixer amplifier to be used ex Mic 1 Mic 2 Mic 3 Mic 4 Note Example illustrated is for clarity only For ease of operation attach the channel 1 output to the channel 1 input channel 2 output to the channel 2 input channel 3 output to ...

Page 12: ...ck up 2 POWER switch Press once to turn the microphone power ON and press again to power OFF The microphone will almost instantly pair with the receiver module once powered on 3 XLR CONNECTOR threaded sleeve for secure connection 4 BATTERY COMPARTMENT Removable lid hides and protects the microphone battery 1 2 3 4 ...

Page 13: ...ine when associated mic is powered on 4 AF LEDs Registers Mic transmission LED will flash when audio is received 5 BNC Connectors Used to mount antennas RECEIVER BACK PANEL 1 Unbalanced Mic Out Outputs all mic signals via the included 1 4 cable to a mixer or amplifier 2 Balanced Mic Out Outputs the respective mic channel audio via an XLR cable to a mixer or an amplifier 3 AC Input Connect AC power ad...

Page 14: ...rs when the batteries are low A Less likely it may be the power supply not providing the correct power Try a suitable replacement adapter with same values to confirm A If problem persists please call VocoPro at 800 678 5348 for further instructions Q The lights on the receiver are flashing off and on continuously what s going on A Ensure the correct power supply is used with the Digital Quad A Inspe...

Page 15: ...and width 300kHz Radio Frequency Range 902 9 927 2MHz Modulation Mode DQPSK Microphone Transmission Frequencies in MHz A 902 900 ORANGE B 904 600 SKY BLUE C 907 500 GRASS GREEN D 910 700 RED E 913 300 DARK BLUE F 916 300 YELLOW G 920 100 BLACK GREEN H 925 800 SILVER I 903 100 BROWN J 905 800 PEACH K 908 800 PURPLE L 912 200 GREEN M 915 000 WHITE N 918 700 BLACK O 922 800 YELLOW GREEN P 927 200 PIN...

Page 16: ...ance with the instructions may cause harmful interference to radio communications However there is no guarantee that interference will not occur in a particular installation If this equipment does cause harmful interference to radio or television reception which can be determined by turning the equipment off and on the user is encouraged to try to correct the interference by one or more of the fol...

Page 17: ......

Page 18: ...Digital Quad Conference Owner s Manual VocoPro 2017 v1 0605 www vocopro com ...

Reviews: