


Repair
WBV.PU.002.EN VX136Q V2.0
63
9.6
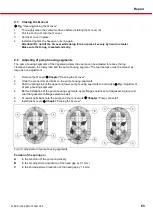
Change of cartridge mechanical seal
Cartridge mechanical seal
– installation/disassembly tool: Part no. WKZ0456
Alternatively
:
Combination tool for lobe change
and
cartridge mechanical seal change
for all VX136Q pump sizes: Part no. PBA.B033.T1
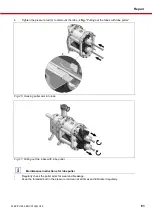
Fig.
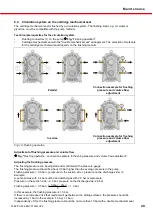
"Cartridge mechanical seal on the gearbox"
1.
Depressurise the buffer chamber if necessary.
2.
Drain and clean the buffer chamber.
3.
If locking bolts or flushing connectors for the circulation system are fitted, dismount them
Chap.
"Circulation system on the cartridge mechanical seal" and
Fig.
"Flushing operation".
4.
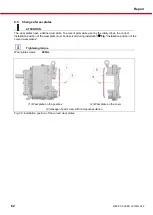
Drain gear oil.
5.
Follow the steps specified in
Chap.
"Rotary lobe change" and "Wear plate change".
6.
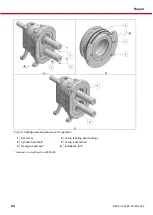
Remove the slotted set screws (1) of the cartridge mechanical seal (Fig. a)).
7.
Put on installation tool (A) and screw the cylinder head bolts (2) into the extracting boreholes of the
cartridge mechanical seal (Fig. b)).
8.
Smoothly pull out the cartridge mechanical seal using the three hexagon head bolts (3) of the
installation tool (Fig. b)).
9.
Change O-ring (4) in the bearing seal housing (Fig. c)).
10.
Before installing the new cartridge mechanical seal, carefully remove the burrs on the keyways and
clean the cartridge mechanical seal seat in the housing.
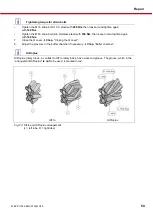
11.
Push new cartridge mechanical seal onto the shaft. Carefully oil the outer O-rings on the seal carrier
(pos. 5 in Fig. b)) before installation. Attention: Do not use mineral oil or grease for O-rings made of
EPDM. Use glycol as an alternative.
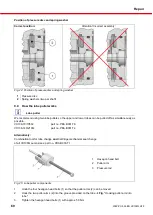
12.
If a circulation system is present, the flushing connector boreholes in the cartridge mechanical seal
must be aligned with the flushing connector boreholes in the bearing seal housing.
13.
To install the new cartridge mechanical seal, place the installation tool on the cartridge mechanical
seal without bolts.
14.
Push rotary lobe (without fitting key) onto the shaft.
15.
Insert the pressure disc and the strain bolt.
16.
Tighten the rotary lobe until the cartridge mechanical seal is flush with the pump housing.
17.
Reinstall any removed locking bolts or flushing connectors.
18.
Remove the rotary lobe again.
19.
Push O-ring and support ring onto the shaft.
20.
Before installing the rotary lobes, thoroughly clean the contact surfaces of the rotary lobes and the
seal.
21.
Install rotary lobes, wear plates and Q cover.
22.
Top up buffer or quenching fluid.
23.
Readjust the pressure in the buffer chamber if necessary.
24.
Top up the gear oil.


