background image

Installation

Anti-tilting chain

WARNING:

MAKE SURE THE ANTI-TILTING CHAINS ARE TAUT WHEN ANCHORED TO

PREVENT THE APPLIANCE TILTING.

The cooker is supplied with two chains which are connected to the rear left and right of the

appliance. The chains should be connected to the wall directly behind the chains as low as

possible to prevent the appliance from tilting forward. If the appliance is installed between two

cupboards, drill a hole on each side of the cupboards, pass the Chains through the holes and

anchor the chains within each cupboard. Ensure the chain connections are strong enough to

support the weight of the appliance and taut to prevent it from tilting forward.

In order to prevent accidental tipping of the appliance, for example a child climbing

onto the open oven door,the stabilizers must be installed. Ensure the chains are correctly anchored

to prevent the appliance from tilting forward.

35

Summary of Contents for 310190

Page 1: ...VOGUE Freestanding Oven with Induction Cooktop 900mm 310190 310191 ...

Page 2: ...hob 11 How to use your oven 16 Positioning the oven trays shelves 17 Cooking modes 18 6 button digital clock 21 Practical cooking advice 24 Using the grill 25 Oven cleaning maintenance 28 Disposal 31 Installation Technical data 32 Instructions for installation 33 Dimensions 34 Combustible surfaces 34 Anti tilting chain 35 Electrical connection 36 Replacing the power supply lead 36 Be Single phase ...

Page 3: ...e appliance had been bought This appliance is designed for non commercial household use and it must not be altered in any way This appliance can only be used safely when it is correctly connected to an efficient earthing system in compliance with current electrical safety standards Packaging items such as plastid bags polystyrene nails etc are potentially dangerous and therefore appropriate measur...

Page 4: ...OR STORE FLAMMABLE MATERIALS IN THE APPLIANCE STORAGE DRAWER OR NEAR THIS APPLIANCE This product is designed to cook food inside private homes and for non commercial purposes It should not be used for any other purpose After using the appliance made sure that all controls are in CLOSED or OFF position DO NOT STORE OR USE FLAMMABLE LIQUIDS OR ITEMS IN THE VICINITY OF THIS APPLIANCE Only use the app...

Page 5: ...guards incorporated in the appliance The use of inappropriate guards can cause accidents Do not use harsh abrasive cleaners or sharp metal scrapers to clean the oven door glass since they can scratch the surface which may result in shattering of the glass WARNING The appliance and its accessible parts become hot during use WARNING Unattended cooking on a hob with fat or oil can be dangerous and ma...

Page 6: ...The probe is part of thermostat Only use the temperature sensing probe recommended for this oven Using flammable liquids near the appliance Take care not to spill sugar or sweet mixtures on to the ceramic glass surface when hot Never place materials or substances on the ceramic glass which may melt plastic or aluminum foil In the event of this happening promptly switch off and remove the molten ma...

Page 7: ...ce yourself Repairs by unskilled persons may cause damage and accidents First refer to the contents of this manual If you do not find the necessary information contact your nearest Service Center Servicing work on this appliance must be carried out by Authorised Personnel Always request the use of original spare parts 7 ...

Page 8: ...iance 1 1 Hob Hob 4 Cooking temperature selection knob 5 Oven Door 6 Storage Drawer Cooking mode selection knob 2 Timer 3 Control knob cooktop burners 2 3 5 6 4 A Induction heating element 1800W B Induction heating element 2300W A A A A B 8 ...

Page 9: ...ccessories The oven is supplied with chrome wire Shelf Supports and a range of shelf options as shown below There are four shelf positions on the oven Grill Tray with removable insert Oven Door Oven Shelf Shelf Supports 9 ...

Page 10: ...Use and Care Controls Control Knob Cooktop Burners 10 ...

Page 11: ... operate properly Each induction cooking zone is provided with a pot detection This prevents a witching on while no pots or pans are placed on the cooking zone or if inappropriate pots or pans are used If pots or pans are removed during the operation the power output will be terminated As long as the cooking zone is switch on any missing or inappropriate pot or pan will be displayed on the corresp...

Page 12: ...cuit and failure of the net synchronization impulse Induction cooking zones Off Off Off Off Off Off On On On On On On On On On On On On Cooking zone cold Off H 0 H 1 Symbol Pot missing U 1 Power setting 2 P F 1 E Cooking zone hot Cooking zone cold Cooking zone hot Without pot With pot Booster function with pot Sensor breakage Sensor short circuit Net synchro nization impulse not available Error me...

Page 13: ... passed the setting code of the simmering power will be displayed During the automatic heat up function if the setting time 20 seconds has already passed a correction of the simmering power is only possible with the plus key If the setting is changed with the minus key the automatic heat up function will be terminated If a pan or pot is removed during the automatic heat up time the time will be ha...

Page 14: ... zone is hot the lamp corresponding to the zone illuminates To operate the outer cooking zone turn the knob past the half way setting Both inner and outer cooking zones will operate Adjustment is continuous so the both zones will operate at any intermediate knob setting between halfway max For highest setting with both zones operating turn the knob past max to the detent position between max TO re...

Page 15: ...n the hotplate make sure that the pan as well as the hotplate itself is perfectly clean and dry To avoid scratching of the ceramic glass surface never use castiron pans or pans with a rough bottom To avoid wasting energy make sure that the diameter of the pan bottom is 20mm bigger than the circle marked on the hotplate The residual heat warning lamp remains illuminated when the temperature of the ...

Page 16: ... you set the thermostat to the highest setting Set the cooking mode selection knob to a cooking mode and leave the oven on for about half an hour with nothing in it and the oven door closed Then open the oven door and allow the oven to cool Any odour that may be detected during this initial use is due to the evaporation of substances used to protect the oven during storage If supplied use the Chro...

Page 17: ...e holes in the oven wall Replace in reverse procedure Refer to the Cooking mode table for the recommended shelf position When fitting the trays or shelves ensure they are fitted between the two wires that are closest together as shown below Oven Shelves have a stop so that they are not fully withdrawn by accident To fully remove the Oven Shelves lift the front of the shelf slightly and withdraw fu...

Page 18: ...n third or fourth shelf When set to Delicate cooking mode the bottom element and the fan will operate This mode is suitable for pastries cakes and non dry sweets in baking tins or moulds that require heat from the bottom When set to Top heat mode the top heating element operates This mode can be used to brown food at the end of cooking Grill food with the oven door closed when not using fan Select...

Page 19: ...n third or fourth shelf When set to Delicate cooking mode the bottom element and the fan will operate This mode is suitable for pastries cakes and non dry sweets in baking tins or moulds that require heat from the bottom When set to Top heat mode the top heating element operates This mode can be used to brown food at the end of cooking Grill food with the oven door closed when not using fan Select...

Page 20: ...ode grill with the oven door closed When set to Fan Forced mode the fan element and the fan operate providing a delicate heat distributed uniformly throughout the oven This mode is ideal for baking and cooking delicate food on multiple shelves especially cakes that need to rise such as cream puffs and for certain tartlets sweets or savoury biscuits savoury puffs swiss rolls and small portions of v...

Page 21: ... AUTO will illuminate which means the automatic cooking feature of the oven is set if cooking time takes 45 minutes and you want it to finish at 14 00 1 Press and set cooking time to 45 minutes using and buttons 2 Press and set finish time to 14 00 using and buttons If AUTO is flash automatic or semi automatic program has been set press button AUTO will clear from the display and the oven can be o...

Page 22: ... finish time with and buttons up to 23 hours and 59 minutes 2 Set cooking temperature and cooking mode by turning the thermostat knob and selector knob The oven starts immediately and AUTO will flash When the finish time is reached the oven automatically stops cooking The alarm will ring and AUTO will flash press the button and the ringing will stop When the button is pressed during semi automatic...

Page 23: ...atically When the cooling fan is on you will notice a flow of air exiting between the oven door and the control panel Note When cooking is finished the cooling fan continues to operate until the oven cools down and then switches off automatically The digital countdown timer can be set up to 23 hours and 59 minutes maximum To set the timer press the button and the or button until the desired time i...

Page 24: ...ould be selected These are the most efficient modes which will reach the desired temperature as quickly as possible using the least amount of energy Once the food has been placed in the oven the desired cooking mode should then be selected If you want to cook food on several shelves Select the Fan Forced mode as this the only cooking mode that allows you to do so When cooking delicate foods on mor...

Page 25: ... to brown the surface but also to cook the bottom of the food It can also be used for browning foods at the end of the cooking process such as adding that gratin finish to pasta bakes for example When using Fan assisted grill mode place the food on the 2nd or 3rd oven shelf from the bottom then place a dripping pan on the 1st rack from the bottom to prevent fat and grease from dripping onto the ov...

Page 26: ...re by 10 Place it on a lower shelf lower the temperature and increase the cooking time Use less liquid lower the temperature and increase the cooking time Grease the pan well and sprinkle it with a dusting of flour or use greaseproof paper Use a lower temperature setting next time It is not necessary to remove the food from all the racks at the same time if pastry is too dry if Pastry has dropped ...

Page 27: ...h a temperature of 220 and swap them halfway through cooking If the pizza has a lot of toppings three or four we recommend you add the mozzarella cheese on top halfway through the cooking process Use a light aluminum pizza pan placing into the shelf supplied with the oven Don t use the dripping pan since this will extend the cooking time making it difficult to get a crispy crust In general the lar...

Page 28: ...r an extended period of time or if you are cooking dishes that contain a lot of water condensation may form on the oven door Dry it using a soft cloth and try reducing the cooking temperature There is a rubber seal surrounding the oven opening which is necessary to ensure the correct operation of the oven Check the condition of this seal on a regular basis If necessary clean it but avoid using abr...

Page 29: ...the door to the full extent 2 Open the lever A completely on both hinges 3 Hold the door open at a slight angle 4 Gently close the door until the hinge levers A are hooked into part B of the door 5 Withdraw the hinge hooks from their location following arrow C 6 Rest the door on a soft surface To replace the door repeat the above steps in reverse 29 ...

Page 30: ...during automatic cooking The results of cooking Are unsatisfactory The cooker is not wired in Or switched on at the wall There is a power failure Wrong type of pot pan Cooking time is incorrect The gob or oven is dirty Clean the hob or oven once cooking is finished Let it cool first Clean hob or oven floor then use a large pan baking dish or grill tray Food has spilled over Timed cooking programmi...

Page 31: ...Card supplied with the appliance Keep the physical receipt which documents your purchase of the appliance and purchase date as you will need to show this for any Warranty repairs Warranty cannot be claimed without proof of purchase By ensuring this product is disposed of correctly you will help prevent potential negative consequences for the environment and human health which could otherwise be ca...

Page 32: ...Installation Technical data 32 ...

Page 33: ...l for any reason Before any procedure it is important to check that the appliance is DiSCONNECTED from the electrical mains The Manufacturer declines all responsibility for any damage deriving from installations in breach of the regulations in force or from failure to comply with these installation instructions This appliance shall be installed only by authorised persons and in accordance with the...

Page 34: ...minimum distance from the appliance Make sure there is a minimum of 650mm between the hob and any shelf Rangehood or exhaust fan that may be installed directly above the hob Zero clearance is permitted on the Side and rear adjoining surfaces below the maintop 750min 150min 900 600 900 34 ...

Page 35: ...m tilting forward If the appliance is installed between two cupboards drill a hole on each side of the cupboards pass the Chains through the holes and anchor the chains within each cupboard Ensure the chain connections are strong enough to support the weight of the appliance and taut to prevent it from tilting forward In order to prevent accidental tipping of the appliance for example a child clim...

Page 36: ...y the circuit breaker Before making the connection check that If the supply cord or plug is damaged it must be replaced by the manufacturer or its Service agent or a similarly qualified person in order to avoid hazard When the installation is complete operate each element and the oven to check that are operating correctly Make sure the indicator lights are also operating correctly When satisfied w...

Page 37: ... Single phase using copper links Two power cord Two circuit break One for induction cooktop and the other for oven separately Warning The coarseness of the power cord must comply with the coarseness marked in the picture ...

Page 38: ...ng to L1 and L2 Cooper link Wiring terminal Phillips screwdriver with a screwdriver Step 2 Put the copper links on and tighten the screws Note The torque of the screw is about 3N M the actual torque shall be determined according to the actual situation Fix the screw without loosening ...

Page 39: ...Installation Step 3 Repeat steps 1 and 2 to install the second copper links Appearance after installation Warning Do not use 5 hot plates at the same time ...

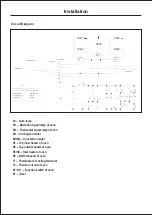
Page 40: ...3 K4 K9 K10 K11 H2 H3 H4 H5 H1 K7 K8 L0 L0 Si1 Si2 L2 L3 N1 L2 L3 For induction hob 380 415V 3N Kitchen Socket 2 For oven 220 240V L0 Oven lamp M1 Cooling fan motor M3 M4 Convection motor H1 Top inner heater of oven H2 Top outside heater of oven H3 H4 Rear heater of oven H5 Bottom heater of oven T1 Thermostat of cooling fan motor T2 Thermal cut out of oven K1 K11 Function switch of oven ET Timer S...

Reviews: