Page 9 of 13
Manual Score-5 - 2018-07 EN
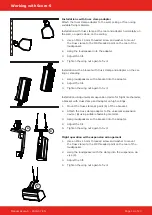
Mounting the L-bracket
1. To hold the L-bracket in a desired position, select one of the
fixing points (1) to (3).
2. Insert the L-bracket with the camlock connector (A) into the
holding cam (B) and turn it around until it engages.
Note: The Camlock connector must be turned and locked correct-
ly to prevent the loudspeaker from falling off!
Fixing points:
(1) L-bracket bottom, Score-5 in tripod mode
(2) L-bracket sideward, Score-5 in horizontal operation
(3)
L-bracket top, Score-5 in flight operations
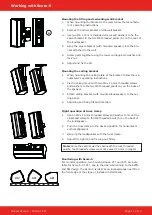
Adjust the tilt
Mount the truss clamp to the L-bracket in such a way that the wing
nut (C) does not hinder tilting.
1. Secure the loudspeaker against tipping by hand.
2. Slightly unscrew the wing nut (C) on the clamp.
3. Adjust the tilt.
4.
Tighten the wing nut (C) again to fix it.
Note:
The wing nut of the clamp must always be tightened,
otherwise there is a risk that it will come loose due to vibrations
and the loudspeaker could tilt uncontrollably!
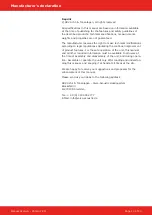
Flight operation with L-bracket on truss
Without truss clamp adapter, the L-bracket with its clamp can be
used on all common truss with 48 - 51 mm belt tubes. The three
fixing points are also used here.
Fixing points:
(1) Connection panel at the top (cables are routed upwards)
(2) L-bracket sideward, Score-5 in horizontal operation
(3) Connection panel at the bottom (cables are routed downwards)
1.
Note:
If you use the fixing point (3) for flight operation, you
must first insert the single-stud fitting into the intended securing
point. Since then the L-bracket sits in front of it!
Hang the loudspeaker and L-bracket with clamp into the truss.
2. Adjusting the tilt.
3.
Tighten the wing nut (C) again to fix it.
Note:
If speakers are suspended with detachable connections,
they require a second, independent, non-combustible connection
(secondary fuse), usually an appropriately dimensioned steel sa
-
fety rope. Please observe the currently applicable standards and
regulations.
Working with Score-5
B
1
2
3
B
A
1
3
2
C


