background image

Herzlichen Dank,

dass Sie ein Voice-Acoustic Produkt gekauft haben.

Seit dem Jahr 2006 entwickeln wir unsere Produkte

in der Überzeugung, dass es auf die Details ankommt.

Wir wünschen Ihnen viel Freude mit diesem Produkt.

Thank you very much,

for purchasing a Voice-Acoustic product.

Since 2006 we have been developing our

products in the firm belief that details matter.

May we wish you a lot of pleasure with this product.

Muchas gracias 

por haber comprado un producto de Voice-Acoustic.

Desdel año 2006 estamos desarrollando nuestros productos

estando convencidos, que son los detalles que cuentan.

Le(s) deseamos mucha alegría usando este producto.

Merci beaucoup

d´avoir acheté un produit Voice-Acoustic.

Depuis 2006, nous développons des produits

avec la ferme conviction que les détails comptent.

Nous vous souhaitons beaucoup de plaisir à utiliser ce produit.

Summary of Contents for VENIA-6

Page 1: ...VENIA 6 Column line array loudspeaker Manual ...

Page 2: ... in the firm belief that details matter May we wish you a lot of pleasure with this product Muchas gracias por haber comprado un producto de Voice Acoustic Desdel año 2006 estamos desarrollando nuestros productos estando convencidos que son los detalles que cuentan Le s deseamos mucha alegría usando este producto Merci beaucoup d avoir acheté un produit Voice Acoustic Depuis 2006 nous développons ...

Page 3: ...7 Connecting cables 7 Operation 7 Working with VENIA 6 Mounting X Tension Kit 8 Headstacking flying equipment mounting 8 Mounting the U bracket 9 Mounting the C bracket 9 Mounting the tilting and swivelling wall brackets 9 Easyfly mechanics 10 Installations with Easyfly mechanics 10 Overview Accessories 11 Manufacturer s declaration Imprint 13 ...

Page 4: ...hese may harm and damage the surfaces Transport and storage When transporting and storing the unit it is important to ensure that the surface and front grill of the loudspe aker are not damaged Moisture can penetrate through exposed wood surfaces and cause the wood to swell A bent or broken front grill will no longer adequately protect the sensitive speaker membranes In addition appreciable dust d...

Page 5: ...n driver with 1 75 voice coil 8 6 5 Neodym woofer with 1 8 voice coil 9 Front grille 1 mm with 5 mm acoustic foam 10 Easyfly flying track for vertical suspension 11 Safety point for safety rope with Single Stud 12 M6 threaded points for mounting a wall or ceiling bracket 13 Threaded points in the back wall for mounting bracket handle 14 Connector panel with two SpeakON connectors 15 M6 threaded po...

Page 6: ...Coverage range h x v 100 x 0 20 Powerhandling 800 W AES 1 600 W program 3 200 W peak at 8 Ω Sound pressure 128 dB SPL AES 131 dB SPL program 134 dB SPL peak Dimensions Weight 1 050 h x 213 w x 390 d mm 27 9 kg Finish Polyurea coating in RAL 9005 Connections The speaker has two loop through Neutrik NL4 SpeakON IN OUT connectors They use the 1 1 connection pins Additional loudspeakers can be looped ...

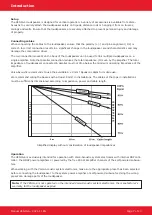
Page 7: ...connected in parallel must not drop below the minimum operating impedance of the amplifier Voice Acoustic recommends to use the available 4 x 4 mm Speakon cables for mobile use We recommend wiring the basses with at least 4 mm in installations The cables of the tops in installations must be sufficiently dimensioned according to impedance power and cable length Simplified display without considerat...

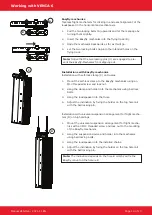
Page 8: ...adstacking flying equipment mounting The headstacking flying equipment allows the installation of two VENIA column line arrays connected at the top using the EasyFly mechanism ring eyes and self lock hooks 1 Rotate a column line array 180 2 Mount the headstacking flying equipment to the bottom of the rotated column line array using the four M10 countersunk screws D on the sides 3 Place the rotated...

Page 9: ... screws B including pla stic washers to mount the C bracket 3 To protect the coatings place the plastic washers between the hex bolt C bracket and the column line array Mounting the tilting and swivelling wall brackets 1 When mounting the bracket to the wall follow the manufactu rer s operating instructions 2 Remove the swivel bracket on the wall bracket 3 Use two M6 x 15 mm threaded screws and wa...

Page 10: ...lamp to the Easyfly mechanics using an M10 threaded screw and lock nut 2 Hang the clamp and holder into the mechanics using ball lock bolts 3 Hang the loudspeaker into the truss 4 Adjust the inclination by fixing the holder on the top hole rail with the ball locking pin Installation with universal suspension arrangement for flight mecha nics D on high ceilings 1 Mount the universal suspension arra...

Page 11: ...fly mechanisms with accessories Art Nr 409992000 Multifunctional rotating ceiling bracket Art Nr 409998001 Carrying bag for 1 x VENIA 6 Art Nr 504602000 X Tension Kit for VENIA 6 Art Nr 504607000 Headstacking flying equipment for VENIA 6 Art Nr 404607001 Headstacking connector for VENIA series Art Nr 409999001 Aluminum bracket handle Art Nr 999995651 Heavy duty flightcase for up to two VENIA 6 Art...

Page 12: ...tiltable Art Nr 999924120 Wall and truss holder max 50 kg slewable Art Nr 999924150 Safety 6 1000 mm Art Nr 999963100 M10 x 40 mm eyebolt Art Nr 999917370 Single stud fitting Art Nr 999957450 Wall bracket slewable and 30 tiltable Art Nr 999924481 Wall bracket slewable and 30 tiltable white Art Nr 999224481 Wall mount with extension Art Nr 409994031 Wall mount with extension white Art Nr 409994032 ...

Page 13: ...tions stipulating the continual improvement of product features For the safe operation of the unit this manual and all other required information must be available to all users at the time of assembly and disassembly of the unit and during opera tion Assemble or operate the unit only after reading and understan ding this manual and keeping it at hand at all times at the site We are happy to receiv...

Reviews: