background image

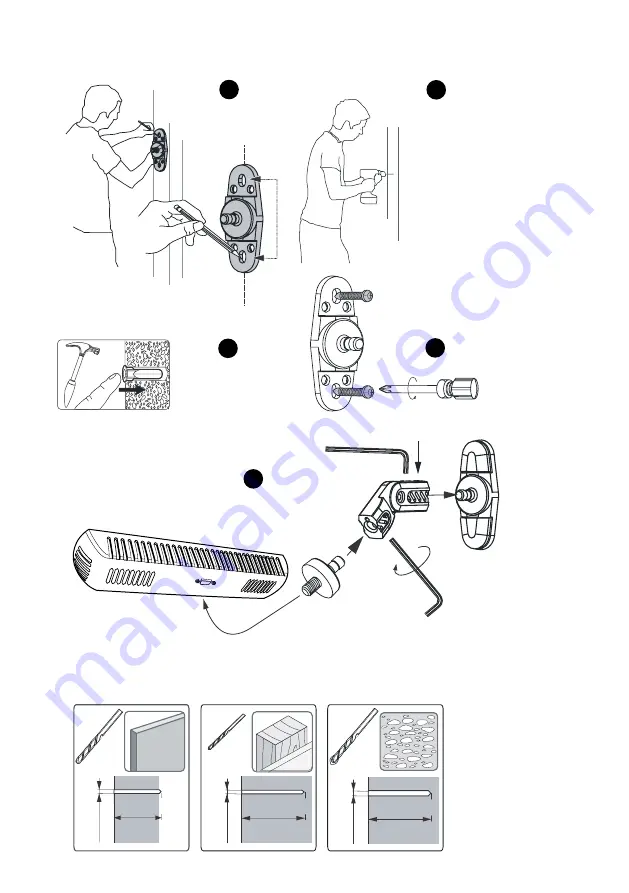
STEP 

1

use the wall base to

mark each hole to drill

with a pencil.

STEP 

2

drill the holes with the given bit

(for wood surface only)

(For solid concrete and drywall only)

STEP 

3

Insert wall anchors

STEP 

4

tightly screw the base to the wall

STEP 

5

assemble the arm to the base

and then screw the emitter on it

mOuntIng InStRuctIOnS (Step by Step)

Wall tyPES and hOlE SIZES

1/2” drywall

13 mm 

(1/2”)

(1/4”) 6.35 mm 

NOT 

INCLUDED

solid concrete

44 mm (1 3/4”)

(3/32”)

4.7 mm 

NOT 

INCLUDED

wood stud

32 mm (1 1/4”)

(3/32”) 2.5 mm 

INCLUDED

7.

Summary of Contents for ActivHub IR50

Page 1: ...model VPES 05000 MUV1200133 V1R2 User manual IR50...

Page 2: ...ct description 3 7 3 1 Technical specifications 3 3 2 how to use the ActivHub ir50 4 3 3 default room configuration 4 3 4 electrical information 5 3 5 active 3D glasses 6 3 6 ceiling wall instructions...

Page 3: ...ation meaning longer LED life protection The kit includes a universal mounting socket for security and is easy to install Key points Volfoni ActivHub IR50 is an infra red emitter to be used with quali...

Page 4: ...inches Weight 240 grams IR Wavelength 940 nm Max range 15 meters 0 25m 30m 7 5 7 5 15 15 30 30 40m 45m SYNC IN DB9 Mounting hole Power LED Power in 3 1 IR Emitter User manual 1 Power Supply 110V 240V...

Page 5: ...emits the infra red signal toward the screen The signal bounces toward the audience wearing 3D active glasses 3 3 RECOMMENDED ROOM CONFIGURATION For other configurations please refer to your technica...

Page 6: ...the following figure HDMI cable BNC SUB D9 female or VESA Mini Din3 Sub D9 female 2 meters by default up to 30 meters Power Supply 24V 240V 3 meters provided Compatible 3D video projector ActivHub IR...

Page 7: ...ic low cost battery Refer to Volfoni website www volfoni com or contact Volfoni Offices to get more informa tion on the EDGE 1 2 Active 3D Glasses 3 6 CEILING WALL INSTRUCTIONS MOUNTING OVERVIEW Befor...

Page 8: ...rywall only STEP 3 Insert wall anchors STEP 4 tightly screw the base to the wall STEP 5 assemble the arm to the base and then screw the emitter on it MOUNTING INSTRUCTIONS Step by Step WALL TYPES AND...

Page 9: ...sure that it is recycled in a manner that protects human health and the environment FCC Compliance Statement This device complies with part 15 of the FCC Rules Operation is subject to the following tw...

Reviews:

Related manuals for ActivHub IR50