


3
ENGLISH
O
peratOr
’
s
M
anual
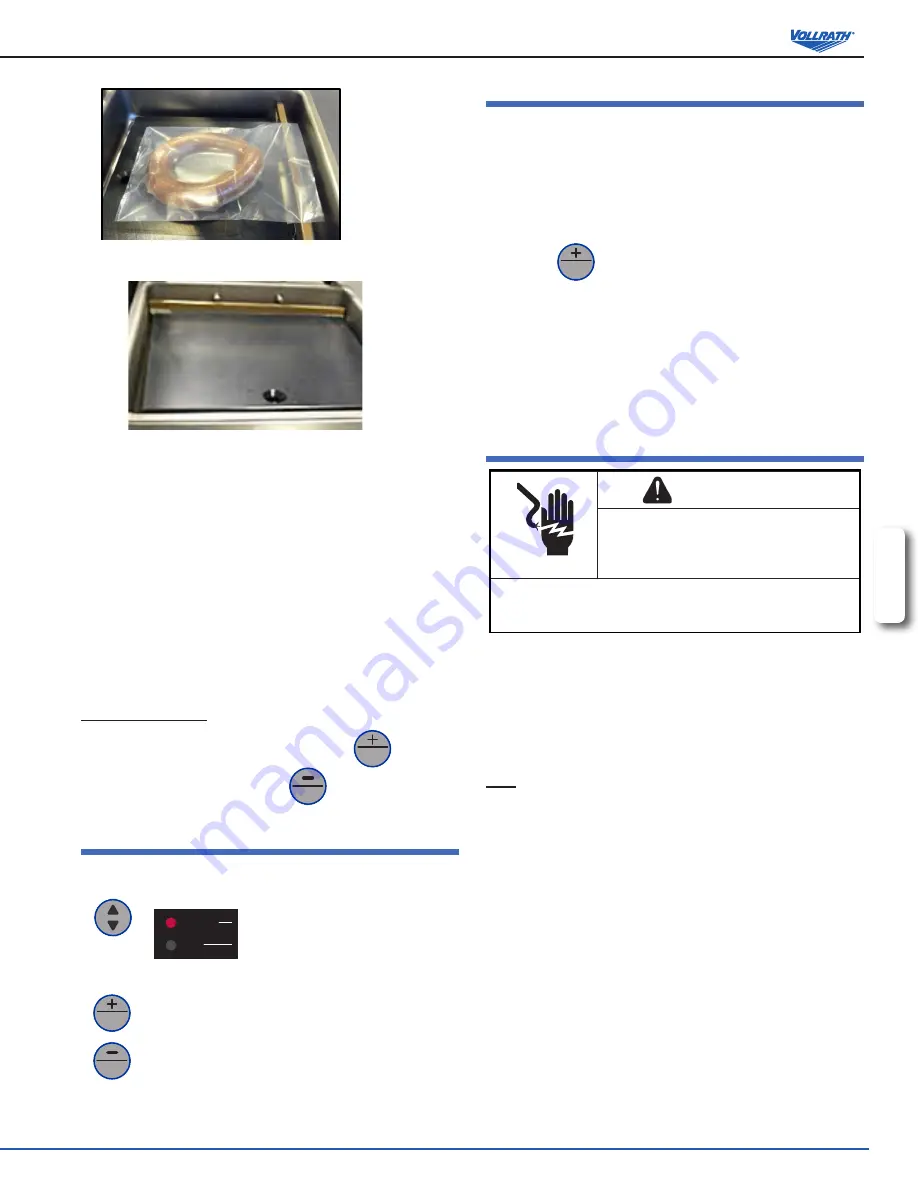
4. Place the bag in the chamber.
• If the product is small, use the included insert plates to reduce
empty space in the chamber. This will reduce the cycle time.
• Position the bag so the open end is placed over the sealing bar.
• The bag should NOT extend outside the chamber.
• The vacuum bag must be placed over the sealing bar without any
folds.
5. Multiple vacuum bags can be placed over the sealing bar if the sealing
bar is longer than the opening of the vacuum bags. Do NOT overlap
vacuum bags.
6. Set the vacuum and seal times.
7. Close the lid. Do not use the lid retainer. The cycle automatically starts.
8. The lid opens automatically when the cycle is complete.
9. Remove the packed product.
10. Wait 15 seconds before packing another product.
S
toPPing
the
m
achine
To stop the vacuum step and move to seal step, press
vac
stop
.
To stop and cancel the entire cycle, press
stop
.
S
ett
the
v
acuum
or
S
eal
t
ime
1. Press the Function Select button to select Vacuum or Seal.
The LED of the selected function illuminates.
vacuum
seal
2. Press the + or - button to set the time.
vac
stop
stop
Press and release changes the time by 1 second.
Press and hold changes the time in 1 second
increments for the first 5 seconds, then by 10 second
increments.
Recommended maximum vacuum time is 60
seconds.
Recommended maximum seal time is 2 seconds.
P
acking
l
iquid
P
roductS
Special care must be taken when packing liquids.
1. Cool foods before packing. Hot food quickly reaches the boiling point,
which can lead to an insufficient seal.
NOTICE: Hot products create condensation which can damage the
pump.
2. Watch the vacuum process through the clear lid.
3. Press the
vac
stop
button as soon as bubbles appear in the product.
This will stop the vacuum and start the seal step.
NOTICE: Do not let products boil. Boiling will increase the amount
of moisture that enters the pump, which can lead to
corrosion.
4. Run the Pump Conditioning Program at the end of the work day. See
“Pump Conditioning program” on page 4.
c
leaning
warning
Electrical Shock Hazard.
Keep water and other liquids from entering the
inside of the unit. Liquid inside the unit could cause
an electrical shock.
Do not spray water or cleaning products. Liquid could contact the
electrical components and cause a short circuit or an electrical
shock.
NOTICE: The machine must be moved in an upright position. Do NOT
tilt the machine. Tilting could enable oil to flow out of the
pump and cause damage to the machine.
NOTICE: If the machine will be idle for more than one month, the oil
should be drained from the pump. Moisture in the oil could
corrode the pump.
d
aily
Run the Pump Conditioning Program
Run the Pump Conditioning Program. See “Pump Conditioning program” on
page 4.
Clean the exterior and interior
1. Unplug the machine. Allow it to cool.
2. Wipe the vacuum chamber, lid, sealing bar, silicone holder and exterior
with a clean damp cloth.
3. Do not use abrasive materials, scratching cleansers or souring pad to
clean the unit. These can damage the finish.
4. Thoroughly wipe off any mild soap or chemical cleaners. Residue could
corrode the surface of the unit.


