background image

Assembly Instructions

Heavy-Duty Stainless Steel Carts

©

2019 The Vollrath Company L.L.C.

Part No. 21818-1 ml

4/23/19

TOOLS REQUIRED FOR ASSEMBLY

• Slotted screwdriver

⁷⁄₁₆

" wrench, two required

• Needle-nose pliers
• Rubber mallet

NOTICE: If you do not have the tools listed above, two special

wrenches with screwdriver ends are included in the
hardware bag.

NOTICE: Read all of the instructions before beginning assembly.

PARTS

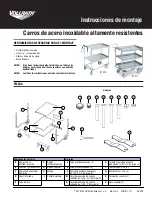
97210

97211

Cart Components

Hardware

A

Right Frame Assembly

F

Lower/Middle Shelf

J

Square Plastic Cap (4)

O

1

¹⁄₄

" long,

¹⁄₄

-20 Round

Head Slotted Screw (4)

B

Caster Channel

G

Top Shelf

K

Round Plastic Cap (2)

P

¹⁄₄

-20 Acorn Nut (4)

C

Left Frame Assembly

H

Handle

L

1

¹⁄₂

" long,

¹⁄₄

-20 Hex Head Screw (4)

Q

¹⁄₄

-20 Lock Nut (4)

D

Reinforcing Channel

I

Front Brace

M

2

¹⁄₂

" long,

¹⁄₄

-20 Round Head Slotted Screw (2)

R

Cotter Pin (2)

E

Axle Tube

N

2" long,

¹⁄₄

-20 Round Head Slotted Screw (4)

S

Special Wrench (2)

J

K

L

N

O

Hardware

H

C

I

F

D

E

B

P

Q

S

M

R

G

A

Summary of Contents for 97210

Page 1: ...d all of the instructions before beginning assembly PARTS 97210 97211 Cart Components Hardware A Right Frame Assembly F Lower Middle Shelf J Square Plastic Cap 4 O 1 long 20 Round Head Slotted Screw 4 B Caster Channel G Top Shelf K Round Plastic Cap 2 P 20 Acorn Nut 4 C Left Frame Assembly H Handle L 1 long 20 Hex Head Screw 4 Q 20 Lock Nut 4 D Reinforcing Channel I Front Brace M 2 long 20 Round H...

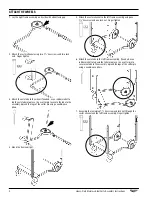
Page 2: ... to the assembly Spread the legs of the cotter pin using a needle nose pliers 4 Stand the frame upright 5 Attach the caster channel to the left frame assembly using one 1 hex screw and one lock nut Finger tighten 6 Attach the axle tube to the left frame assembly If needed use a rubber mallet to tap axle the tube into place Use a cotter pin to secure the tube to the assembly Spread the legs of the ...

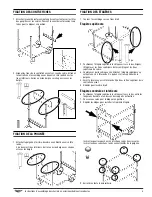
Page 3: ...HE SHELVES 1 Turn the assembly onto its right side Top Shelf 2 Position the top shelf with the open side facing down Align the shelf with the top holes on the assembly and the top holes on the frame assembly 3 Starting with the left frame side Attach the top shelf using one 2 round head screw through the top hole of the handle 4 Then insert one 2 round head screw through the top hole of the front ...

Page 4: ...en contacting Vollrath Technical Services please be ready with the item number model number if applicable serial number and proof of purchase showing the date the unit was purchased WARRANTY STATEMENT FOR THE VOLLRATH CO L L C This warranty does not apply to products purchased for personal family or household use and The Vollrath Company LLC does not offer a written warranty to purchasers for such...

Page 5: ...ons avant de commencer l assemblage PIÈCES 97210 97211 Composants du chariot Quincaillerie A Cadre droit F Étagères inférieure et centrale J Capuchon en plastique carré 4 O Vis fendue à tête ronde 1 po long 20 4 B Canal à roulettes G Étagère supérieure K Capuchon en plastique rond 2 P Écrou borgne 20 4 C Cadre gauche H Poignée L Vis à tête à six pans 1 po long 20 4 Q Contre écrou 20 4 D Canal de r...

Page 6: ...be sur l assemblage Écartez les jambes de la goupille fendue avec une pince à bec fin 4 Redressez le cadre 5 Attachez le canal à roues au cadre gauche avec une vis à six pans 1 po et un contre écrou Serrez avec les doigts 6 Attachez le tube essieu au cadre gauche Si nécessaire utilisez un maillet en caoutchouc pour tapoter sur le tube essieu et le mettre en place Utilisez une goupille fendue pour ...

Page 7: ... assemblage sur son flanc droit Étagère supérieure 2 Positionnez l étagère supérieure le côté ouvert vers le bas Alignez l étagère sur les trous supérieurs de l assemblage et les trous supérieurs du cadre 3 Commencez par le cadre gauche Attachez l étagère supérieure en enfilant une vis à tête ronde 2 po dans le trou supérieur de la poignée 4 Ensuite insérez une vis à tête ronde 2 po dans le trou s...

Page 8: ... techniques de Vollrath tenez vous prêt à fournir le numéro d article le numéro de modèle s il y a lieu le numéro de série et le justificatif d achat indiquant la date d achat de l appareil GARANTIE DE LA VOLLRATH CO L L C Cette garantie ne s applique pas aux produits achetés pour un usage personnel familial ou ménager et la Vollrath Company LLC ne propose aucune garantie écrite aux acheteurs pour...

Page 9: ...aje PIEZAS 97210 97211 Componentes del carro Herrajes A Conjunto del bastidor derecho F Repisa inferior mediana J Tapa plástica cuadrada 4 O Tornillo ranurado de cabeza redonda de 20 1 de largo 4 B Canal de las ruedecillas G Repisa superior K Tapa plástica redonda 2 P Tuerca ciega 20 4 C Conjunto del bastidor izquierdo H Mango L Tornillo de cabeza hexagonal de 20 1 de largo 4 Q Contratuerca 20 4 D...

Page 10: ...unto Extienda las patas de la chaveta con un alicates de punta de aguja 4 Coloque el bastidor en posición vertical 5 Fije el canal de las ruedecillas al conjunto del bastidor izquierdo usando un tornillo hexagonal de 1 y una contratuerca Apriete a mano 6 Fije el tubo del eje al conjunto del bastidor izquierdo Si es necesario use un mazo de goma para golpear suavemente el eje y colocar el tubo en s...

Page 11: ... sobre su lado derecho Repisa superior 2 Coloque la repisa superior con el lado abierto hacia abajo Alinee la repisa con los orificios superiores en el conjunto y los orificios superiores en el conjunto del bastidor 3 Comenzando con el lado del bastidor izquierdo Fije la repisa superior pasando un tornillo de cabeza redonda de 2 por el orificio superior del mango 4 Luego inserte un tornillo de cab...

Page 12: ... comunicarse con los servicios esté listo para proporcionar el número de artículo número de modelo si corresponde número de serie y el comprobante de compra que muestre la fecha en que adquirió la unidad CLÁUSULA DE GARANTÍA DE THE VOLLRATH CO L L C Esta garantía no se aplica a los productos adquiridos para uso personal familiar ni doméstico y The Vollrath Company LLC no ofrece una garantía por es...

Reviews: