background image

INSTALLATION INSTRUCTIONS

w w w . v o l t l i g h t i n g . c o m

customersupport@voltlighting.com • 813.978.3700

- 4 -

- 5 -

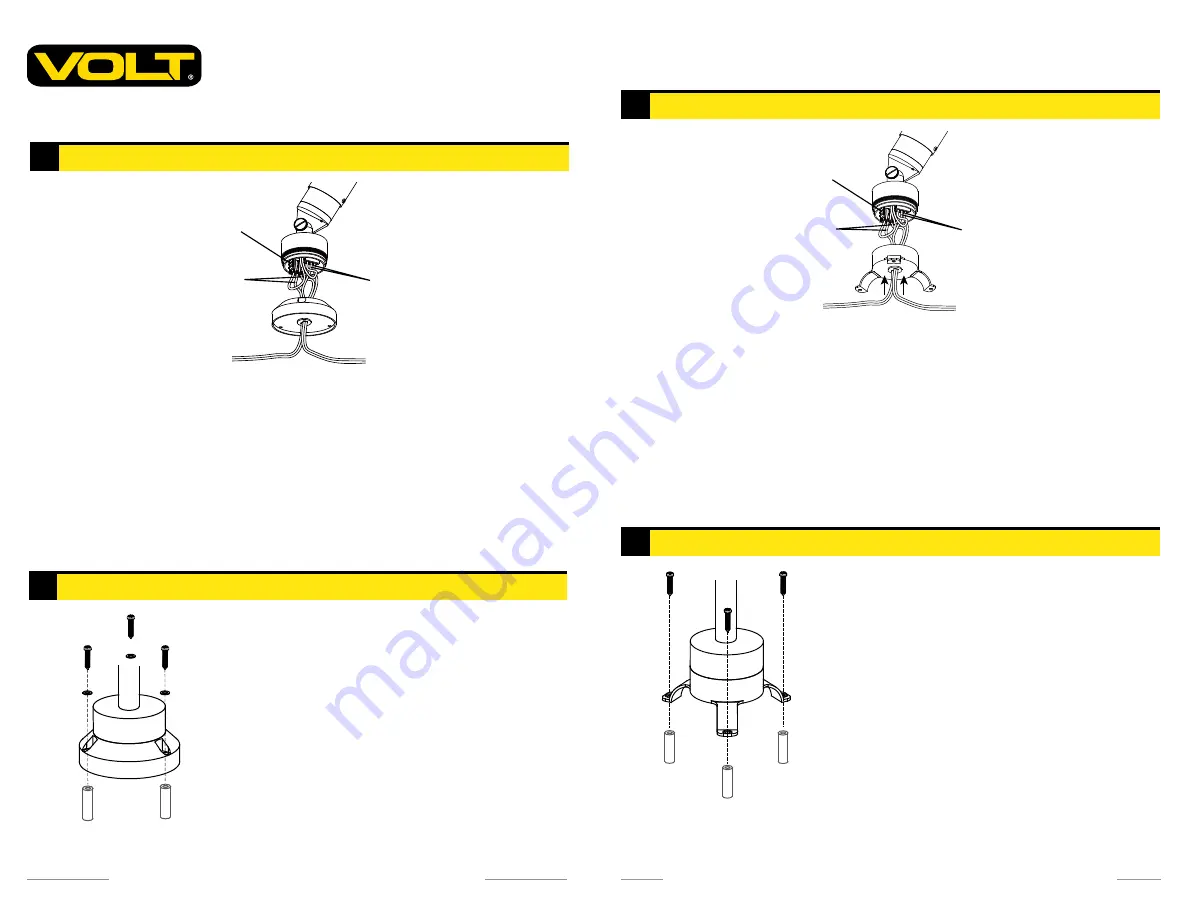
Option 1: Surface Mount

Wire Connection

1

Integrated Hub Top

Main Supply Wires

Fixture Wires

Connectors

Surface Mount

Main Supply Wire

Main Supply Wire 

Continuation

Insert the main supply wire continuation (if needed) and the main 

supply wire up through the bottom of the surface mount and strip the 

ends of both sets of supply wires.

Attach the fixture wires and both sets of the main supply wires to their 

correct connectors in the integrated hub top.  

Once the wires are installed properly, thread the integrated hub top 

back onto the surface mount and hand tighten until snug.

Install Surface Mount

2

Screw

Optional Anchor

Surface Mount

Washer

Place the surface mount onto 

the desired location and secure 

it with the screws. Tighten with 

a screwdriver. Nylon spacers are 

required when installing on trees. 

Option 2: Tripod Mount

Wire Connection

1

Integrated Hub Top

Main Supply Wires

Fixture Wires 

Connectors

Tripod Mount

Main Supply Wire

Main Supply Wire 

Continuation

Insert the main supply wire continuation (if needed) and the main 

supply wire up through the bottom of the tripod mount and strip the 

ends of both sets of supply wires.

Attach the fixture wires and both sets of the main supply wires to their 

correct connectors in the integrated hub top.  

Once the wires are installed properly, thread the integrated hub top 

back onto the tripod mount and hand tighten until snug.

Install Tripod Mount

2

Screw

Optional 

Anchor

Tripod Mount

Washer

Place the tripod mount onto the 

desired location and secure it 

with the screws. Tighten with a 

screwdriver. Nylon spacers are 

required when installing on trees. 

VOLT

®

 Top Dog Downlight with Integrated Hub Top

VAL-2101-0-BBZ (includes part# VAL-1810-X-BXX & VAC-ZWM7-BBZ)

Summary of Contents for VAL-2101-0-BBZ

Page 1: ... part VAL 1810 X BXX VAC ZWM7 BBZ INSTALLATION INSTRUCTIONS Specifications and product details subject to change without notice Copyright 2019 VOLT Lighting Lutz FL USA 33549 All rights reserved customersupport voltlighting com 813 978 3700 Help Hotline 1 813 978 3700 Mon Fri 8am 8pm Sat Sun 10am 6pm EST 1 ...

Page 2: ...nd wire connector so that it is located within 6 inches 15 2 cm from a building structure a luminaire or fitting 6 The main low voltage cable is intended for shallow burial less than 6 inches 152 mm 7 If additional lengths of low voltage cable are required please contact www voltlighting com or call 1 813 978 3700 A 1 Fixture Body B 1 Integrated hub top w w w v o l t l i g h t i n g c o m customer...

Page 3: ...and secure it with the screws Tighten with a screwdriver Nylon spacers are required when installing on trees Option 2 Tripod Mount Wire Connection 1 Integrated Hub Top Main Supply Wires Fixture Wires Connectors Tripod Mount Main Supply Wire Main Supply Wire Continuation Insert the main supply wire continuation if needed and the main supply wire up through the bottom of the tripod mount and strip t...

Page 4: ...uard Set Screw Bulb Installation Install Lens and Glare Guard 3 Thread the lens onto the fixture body and hand tighten Then place the glare guard onto the lens and secure with the previously removed set screw Lens Set Screw Glare Guard Fixture Body Loosen the set screw to remove the glare guard and the lens to expose the bulb Replace it with the correct wattage and type marked on the fixture label...

Page 5: ... without notice Copyright 2019 VOLT Lighting Lutz FL USA 33549 All rights reserved customersupport voltlighting com 813 978 3700 w w w v o l t l i g h t i n g c o m IS VAL 2101 0 BBZ ver1 pdf Help Hotline 1 813 978 3700 Mon Fri 8am 8pm Sat Sun 10am 6pm EST ...

Reviews: