background image

45

MAINTENANCE OPERATION

Service battery and fuses

All of the electrical circuits on your 

Volta have fuses to protect them from 
damage caused by excess current flow 

(short circuit or overload). If something 

electrical stops working, the first thing 
you should check for is a blown fuse. 
Determine from the diagram which fuse 
or fuses control that component. Check 
those fuses. Replace any blown fuses 
and check component operation.

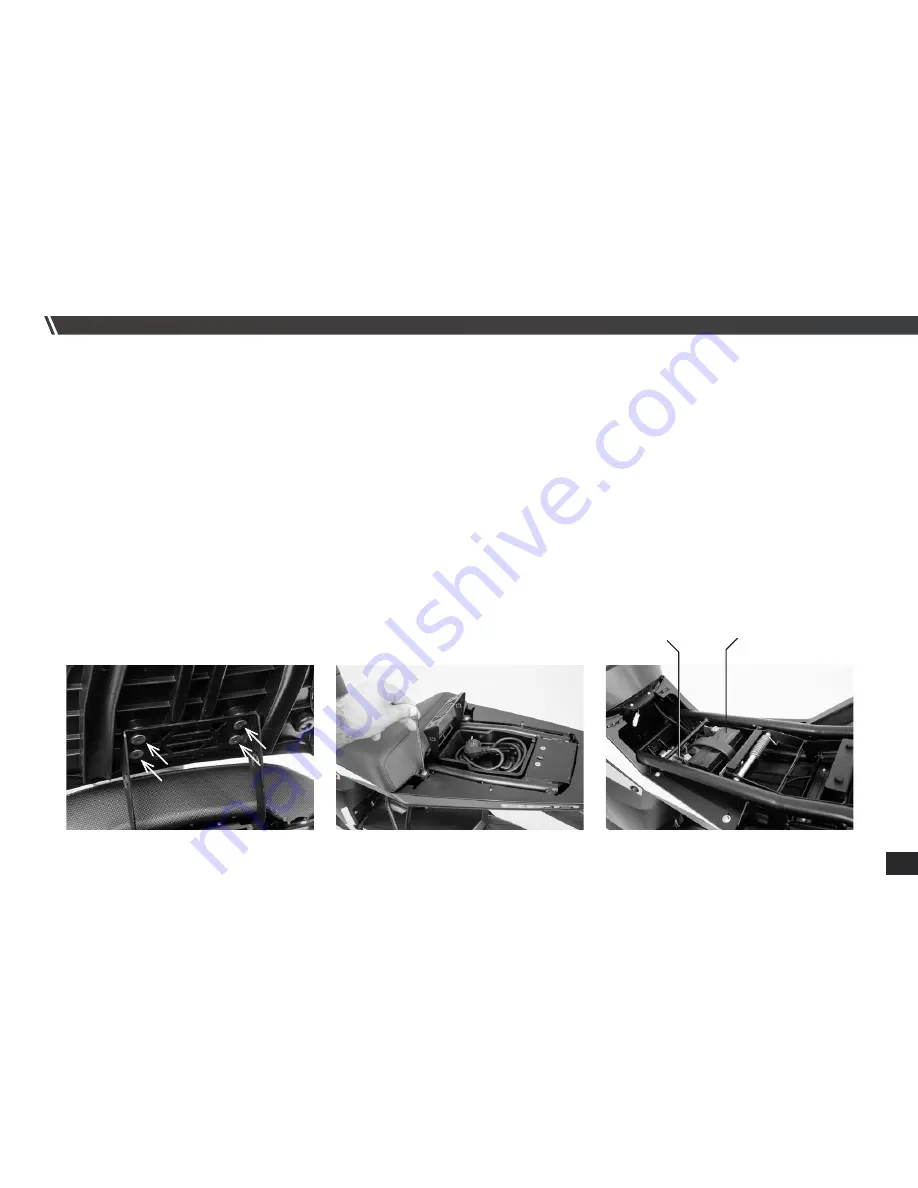
Service battery and the fuse box are 
placed under the seat. 

Service Battery

Fuse Box

How to remove the seat:

 • Open the rear seat (page 28)
 • Unscrew the 4 bolts under the rear 

seat. 

(pic. 1)

 • Unscrew the 2 bolts that fix the seat. 

(pic. 2)   

 • Remove the seat

(pic.3) 

pic. 1

pic. 2

pic. 3

Summary of Contents for BCN 2015

Page 1: ...OWNER S MANUAL Volta BCN...

Page 2: ...y VOLTA MotorBikes S L and is protected by copyright trademark and other intellec tual property rights Material in the manual is made available solely for your personal non commercial use and may not...

Page 3: ...and familiarize yourself with the all the information that we have prepared for you before riding your new VOLTA The manual contains important data and instructions intended to assist you in gaining m...

Page 4: ...horized by Volta Read carefully the information when you see the following signs The safety alert symbol means Attention BE CAREFUL YOUR SAFETY IS IN VOLVED When you see this symbol in the manual this...

Page 5: ...rview of the con tents of your owner s manual INDEX Motorcycle Safety 6 Instruments Controls 9 Before Riding 14 Basic Operation Riding 20 Charge and Batteries 27 Servicing your Volta 31 Technical Info...

Page 6: ...bikes it s important to understand and learn how the Volta works and handles Ride responsible to avoid accident involving you and other drivers ride always within the legal limits pay attention to the...

Page 7: ...riding position or interfere with operating any controls Do not add any electrical equipment that will exceed the Volta s electrical system capacity A blown fuse can cause a loss of lights or motor p...

Page 8: ...t remove any of them If any becomes hard to read please contact with your Volta Authorized Service Point The VIN number is required for your Volta registration It may also be required when ordering p...

Page 9: ...Button Horn is operated when this button is pres sed 4 Speed Limiter Switch on to select the top limit speed The indicator will be lighting while activated and the bike won t allow to overpass the se...

Page 10: ...es the traction circuit Traction Switch off In this position the traction circuit is interrupted and the motor cannot be started 3 Map selector By pushing this button the driving modes changes among C...

Page 11: ...r functions are described on the following pages 1 State of Charge 2 Low battery LED 3 Critical problem red 4 Speed control green 5 Electric motor enabled green 6 Left indicator green 7 Full charged g...

Page 12: ...en charging pag 28 10 LED9 Right indicator green Flashes when right indicator is on 11 Speed Speed in Km h 12 Trip Distance in Km 13 Time Time 14 MAP Selected Map CITY ECO SPORT pag 23 15 Stand Shows...

Page 13: ...will temporarily show all black so you can make sure the liquid crystal display is functioning properly The LCD backlight will always be illuminated when the Volta is powered up If any part of the dis...

Page 14: ...and look for anything that appears unusual such as a leak or loose parts Make sure the headlight running light brakelight taillight license light and turn signals are working properly Rotate the throt...

Page 15: ...eft prevention Tur ning your key clockwise you will unlock the steering and turn on your Volta Turning your key counter clockwise you will switch on your Volta and then lock the steering Key Position...

Page 16: ...oard page 11 will be flashing MAP position in 0 No traction at the moment Step 3 Push front or rear brake during almost 3 seconds the warning led number 6 in the dashboard page 11 will be flashing fas...

Page 17: ...you are 100 sure that you want to start moving the bike and the trajectory of the motorbike is safe without people or objects that may cause an accident When the bike is ready the needle displays the...

Page 18: ...s Know how to operate all the controls Before each ride be sure You feel well and are in good physical and mental condition You are wearing an approved motor cycle helmet with chin strap tightened sec...

Page 19: ...bright colored helmet and reflective strips can make you more noticeable in traffic An open face helmet offers some protection but a full face helmet offers more Regardless of the style look for a DOT...

Page 20: ...akes Before riding your Volta for the first time please review the Motorcycle Safety section and the Before Riding section Even if you have ridden other motorcycles take time to become familiar with h...

Page 21: ...ess use both levers balancing both to find the most suitable braking effectiveness for each kind of riding Be careful when braking on unstable surfaces like wet pavement dusty roads or any kind of irr...

Page 22: ...nd reduce control of your Volta When riding in wet or rainy conditions or on loose surfaces the ability to maneuver and stop will be reduced All of your actions should be smooth under these conditions...

Page 23: ...d Driving Mode The Map indicator figure 14 page 11 will show which mode is active Note that the switch only works while throttle is off Driving mode details Eco Smooth driving low power reduced top sp...

Page 24: ...that the Volta s drive system can be disabled 1 Place the OFF ON switch in the OFF position 2 Put the kickstand down 3 Turn the ignition switch countercloc kwise to the OFF position Additionally the V...

Page 25: ...3 Push in on the ignition key and turn it to the LOCK position counter clock wise 4 Remove the key from the ignition Unlocking the Steering Lock To unlock the steering lock 1 Insert key into the ignit...

Page 26: ...switch 1 on the left handle and the trunk cover will open If the storage is full be careful when closing avoiding to force the cover To charge any electronic device just connect the charging wire to...

Page 27: ...0v 220v Normal charge time is just over 4 hours if the battery is fully depleted The battery pack is a sealed unit It has a factory seal that cannot be removed The manipulation of the battery pack is...

Page 28: ...ing information During the charging process your Volta will be informing of the charging state The different charging steps will be displayed in the LCD dashboard screen The charging state will be als...

Page 29: ...ike at your discretion Even we recommend to do full charges is not necessary to wait until the charge is full you can charge your Volta for a shorter time the only fact is that maybe the battery won t...

Page 30: ...y Power battery indicator and LED s will switch off automatically this means that the bike is fully charged and ready You don t need to unplug the bike if the battery is fully charged the Volta switch...

Page 31: ...the tread looking closely for nails or any cutting objects that could damage the surface Roll both wheels to be sure that all the surface is checked Check the general condition of the wheels Lights Ma...

Page 32: ...an the bike rinsing with water We suggest drying it with an air com pressor and some rags After cleaning your Volta and before connect it to the power supply ensure that the plug is absolutely dry or...

Page 33: ...e power supply The software of the bike will keep the batteries in the best conditions but saving the most energy possible the power supply only works when necessary using short periods of charge to m...

Page 34: ...Be sure to inspect your Volta before each ride perform the periodic checks and follow the Maintenance Schedule in this section Improperly maintaining this Volta or failing to correct a problem before...

Page 35: ...operations can only be done by a Volta Authorized Service Point unless you have the proper tools service data and mechanical and electronics qualification The battery pack is a sealed unit It has a f...

Page 36: ...is manual Other items involve more extensive procedures and may require special training tools and equipment We recommend that you have your Vol ta Authorized Service Agent perform these tasks unless...

Page 37: ...Tyres I I I I I I I I I I Motor Brushes Transmission Belt tension I I I I I I I I I I Belt state Steering Bearings lubrication I I I I I Suspension Rear shock check I I I I I Front Fork check I I I I...

Page 38: ...38 MAINTENANCE COMPONENT LOCATION 3 1 4 1 Rear brake fluid reservoir 2 Rear brake lever 3 Front brake fluid reservoir 4 Front brake lever 2...

Page 39: ...39 MAINTENANCE COMPONENT LOCATION 2 3 1 1 Belt 2 Fuse Box under the seat 3 Service Battery under the seat...

Page 40: ...40 MAINTENANCE COMPONENT LOCATION 1 Front brake caliper 2 Rear brake caliper 3 Front tyre 4 Rear tyre 2 4 1 3...

Page 41: ...eyond the recommended limit there is probably air in the brake system See your Volta Authorized Service Agent to have the air bled from the system Brake Fluid Recommendation The recommended brake flui...

Page 42: ...rake pad wear pla ce yourself in the opposite side of the brake caliper right side From this point you have a clear vision of the brake pads The minimum recommended thickness should be no less than 2m...

Page 43: ...and use an air pressure gauge to measure the air pressure at least once a month or any time you think the tyres might be low Tubeless tyres have some degree of self sealing ability if they are punctur...

Page 44: ...or damage Tread Wear Every tyre has a depth mark in each groove to check the wearing For the best performance you should replace a tire before the tread depth reaches the limits Tyre Repair We strongl...

Page 45: ...you should check for is a blown fuse Determine from the diagram which fuse or fuses control that component Check those fuses Replace any blown fuses and check component operation Service battery and...

Page 46: ...light and USB charger FUSE 5 4A Rose High and low beam light FUSE 6 5A Tan Sells and motor fans Fuse diagram Keys loss Your Volta has an onboard security system that is coded to the transponders in ea...

Page 47: ...0 mm Weight 130 Kg Ground clearance 235 mm Capacities Passenger capacity 1 operator 1 passenger Maximum weight capacity 250 Kg Motor specifications Power 11 Kw 14 96 Hp Torque 6 6 Nm Speed 4800 rpm Vo...

Page 48: ...a 2 2 kg cm2 Batteries Main battery cells 20 x 3 7 V 40 Ahr 148 Whr Lithium Polymer Cell Lights Headlight HS1 12V 35 35W bulb Brake Tail light 6 x 12V 0 24 2 4W LED Turn signal lights 12093RY 12V 10W...

Page 49: ...ho delivers the bike once you have provided them all the necessary data to fill up the Warranty Card at the end of this book If the purchase have been done through an agent he must fill the form and s...

Page 50: ...e indicated the owner s manual or use beyond the limitations or specifications specified by Volta maximum load passenger capacity engine speed and others e Any damage that results from use of non genu...

Page 51: ...riginal authorised Volta selling dealer where both you and the machine are known In normal servicing circumstances regular servicing reduces the overall cost of maintenance Should a fault occur during...

Page 52: ...____________________________ Country __________________________________ E mail ______________________________________________ Phone ___________________________________ Motorcycle s data Model Volta __...

Page 53: ...53 SERVICE CONTROLS Mileage Date Dealer data Next service Signature Stamp...

Page 54: ...54 SERVICE CONTROLS Mileage Date Dealer data Next service Signature Stamp...

Page 55: ...Display check 11 Enabling drive system 15 Fuse box 39 45 Headlight ON OFF 9 Helmet 6 High beam indicator 9 Horn 9 Ignition switch 10 16 Immobilizer 25 Indicators 9 11 Key 15 16 25 28 46 Kickstand 16 2...

Page 56: ...56 NOTES...

Page 57: ...57 NOTES...

Page 58: ...VOLTA MotorBikes c Vilatenim 33 Nau 3 1 17600 Figueres Girona Spain info voltamotorbikes com www voltamotorbikes com...

Reviews: