background image

50

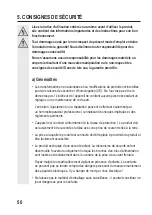
5. CONSIGNES DE SÉCURITÉ


Lisez la notice d’utilisation entière vous-même avant d’utiliser le produit, 

elle contient des informations importantes et des instructions pour son bon 

fonctionnement.


 Tout dommage causé par le non-respect du présent mode d’emploi entraîne 

l’annulation de la garantie! Nous déclinons toute responsabilité pour des 

dommages consécutifs!


 Nous n’assumons aucune responsabilité pour les dommages matériels ou 

corporels résultant d’une mauvaise manipulation ou le non-respect des 

consignes de sécurité! Dans de tels cas, la garantie prend fin.


a) Généralités


•   Les transformations non autorisées et/ou modifications du produit sont interdites 

pour des raisons de sécurité et d’homologation (CE). Ne l’ouvrez pas et ne le 

démontez pas ! L’intérieur de l’appareil ne contient aucune pièce nécessitant un 

réglage ou une maintenance de votre part.


   L’entretien, l’ajustement ou la réparation peuvent s’effectuer seulement par 

un homme/réparateur professionnel, connaissant les risques impliqués et des 

règlements pertinents. 


•   L’appareil est construit conformément à la classe de protection I. Le produit doit 

exclusivement être raccordé et utilisé avec une prise de courant reliée à la terre.


•   La prise à laquelle le produit est connecté doit être placé à proximité du produit et 

être facilement accessible.


•   Le produit est équipé d’une sécurité enfant. La mécanisme de sécurité enfant 

déverrouille l’ouverture uniquement lorsque les broches d’un bloc d’alimentation 

sont insérées simultanément dans l’ouverture de la prise de courant frontale.


   Soyez malgré tout particulièrement vigilant en présence d’enfants. Les enfants 

ne peuvent pas se rendre compte des dangers provenant du mauvais maniement 

des appareils électriques. Il y a danger de mort par choc électrique !


•   Ne laissez pas le matériel d’emballage sans surveillance : il pourrait constituer un 

jouet dangereux pour les enfants.

Summary of Contents for 1368660

Page 1: ...PERATING INSTRUCTIONS PAGE 24 45 CONTR LEUR DE CONSO D NERGIE F MODE D EMPLOI PAGE 46 67 MONITOR ENERGII Q INSTRUKCJA U YTKOWANIA STRONA 68 91 VERSION 05 16 Best Nr Item no N de commande Nr zam 136866...

Page 2: ...isplay 10 a Ger t 10 b Display Symbole 11 7 Inbetriebnahme 12 8 Bedienung 13 a Displayanzeigen umschalten 13 b Einstellmodus starten bedienen beenden 14 c Uhrzeit einstellen 15 d Stromtarif einstellen...

Page 3: ...Markenfamilie selbst f r die anspruchsvollsten Aufgaben immer die optimale L sung zur Hand Und das Besondere Die ausgereifte Technik und die zuverl ssige Qualit t unserer Voltcraft Produkte bieten wir...

Page 4: ...Hinweise in dieser Bedienungsanleitung hin die unbedingt zu beachten sind Das Pfeil Symbol ist zu finden wenn Ihnen besondere Tipps und Hinweise zur Bedie nung gegeben werden sollen Das Produkt ist n...

Page 5: ...len Stromtarif Die gespeicherten Daten lassen sich auch unabh ngig von einer Netzsteckdose anzeigen da in diesem Fall die Stromversorgung des Messger ts ber einen integrierten Akku bernom men wird der...

Page 6: ...gs Einstellungs oder Reparaturarbeiten d rfen nur von einem Fach mann Fachwerkstatt durchgef hrt werden die mit den damit verbundenen Gefahren bzw einschl gigen Vorschriften vertraut ist Das Produkt i...

Page 7: ...elektrischen Schlag Das Produkt ist kein Spielzeug es geh rt nicht in Kinderh nde Platzieren Sie das Produkt so dass es von Kindern nicht erreicht werden kann Das Produkt darf keinen extremen Tempera...

Page 8: ...das Kondenswasser verdunstet ist dies kann einige Stunden dauern Erst danach darf das Produkt mit der Netzspannung verbunden und in Betrieb genommen werden Verwenden Sie das Produkt nicht wenn es bes...

Page 9: ...dem Produkt aus Es besteht h chste Gefahr eines Brandes oder lebensgef hrlichen elektrischen Schlages Sollte dennoch Fl ssigkeit ins Ger teinnere gelangt sein schalten Sie sofort die Netzsteckdose an...

Page 10: ...500ADVANCED UK 4500ADVANCED FR 4500ADVANCED CH 1 Taste SET 2 Taste C 3 Taste RESET 4 Taste 5 Taste 6 Display 7 Schutzkontakt Stecker auf der R ckseite 8 Schutzkontakt Steckdose zum Anschluss des zu me...

Page 11: ...ne sind einstellbar z B f r Tag Nachtstrom TIME Betriebsdauer COST Kostenanzeige PM Anzeige f r zweite Tagesh lfte bei 12h Uhrzeit Modus kWh Kilowattstunde ENERGY Energie GHG CO2 GHG Greenhouse gas Tr...

Page 12: ...Arbeitszimmer programmieren Die Displaybeleuchtung funktioniert aus Stromspargr nden nur dann wenn das Ener giekostenmessger t in der Netzsteckdose steckt Trennen Sie einen evtl angeschlossenen Verbra...

Page 13: ...ng in Volt V Leistungsfaktor PF engl Power Factor Max Leistung in Watt MAX W Max Strom in Ampere MAX A Bei den Werten f r Leistung Strom Spannung und Leistungsfaktor handelt es sich jeweils um den akt...

Page 14: ...e f r eine Minute keine Taste dann wird der Einstellmodus automa tisch verlassen die bisherigen Einstellungen werden ebenfalls bernommen Der Wechsel zwischen den Funktionen geschieht mit kurzem Druck...

Page 15: ...Uhrzeit blinken Stellen Sie die Minuten mit der Taste 4 bzw 5 ein Dr cken Sie kurz die Taste SET 1 zur Best tigung die Anzeige h rt auf zu blinken Wenn die Anzeige nicht mehr blinkt k nnen Sie mit ku...

Page 16: ...r Anzeige des Messger ts Dr cken Sie kurz die Taste SET 1 das W hrungszeichen blinkt Stellen Sie die gew nschte W hrung oder CHF mit der Taste 4 bzw 5 ein Dr cken Sie kurz die Taste SET 1 Die erste St...

Page 17: ...arif 2 blinken Stellen Sie die Minuten der Startzeit f r den Stromtarif 2 mit der Taste 4 bzw 5 ein Dr cken Sie kurz die Taste SET 1 zur Best tigung Die Anzeige h rt auf zu blinken und es wird wieder...

Page 18: ...uss der Einstellmodus gestartet werden indem Sie die Taste SET 1 f r ca 3 Sekunden gedr ckt halten Oben links im Display wird angezeigt und in der oberen Anzeigezeile erscheint 24Hr oder 12Hr Dr cken...

Page 19: ...nnung von 230 V AC eine Leistung von 460 W Wenn Sie vor der Einstellung des Grenzwerts f r die berlast die CO2 Emission eingestellt haben siehe Abschnitt e so k nnen Sie direkt mit dem n chsten Schrit...

Page 20: ...Alarm Funktion CLr ALL dAtA Hier werden folgende Daten gel scht zur ckgesetzt Energie kWh Kosten Betriebsdauer Wert f r CO2 Emission Maximalwert f r Leistung und Strom Es werden nur die Messdaten gel...

Page 21: ...instellung der Uhrzeit Kapitel 8 c Soll der Einstellmodus verlassen werden so halten Sie die Taste SET 1 f r 3 Sekun den gedr ckt oder Sie dr cken f r eine Minute keine Taste h Hintergrundbeleuchtung...

Page 22: ...en Verbraucher vollst ndig von der Steckdose des Messger ts Zur Reinigung der Au enseite gen gt ein trockenes weiches und sauberes Tuch Staub kann mit Hilfe eines langhaarigen weichen und sauberen Pin...

Page 23: ...0 3680 W Messbereich Leistungsfaktor 0 01 1 00 Aufl sung Leistungsfaktor 0 01 Messbereich GHG CO2 0 001 999999 kg Aufl sung GHG CO2 0 001 kg Einstellbereich berlastalarm 1 19 A 1 3999 W Zeitanzeige St...

Page 24: ...splay 32 a Device 32 b Display symbols 33 7 Getting started 34 8 Operation 35 a Toggling the display 35 b Starting using closing the set up mode 36 c Setting the time 37 d Setting the electricity tari...

Page 25: ...Voltcraft brand family provide the optimum solution even for the most demanding tasks In particular We offer you the mature technology and reliable quality of our Voltcraft products at an almost unbea...

Page 26: ...instructions in this operating manual which absolutely have to be observed The arrow symbol indicates that special tips and notes on operation are provided here The product is only intended to be inst...

Page 27: ...to a normal electricity tariff The saved data can also be shown independently of a mains socket since the measuring device is supplied with electricity from the integrated rechargeable battery in this...

Page 28: ...ment or repair work may only be carried out by an expert authorised service centre which is familiar with the hazards involved and the relevant regulations The product is designed according to protect...

Page 29: ...it is out of the reach of children The product must not be exposed to extreme temperatures direct sunlight or strong vibrations Do not operate the device in environments where there are high levels o...

Page 30: ...his should it be plugged in to the mains supply and put into use Do not use the product if it is damaged There is a life threatening risk of an electric shock Switch off the mains socket to which the...

Page 31: ...to the product You run the risk of causing a fire or a fatal electric shock If any liquid has still managed to enter the device immediately turn off the power supply to the mains socket at which the...

Page 32: ...evice 4500ADVANCED UK 4500ADVANCED FR 4500ADVANCED CH 1 SET button 2 C button 3 RESET button 4 button 5 button 6 Display 7 Grounded plug at the rear 8 Grounded socket for connection of the load to be...

Page 33: ...riff two different tariffs can be set e g for day night time electricity TIME Operating time COST Cost display PM Display for afternoon in 12h time mode kWh Kilowatt hour ENERGY Energy GHG CO2 GHG gre...

Page 34: ...n the battery is sufficiently charged after about 1 hour For energy saving reasons the display light only works when the energy cost measuring device is plugged into a mains socket Disconnect a load t...

Page 35: ...r in Watt W Current in Ampere A Voltage in Volt V Power factor PF Max power in Watt MAX W Max current in Ampere MAX A The values for power current voltage and power factor are each the currently measu...

Page 36: ...rnatively if you do not press any button for one minute the set up mode is closed automatically and the setting made so far are also applied The functions are toggled by briefly pressing the button 5...

Page 37: ...utes of the displayed time flash Set the minutes with the 4 or 5 button Briefly press the SET 1 button to confirm the time display will stop flashing When the time display no longer flashes you can pr...

Page 38: ...currency symbol flashes Set the desired currency or CHF with the 4 or 5 button Press the SET button 1 briefly The first position of the electricity price for tariff 1 flashes Change the numeric value...

Page 39: ...he starting time for electricity tariff 2 with the 4 or 5 button Press the SET button 1 briefly for confirmation The display stops flashing and the price for electricity tariff 1 set before will be sh...

Page 40: ...emission you can proceed directly with the next step Otherwise the set up mode must be started by pressing the SET button 1 for approx 3 seconds will be shown in the top left of the display and 24Hr...

Page 41: ...s to a power of 460 W for a mains voltage of 230 V AC If you have set the CO2 emission see section e before setting the limit value for overload ing you can proceed directly with the next step Otherwi...

Page 42: ...verload alarm CLr ALL dATA function This will delete reset the following data Energy kWh Costs Operating duration Value for CO2 emission Maximum value for power and current Only measurement data are d...

Page 43: ...return to the beginning of the set up mode setting the time chapter 8 c If you want to close the set up mode hold the SET button 1 pressed for 3 seconds or do not press a button for one minute h Backg...

Page 44: ...tely Remove the connected consumers from the socket of the measuring device To clean the outside of the product a dry soft and clean cloth is sufficient Dust can easily be removed using a clean long h...

Page 45: ...Power factor of measurement range 0 01 1 00 Power factor resolution 0 01 GHG CO2 measurement range 0 001 999999 kg GHG CO2 resolution 0 001 kg Set up range for overload alarm 1 19 A 1 3999 W Time disp...

Page 46: ...Appareil 54 b Affichage Symbole 55 7 Mise en service 56 8 Utilisation 57 a Activer d sactiver afficher les annonces 57 b D marrer le mode de r glage utilisation fin 58 c R glage de l heure 59 d Ajuste...

Page 47: ...la main de marques avec un produit de la soci t Voltcraft m me pour les t ches les plus exigeantes Et notre particularit Nous vous offrons la technologie m re et la qualit fiable de nos produits Voltc...

Page 48: ...tions importantes dans ce mode d emploi qui doivent tre observ Le symbole de la fl che est utilis pour indiquer o sont donn s des conseils sp cifiques et des informations sur l utilisation Le produit...

Page 49: ...mp ch de CO2 par rapport un tarif normal Les donn es enregistr es peuvent tre ind pendamment d une prise de courant affich e car dans ce cas l alimentation de l instrument via une batterie int gr e es...

Page 50: ...ntenance de votre part L entretien l ajustement ou la r paration peuvent s effectuer seulement par un homme r parateur professionnel connaissant les risques impliqu s et des r glements pertinents L ap...

Page 51: ...nts Placez le produit de mani re le mettre hors de port e des enfants Le produit ne doit pas tre expos des temp ratures extr mes aux rayons directs du soleil ou de fortes vibrations Le fonctionnement...

Page 52: ...avant de le brancher Attendez jusqu ce que la condensation se soit vapor e cela peut prendre quelques heures C est seulement apr s cette p riode que l appareil peut tre branch la tension du secteur e...

Page 53: ...du produit Cela peut causer un risque important d incendie ou de danger de mort par choc lectrique Toutefois si le liquide p n tre l int rieur de l unit arr tez imm diatement la prise laquelle le prod...

Page 54: ...4500ADVANCED UK 4500ADVANCED FR 4500ADVANCED CH 1 Touche SET 2 Touche C 3 Touche RESET 4 Touche 5 Touche 6 Affichage 7 Bouchon de s curit l arri re 8 Protection prise de contact pour le branchement d...

Page 55: ...nts sont r glables par exemple pour jour nuit TIME Temps de fonctionnement COST Affichage du prix PM La deuxi me moiti de la journ e l indicateur de mode 12heures kWh Kilowatt heure ENERGY nergie GHG...

Page 56: ...rogramme L clairage de l cran conomiser de l nergie ne fonctionne que si le moniteur de co t nerg tique est dans la prise de courant Supprimer s par ment reliant les appareils consommateurs du disposi...

Page 57: ...Tension V Facteur de puissance PF galement connu sous le nom facteur de puissance Puissance maximale en Watts MAX W Courant en amp res MAX A maximum La puissance courant tension et les facteurs de pu...

Page 58: ...puyez sur une touche dans la minute puis le mode de r glage reste automatiquement les param tres pr c dents sont galement appliqu s Le changement entre les fonctions se fait en appuyant bri vement sur...

Page 59: ...le bouton 4 et 5 Appuyez bri vement sur le bouton SET 1 pour confirmer l cran s arr te de clignoter Lorsque l afficheur ne clignote plus vous pouvez appuyer bri vement sur le bouton 5 interrupteur au...

Page 60: ...bole clignote Faire la monnaie d sir e ou CHF avec la touche 4 et 5 Appuyez bri vement sur le bouton SET 1 Le premier chiffre du prix de l lectricit pour le tarif d lectricit 1 clignote Changer la val...

Page 61: ...de modification tarifaire 2 Flash R gler l heure de d but pour le tarif de puissance 2 avec la touche le proc s verbal 4 et 5 Appuyez bri vement sur le bouton SET 1 pour confirmer L affichage cesse d...

Page 62: ...n appuyant sur le bouton SET 1 pendant 3 secondes En haut gauche sur l cran est montr et 24heures ou 12heures appara t dans la ligne du haut de l cran 2x Appuyez bri vement sur le bouton 5 pour obteni...

Page 63: ...nsion secteur de 230 V CA Si vous avez d fini les missions de CO2 avant le r glage de la valeur limite de la surcharge voir section e alors vous pourrez continuer l tape suivante Sinon le param tre do...

Page 64: ...nction CLr ALL dAtA Ici les donn es suivantes sont supprim es r initialis es nergie kWh Co t Temps de fonctionnement Valeur pour les missions de CO2 Courant et puissance maximale Seules les donn es de...

Page 65: ...heure chapitre 8 c Pour quitter le mode de r glage alors maintenez enfonc le bouton SET 1 pendant 3 secondes ou appuyez sur aucune touche pendant une minute h R tro clairage Si l appareil de mesure t...

Page 66: ...er compl tement un consommateur branch de la sortie du compteur Pour nettoyer l ext rieur il suffit d utiliser un chiffon propre sec et doux La poussi re peut tre facilement enlev e l aide d une bross...

Page 67: ...1 W 1000 3680 W Facteur de puissance mesure gamme 0 01 1 00 Facteur de puissance de r solution 0 01 Plage de mesure de GHG CO2 0 001 999999 kg R solution GHG CO2 0 001 kg Plage de r glage alarme de s...

Page 68: ...79 b Symbole na wy wietlaczu 80 7 Uruchomienie 81 8 Obs uga 82 a Prze czanie informacji na wy wietlaczu 82 b Tryb ustawie uruchamianie obs uga zako czenie dzia ania 83 c Ustawianie godziny 84 d Ustaw...

Page 69: ...ymagaj cych zada Co wi cej nasze produkty Voltcraft charakteryzuj si wypracowan technologi i niezawodn jako ci a tak e niemal doskona ym stosunkiem ceny do wydajno ci W ten spos b tworzymy podstawy dl...

Page 70: ...re nale y bezwzgl dnie przestrzega Symbol strza ki pojawia si w miejscach w kt rych znajduj si dok adne wskaz wki i porady dotycz ce eksploatacji Produkt jest przeznaczony do u ytku wy cznie w suchych...

Page 71: ...ki korzystaniu z taryfy ekologicznej Zapisane dane mog by r wnie wy wietlane niezale nie od gniazda sieciowego poniewa w tym przypadku przyrz d pomiarowy zasilany jest przez wbudowany akumulator akum...

Page 72: ...nien zajmowa si cz ciami wymagaj cymi obs ugi lub regulacji znajduj cymi si wewn trz urz dzenia Prace konserwacyjne nastawcze i naprawcze nale y zleci fachowcowi wyspecjalizowanemu warsztatowi ze znaj...

Page 73: ...r dem Ten produkt nie jest zabawk dlatego te powinien by trzymany poza zasi giem dzieci Urz dzenie nale y umie ci w takim miejscu by dzieci nie mog y mie do niego dost pu Produkt nie mo e by nara ony...

Page 74: ...da wyschnie co mo e zaj kilka godzin Dopiero wtedy mo na pod czy produkt do zasilania i eksploatowa Nie nale y u ytkowa uszkodzonego produktu Istnieje niebezpiecze stwo pora enia pr dem W przypadku st...

Page 75: ...ewa p yn w na produkt lub w jego pobli u Istnieje du e ryzyko po aru lub powa nego pora enia pr dem W przypadku dostania si cieczy do wn trza urz dzenia nale y natychmiast wielobiegunowo od czy zasila...

Page 76: ...dzenie 4500ADVANCED UK 4500ADVANCED FR 4500ADVANCED CH 1 Przycisk SET 2 Przycisk C 3 Przycisk RESET 4 Przycisk 5 Przycisk 6 Wy wietlacz 7 Wtyczka bezpiecze stwa z ty u 8 Gniazdko elektryczne do pod cz...

Page 77: ...elektrycznej mo liwo ustawienia dw ch r nych taryf np dziennej i nocnej TIME czas pracy COST koszt PM wy wietlanie drugiej po owy dnia w trybie 12 godzinnym kWh kilowatogodziny ENERGY energia GHG CO2...

Page 78: ...im o wietleniu np w salonie lub pomieszczeniu roboczym Pod wietlenie wy wietlacza dzia a tylko wtedy gdy monitor koszt w energii jest pod czony do gniazda zasilania Dzieje si tak ze wzgl du na oszcz d...

Page 79: ...Napi cie elektryczne w woltach V Wsp czynnik mocy PF ang Power Factor Maks moc w watach MAX W Maks nat enie pr du w amperach MAX A W przypadku warto ci moc nat enie napi cie i wsp czynnik mocy wy wie...

Page 80: ...przycisk w W rezultacie nast pi automatycznie wyj cie z trybu ustawie przy czym zostan zastosowane poprzednie ustawienia Zmiany mi dzy funkcjami mo na dokona przez kr tkie naci ni cie przycisku 5 pod...

Page 81: ...uty za pomoc przycisku 4 lub 5 Naci nij kr tko przycisk SET 1 w celu potwierdzenia wy wietlacz przestanie miga Gdy wy wietlacz przestanie miga mo na za pomoc kr tkiego naci ni cia przycisku 5 przej do...

Page 82: ...urz dzeniu pomiarowym Naci nij kr tko przycisk SET 1 symbol waluty na wy wietlaczu zacznie miga Za pomoc przycisku 4 lub 5 ustaw odpowiedni walut lub CHF Naci nij kr tko przycisk SET 1 Zacznie miga p...

Page 83: ...y 2 zaczn miga Ustaw minuty rozpocz cia taryfy 2 za pomoc przycisku 4 lub 5 W celu potwierdzenia naci nij kr tko przycisk SET 1 Wy wietlacz przestanie miga i wy wietlona zostanie wcze niej wprowadzona...

Page 84: ...ie przez naci ni cie i przytrzymanie przycisku SET 1 przez oko o 3 sekundy W lewym g rnym rogu ekranu wy wietlany jest symbol a w g rnej linii wy wietlacza pojawi si symbol 24Hr lub 12Hr Teraz nale y...

Page 85: ...V AC oraz mocy 460 W Je li przed ustawieniem warto ci granicznej przeci enia ustawiono warto emisji CO2 patrz punkt e mo na przej dalej do nast pnego etapu W przeciwnym wypadku konieczne jest uruchomi...

Page 86: ...ast puj ce dane zostan usuni te lub przywr cone do warto ci domy lnych energia kWh koszt czas pracy warto emisji CO2 maksymalna warto mocy i nat enia pr du elektrycznego Zostan usuni te wy cznie dane...

Page 87: ...o pocz tku trybu ustawie ustawianie godziny rozdzia 8 c Aby wyj z trybu ustawie nale y wciska przycisk SET 1 przez 3 sekundy lub przez minut nie nale y naciska adnego z przycisk w h Pod wietlenie wy w...

Page 88: ...czy od gniazda urz dzenia pomiarowego pod czone urz dzenie Do czyszczenia powierzchni zewn trznej nale y u ywa suchej mi kkiej czystej szmatki Kurz mo e zosta atwo usuni ty za pomoc czystej mi kkiej s...

Page 89: ...00 Rozdzielczo pomiaru wsp czynnika mocy 0 01 Zakres pomiaru GHG CO2 0 001 999999 kg Rozdzielczo pomiaru GHG CO2 0 001 kg Zakres regulacji alarmu przeci eniowego 1 19 A 1 3999 W Tryb wy wietlania cza...

Page 90: ...90...

Page 91: ...91...

Page 92: ...Copyright 2016 by Conrad Electronic SE F Information l gales Ceci est une publication de Conrad Electronic SE Klaus Conrad Str 1 D 92240 Hirschau www conrad com Tous droits r serv s y compris de trad...

Reviews: