30
d) System Setup
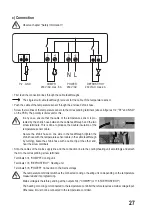
• Keep the button "SET" (6) pushed for 5 seconds until the upper display line shows "F1".
• Use the buttons "
" (5) and " " (8) to select the functions "F1" to "F11" (see description in the table and on the
following pages).
If you do not push any button for 10 seconds, setting mode is left automatically. The settings made are
saved.
• When you have selected the chosen function (e.g. "F3"), briefly push the button "SET" (6) to confirm.
• Change the setting with the buttons "
" (5) and " " (8). Keep the respective button pressed for quick adjustment.
• Briefly push the button "SET" (6), to save the setting and return to selection of the functions "F1" to "F11". Then you
can select and set another function.
• To leave setting mode, briefly push the button "AUX/
" (4). Alternatively, do not push any button for 10 seconds.
The settings made are saved.
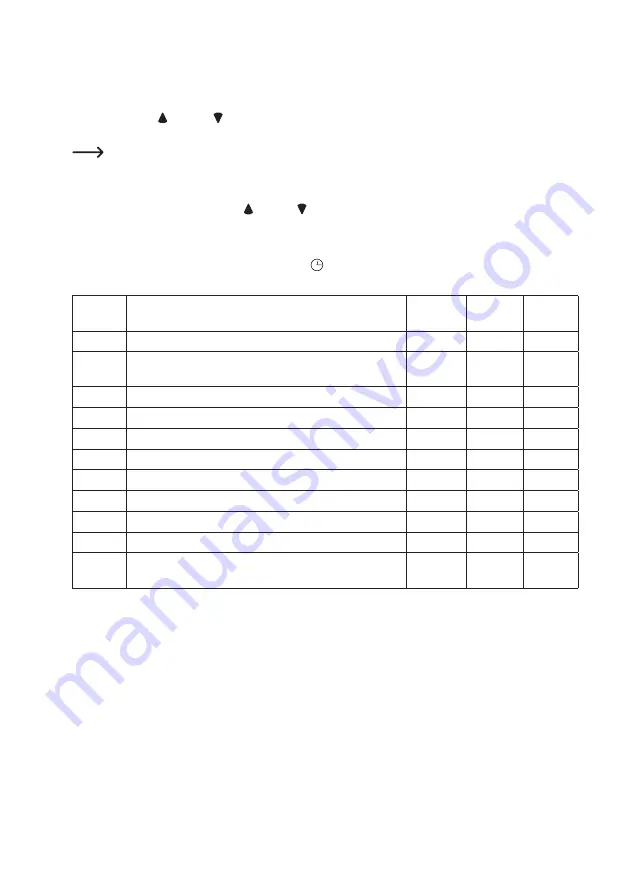
Function Description
Setting
range
Default
Setting
Unit
F1
Sets the temperature for hysteresis
0....10.0
2.0
°C
F2
Sets the delay time for switching between cooling and heat-
ing mode
0....60
10
minutes
F3
Calibrates the temperature
-5.0....5.0
0
°C
F4
Sets the delay time for restart of the cooling unit
0....10
3
minutes
F5
Sets the password for access to the system setup
0....999
0
-
F6
Sets the counter for starting defrosting
0....999
60
minutes
F7
Sets the time for defrosting
0....60
10
minutes
F8
Selects the operating mode
0....1
0
-
F9
Sets the difference for the temperature alarm
1....20
10
°C
F10
Sets the delay time for the temperature alarm
0....90
20
minutes
F11
Sets the delay time for the temperature alarm (after switching
on the temperature controller)
0....10
2.0
hours

