d) Measurement
1.
Before taking sample measurement, see “Notes for an accurate measurement” on preparing
a glass bottle and sample.
2. 10 ml sample is required for accurate measurements. Use the supplied measuring cup to
take 10 ml sample, then fill the supplied testing bottle with 10 ml sample from the measuring
cup.
3. Tighten the cap onto the testing bottle, and place it into the sample holder of the instrument.
Then close the cap of the sample holder securely by aligning the notch on the cap with the
arrow marked next to the cap.
4. Press the
button to turn the instrument on. Then press the
button to
initialize measurement. “
” flashes on the display when measuring.
5. Wait around 10 seconds for the measurement completion. The turbidity reading is displayed.
If the measured turbidity is over 1000 NTU, “HI” is displayed instead.
e) Storage and recall
• To store a turbidity reading, press the
button when a turbidity reading is obtained on
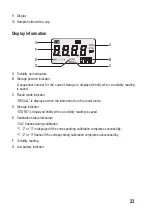
the display. “STORE”
(D)
and a sequence number
(B)
for storage is displayed briefly. Up to
150 turbidity readings can be saved.
• To recall the stored turbidity readings, press and hold the
button
(7)
for three seconds
to enter the recall mode. “RECALL”
(C)
is displayed. Then press the
or
button to browse the stored turbidity readings.
• To exit the recall mode, press and hold the
button for three seconds. “RECALL”
disappears on the display.
• To delete all the stored turbidity readings, in the recall mode hold down the
and
buttons simultaneously for three seconds. “CLR” is displayed briefly.
f) Unit change
• In the measurement mode, press and hold the
button for three seconds until the
unit icon
(A)
flashes on the display. Then press the
or
button to select a unit
(NTU, FTU and EBC), and press the
button to confirm.
g) Switch off
• The instrument switches off automatically if there are 10 minutes of inactivity.
• You can also press the /
button to switch off the instrument.
27


