62
11.1 Switching the multimeter on and off
Turn the control dial
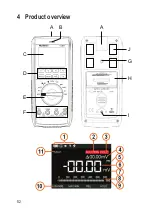
(E)
to select the desired mode.
The optimal measurement range is automatically selected (except in current mode).
When measuring a current, always start with the largest measurement range, and
then switch to a smaller range if necessary. Always disconnect the test leads from
the measured object before switching to another mode.
To turn the multimeter off, move the control dial to the “OFF” position. Always turn
the measurement device off when it is not in use.
Before storing the multimeter, insert the test leads into the high-impedance meas-
urement sockets (COM and V). This helps to prevent errors when making subse-
quent measurements.
The included test lead plugs are fitted with transport protection
caps. These caps must be removed before inserting the test leads
into the measurement sockets.
Before using the multimeter, you must insert the included batter-
ies. For more information on inserting/replacing the batteries, see
“Cleaning and care”.
11.2 Incorrect wiring alarm
The multimeter automatically detects which sockets are connected to the test leads.
If the test leads are connected to the wrong sockets (which can be dangerous for
the user and damage the multimeter), the multimeter triggers an acoustic and opti-
cal alarm.
If you switch to another measurement mode (except current mode) when the test
leads are connected to the sockets, the multimeter triggers an alarm. The alarm is
also triggered when the measuring input is switched from the 10 A socket to the
mAµA one.
If the alarm is triggered and “Check InPut” (followed by the relevant socket) appears
on the display, check that the leads are connected to the correct sockets and that
you have selected the correct measurement mode.
If the alarm is triggered, check that you have selected the correct
measurement mode and that the cables are connected to the cor-
rect sockets.


