29
7. DELIVERy CONTENT
• Meter
• USB power adapter
• Telescopic hot-wire sensor
• USB cable
• Software CD
• Case
• Operating instructions
8. CHARgINg THE RECHARgEABLE BATTERy
1. Connect the USB cable's Mini-USB plug to the Mini-USB port (5) on the meter.
2. Connect the USB cable's USB A plug to a USB port of a USB power source (i.e.
computer, USB power adaptor, etc.).
3. The battery symbol blinks in the upper left of the display (13) to signalize that the
rechargeable battery is charging.
4. When the battery symbol remains lit, charging is complete. Disconnect the USB
cable from the meter and the power source.
Charging takes approx. 4 – 5 hours.
Charge the rechargeable battery as soon as the battery symbol appears on the
display during use.
9. OPERATION
a) Basic function
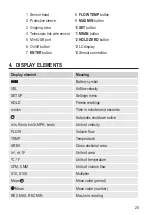
1. Connect the telescopic hot-wire sensor's (4) plug to the meter's sensor
connection (14). The plug can only be plugged in one way. Do not exert any force.
The arrow on the plug must point to the arrow above the display (13).
2. Push down the metallic protective sleeve (2) on the sensor head (1) to expose the
hot-wire sensor and the thermistor.
3. Pull the telescopic rod apart to the required length. Hold the rod by the black gripping
area (3).
Summary of Contents for PL-135 HAN
Page 6: ...6 3 Bedienelemente 1 2 3 14 13 7 10 8 11 9 12 6 5 4 ...
Page 24: ...24 3 Operating elements 1 2 3 14 13 7 10 8 11 9 12 6 5 4 ...
Page 42: ...42 3 Eléments de fonctionnement 1 2 3 14 13 7 10 8 11 9 12 6 5 4 ...
Page 60: ...60 3 Bedieningselementen 1 2 3 14 13 7 10 8 11 9 12 6 5 4 ...
Page 75: ...75 ...


