background image

18

Introduction

Dear Customer,

Thank you for making the excellent decision to purchase this Voltcraft® product.
You have acquired a high-quality product with a brand name that stands out for professional competence
and permanent innovation in the field of measuring, charging and power technology.
With Voltcraft®, you will be able to cope even with difficult tasks as an ambitious hobbyist or as a profes-
sional user. Voltcraft® offers reliable technology with an exceptional cost-performance ratio.
We are certain: Starting to work with Voltcraft will also be the
beginning of a long, successful cooperation.
Enjoy your new Voltcraft® product!

Table of contents

Introduction ............................................................................................................................................18
Intended use ..........................................................................................................................................19
Safety instructions ..................................................................................................................................19
Scope of delivery ....................................................................................................................................20
Controls ..................................................................................................................................................21
Operation ................................................................................................................................................22

Inserting the battery ..........................................................................................................................22
Connecting the measuring sensor ....................................................................................................22
Setting up the meter ..........................................................................................................................22
Automatic power-off ..........................................................................................................................22
Switching on/off ................................................................................................................................22

Carrying out a measurement ..................................................................................................................22

Preparing to measure........................................................................................................................22
Select measuring function ................................................................................................................23
Select measurement and unit............................................................................................................23
HOLD function ..................................................................................................................................23
Min/max memory “REC”....................................................................................................................23
Null balancing....................................................................................................................................24

Data logger ............................................................................................................................................24

Setting and adjusting the time interval ..............................................................................................24
Using the data logger ........................................................................................................................25
Reading out memory on the meter....................................................................................................25
Memory output via interface ..............................................................................................................25
Deleting the memory ........................................................................................................................26

RS-232 interface ....................................................................................................................................26
Maintenance and cleaning......................................................................................................................27

Replacing the battery ........................................................................................................................27

Disposal ..................................................................................................................................................28
Troubleshooting ......................................................................................................................................28
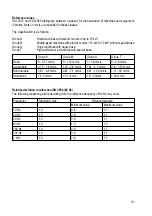
Specifications..........................................................................................................................................29

Summary of Contents for Q79286

Page 1: ...NUNGSANLEITUNG Seite 4 17 Vibration Meter VBM 100 OPERATING INSTRUCTIONS Page 18 31 Vibrom tre VBM 100 NOTICE D EMPLOI Page 32 45 Vibratiemeter VBM 100 GEBRUIKSAANWIJZING Pagina 46 59 Best Nr Item No...

Page 2: ...yright 2009 by Voltcraft Informations l gales dans nos modes d emploi Ce mode d emploi est une publication de la soci t Voltcraft Lindenweg 15 D 92242 Hirschau Allemagne T l 49 180 586 582 7 www voltc...

Page 3: ...ist of contents with the corresponding page numbers can be found in the index on page 18 Ce mode d emploi appartient ce produit Il contient des recommandations en ce qui concerne sa mise en service et...

Page 4: ...3...

Page 5: ...der Beginn einer langen und guten Zusammenarbeit Viel Spa mit Ihrem neuen Voltcraft Produkt Inhaltsverzeichnis Einf hrung 4 Bestimmungsgem e Verwendung 5 Sicherheitshinweise 5 Lieferumfang 6 Bedienel...

Page 6: ...nter widrigen Umge bungsbedingungen ist nicht zul ssig Widrige Umgebungsbedingungen sind N sse oder hohe Luftfeuchtigkeit Staub und brennbare Gase D mpfe oder L sungsmittel Hei e Leuchtquellen Eine an...

Page 7: ...richtungen sind die Unfallverh tungsvorschriften des Verbandes der gewerblichen Berufsgenossenschaften f r elektrische Anlagen und Betriebsmittel zu beachten In Schulen und Ausbildungseinrichtungen Ho...

Page 8: ...en H Data Hold das Display wird eingefroren RMS Anzeige Mittelwert VEL Anzeige Geschwindigkeit engl Velocity DISPp p Anzeige max Schwingungsversatz engl Displacement ACC Anzeige Beschleunigung engl Ac...

Page 9: ...geschaltet wenn ca 10 Minuten lang keine Taste gedr ckt wurde Das Messger t kann ber die POWER Taste 3 wieder eingeschaltet werden Im Aufzeichnungsmodus REC ist die automatische Abschaltfunktion deakt...

Page 10: ...eige Metrische Einheit Engl Einheit Beschleunigung ACC m s2 G ft s2 Geschwindigkeit VEL mm s cm s inch s Schwingungs Versatz DISPp p mm inch F r Vibrations berwachungen werden blicherweise Beschleunig...

Page 11: ...rh ht jedoch die Pr zision beim Messen Der Nullabgleich ist nur bis zu einer Nullwert Abweichung von max 10 Digits m glich Anzeige z B 1 0 oder 0 10 Datenlogger Das Messger t kann ber einen l ngeren Z...

Page 12: ...n Sie das Messger t ein Taste POWER und warten Sie die Initialisierungsphase ab Dr cken Sie die Taste REC 7 REC erscheint permanent im Display Dr cken Sie die Taste LOGGER 6 Jedes Dr cken speichert de...

Page 13: ...r t ber die Tas te POWER 4 ein Lassen Sie alle drei Tasten los wenn der Piepton ert nt Der aktuelle Intervall Wert blinkt Sie befin den Sich im Einstellbereich Um den Speicher zu l schen halten Sie f...

Page 14: ...gen Baud Rate 9600 Parit t Nein Anzahl Datenbits 8 Stopbit 1 9600 N 8 1 Wartung und Reinigung Bis auf den Batteriewechsel und eine gelegentliche Reinigung ist das Ger t wartungsfrei Zur Reinigung nehm...

Page 15: ...untersagt Entsorgung von gebrauchten Batterien Akkus Sie als Endverbraucher sind gesetzlich Batterieverordnung zur R ckgabe aller gebrauchten Batterien und Akkus verpflichtet eine Entsorgung ber den H...

Page 16: ...nd ausschlie lich durch einen autorisierten Fachmann durchzuf hren Sollten Sie Fragen zum Umgang des Messger tes haben steht Ihnen unser techn Sup port unter folgender Telefonnummer zur Verf gung Volt...

Page 17: ...ndigkeit VEL Einheit mm s cm s inch s Messbereich 0 5 199 9 mm s 0 05 19 99 cm s 0 02 7 87 inch s Aufl sung 0 1 mm s 0 01 cm s 0 01 inch s Genauigkeit 5 2 5 2 5 2 Abgleichpunkt 50 mm s 160 Hz 50 mm s...

Page 18: ...ent Gruppe T Hochleistungs Maschinen mit speziellem Fundament Gruppe K Gruppe M Gruppe G Gruppe T Gut 0 0 71 mm s 0 1 12 mm s 0 1 8 mm s 0 2 8 mm s Akzeptabel 0 72 1 8 mm s 1 13 2 8 mm s 1 81 4 5 mm s...

Page 19: ...ong successful cooperation Enjoy your new Voltcraft product Table of contents Introduction 18 Intended use 19 Safety instructions 19 Scope of delivery 20 Controls 21 Operation 22 Inserting the battery...

Page 20: ...Measurements must not be carried out under adverse ambient conditions Adverse ambient conditions include Excessive dampness or humidity Dust or combustible gases vapours or solvents Hot light sources...

Page 21: ...ulations of the relevant trade associations for electrical systems and operat ing materials are to be observed in commercial institutions In schools training centres hobby and self help workshops the...

Page 22: ...The max peak value is measured constantly and recorded H Data hold display is locked RMS Average value display VEL Velocity display DISPp p Max displacement display ACC Acceleration display Battery r...

Page 23: ...cording mode REC automatic power off is deactivated Switching on off Press the POWER button 4 to switch on the meter After a short while initialisation display and sys tem test is complete and the met...

Page 24: ...VEL mm s cm s inch s Displacement DISPp p mm inch Vibration monitoring usually measures acceleration or velocity To switch between the metric system and the English system hold down the UNIT button 6...

Page 25: ...the measuring function but it increases the accuracy of measurements Null balancing is possible at zero deviation to a maximum of 10 digits display shows e g 1 0 0 10 Data logger The meter can record...

Page 26: ...ng proceed as follows Switch on the meter POWER button and wait until initialisation is complete Press the REC button 7 REC is displayed permanently Press the LOGGER button 6 Every keystroke logs the...

Page 27: ...he POWER button 4 to switch on the device Let go of all three buttons when you hear the beep The current time interval is flashing You are now in programming mode To delete the memory hold down the RE...

Page 28: ...34 D0 End signal RS 232 settings Baud rate 9600 parity none data bits 8 stop bit 1 9600 N 8 1 Maintenance and cleaning Apart from battery replacements and occasional cleaning the device is maintenance...

Page 29: ...e device in the household waste Disposal of used batteries rechargeable batteries The end user is legally obliged battery regulation to return all used batteries and rechar geable batteries Disposal i...

Page 30: ...rried out by an approved spe cialist If you have questions concerning the use of the meter our technical support service is available at the following telephone number Voltcraft Lindenweg 15 92242 Hir...

Page 31: ...city VEL Unit mm s cm s inch s Measuring range 0 5 199 9 mm s 0 05 19 99 cm s 0 02 7 87 inch s Resolution 0 1 mm s 0 01 cm s 0 01 inch s Accuracy 5 2 5 2 5 2 Balance point 50 mm s 160 Hz 50 mm s 160 H...

Page 32: ...with special base Group K Group M Group G Group T Good 0 0 71 mm s 0 1 12 mm s 0 1 8 mm s 0 2 8 mm s Acceptable 0 72 1 8 mm s 1 13 2 8 mm s 1 81 4 5 mm s 2 8 7 10 mm s Still tolerable 1 81 4 5 mm s 2...

Page 33: ...eaucoup de r ussite avec votre nouveau produit Voltcraft Table des mati res Introduction 32 Utilisation conforme 33 Consignes de s curit 33 Contenu de la livraison 34 El ments de commande 35 Mise en s...

Page 34: ...antes d favorables Des conditions d environnement d favorables sont pr sence de liquides ou humidit atmosph rique trop lev e Poussi re et gaz inflammables vapeurs et solvants sources lumineuses chaude...

Page 35: ...tallations industrielles il convient d observer les prescriptions de pr vention des accidents relatives aux installations et aux mat riels lectriques des associations professionnelles Dans les coles l...

Page 36: ...H Data Hold l cran est gel RMS Affichage valeur moyenne VEL Affichage Vitesse anglais Velocity DISPp p Affichage maxi D calage de fr quence anglais Displacement ACC Affichage Acc l ration anglais Acc...

Page 37: ...a pile L appareil de mesure s teint automatiquement si vous n appuyez sur aucune touche pen dant environ 10 minutes Il est possible de remettre l appareil de mesure en marche avec la touche POWER 3 En...

Page 38: ...ue pression sur la touche commute l affichage Les mesures possibles sont Mesure Affichage Unit m trique Unit anglaise Acc l ration ACC m s2 G ft s2 Vitesse VEL mm s cm s inch s D calage de fr quence D...

Page 39: ...lors de la mesure La compensation z ro n est possible que jusqu une divergence par rapport z ro de 10 digits maxi affichage par ex 1 0 ou 0 10 Enregistreur L appareil de mesure peut saisir et enregis...

Page 40: ...rement manuel des donn es dur e d intervalle 0s Pour activer la fonction de l enregistreur veuillez proc der comme suit Mettez en marche l appareil de mesure touche POWER et attendez la fin de la phas...

Page 41: ...es Arr tez l appareil de mesure Maintenez enfonc e les touches HOLD 3 et REC 7 et allumez l appareil l aide de la touche POWER 4 L chez toutes les trois touches lorsque le bip sonore retentit La vale...

Page 42: ...uivant 00001234 D0 Signe final R glages RS232 Baud 9600 parit non nombre de bits de donn es 8 bit d arr t 1 9600 N 8 1 Maintenance et nettoyage A l exception du remplacement de la pile et d un nettoya...

Page 43: ...le jeter dans la poubelle ordinaire limination des piles accus usag e s Le consommateur final est l galement tenu ordonnance relative l limination des piles usag es de rapporter toutes les piles et to...

Page 44: ...alifi et agr Si vous deviez avoir des questions concernant la manipulation de l appareil de mesure notre support technique est votre disposition par t l phone au num ro suivant Voltcraft D 92242 Hirsc...

Page 45: ...VEL Unit mm s cm s inch s Plage de mesure 0 5 199 9 mm s 0 05 19 99 cm s 0 02 7 87 inch s R solution 0 1 mm s 0 01 cm s 0 01 inch s Pr cision 5 2 5 2 5 2 Point milieu 50 mm s 160 Hz 50 mm s 160 Hz 50...

Page 46: ...de haute performance avec fondation sp ciale Groupe K Groupe M Groupe G Groupe T Bien 0 0 71 mm s 0 1 12 mm s 0 1 8 mm s 0 2 8 mm s Acceptable 0 72 1 8 mm s 1 13 2 8 mm s 1 81 4 5 mm s 2 8 7 10 mm s...

Page 47: ...ge samenwerking Veel plezier met uw nieuwe Voltcraft product Inhoudsopgave Inleiding 46 Voorgeschreven gebruik 47 Veiligheidsvoorschriften 47 Leveringsomvang 48 Bedieningselementen 49 Ingebruikname 50...

Page 48: ...1604A Een meting onder slechte omgevingsvoorwaar den is niet toegestaan Ongunstige omstandigheden zijn vocht of een te hoge luchtvochtigheid stof en brandbare gassen dampen of oplosmiddelen warme lic...

Page 49: ...ovoorschriften ter voorkoming van ongevallen met betrekking tot elektrische installaties en bedrijfsmiddelen in acht te worden genomen In scholen opleidingscentra hobbyruimten en werkplaatsen moet doo...

Page 50: ...ehouden H Data hold het display wordt bevroren RMS Weergave gemiddelde waarde VEL Weergave Snelheid Engels velocity DISPp p Weergave max Verplaatsing Engels displacement ACC Weergave Versnelling Engel...

Page 51: ...tapparaat wordt automatisch uitgeschakeld als gedurende ca 10 minuten geen toets is ingedrukt Het meetapparaat kan met de POWER toets 3 weer worden ingeschakeld In de registratiemodus REC is de automa...

Page 52: ...gave verder Mogelijke metingen zijn Meting Display Metrische eenheid Engelse eenheid Versnelling ACC m s2 G ft s2 Snelheid VEL mm s cm s inch s Verplaatsing door trilling DISPp p mm inch Voor trilling...

Page 53: ...r verhoogt enkel de nauwkeurig heid bij het meten De nulstelling is alleen mogelijk tot een nulwaarde afwijking van maximaal 10 digits weer gave bijv 1 0 of 0 10 Datalogger Het meetapparaat kan over e...

Page 54: ...kel het meetapparaat in toets POWER en wacht de initialiseringsfase af Druk op de toets REC 7 REC verschijnt permanent op het display Druk op de toets LOGGER 6 Elke keer dat op de toets wordt gedrukt...

Page 55: ...POWER 4 aan Laat de drie toetsen los zodra u een pieptoon hoort De actuele intervalwaarde knippert U bevindt zich in de instelmodus Om het geheugen te wissen houdt u ca 5 s de toets REC 7 ingedrukt D...

Page 56: ...aantal databits 8 stopbit 1 9600 N 8 1 Onderhoud en reiniging Afgezien van de vervanging van de batterij en een incidentele reiniging is het meetapparaat onder houdsvrij Gebruik voor het schoonmaken...

Page 57: ...gestaan Afvoer van lege batterijen accu s U bent als eindverbruiker wettelijk KCA voorschriften verplicht alle lege batterijen en accu s in te leveren afvoeren via het huisvuil is niet toegestaan Batt...

Page 58: ...end door een erkend vakman worden uitgevoerd Bij vragen over het gebruik van het meetapparaat staat onze technische helpdesk onder het volgende telefoonnummer ter beschikking Voltcraft Lindenweg 15 92...

Page 59: ...VEL Eenheid mm s cm s inch s Meetbereik 0 5 199 9 mm s 0 05 19 99 cm s 0 02 7 87 inch s Resolutie 0 1 mm s 0 01 cm s 0 01 inch s Nauwkeurigheid 5 2 5 2 5 2 Afstelpunt 50 mm s 160 Hz 50 mm s 160 Hz 50...

Page 60: ...ep T Machines met hoog vermogen en speciaal fundament Groep K Groep M Groep G Groep T Goed 0 0 71 mm s 0 1 12 mm s 0 1 8 mm s 0 2 8 mm s Acceptabel 0 72 1 8 mm s 1 13 2 8 mm s 1 81 4 5 mm s 2 8 7 10 m...

Page 61: ...60...

Page 62: ...61...

Reviews: