38
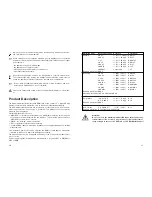
For measuring direct currents, proceed as follows:
- Connect the black measuring cable with the COM
socket (7) and the red measuring cable with the mA
socket (8).
- If you want to measure currents up to max. 4 mA,
set the range selection switch (5) to position "µA"
respectively up to max. 400 mA to position "mA".
- Now connect the two measuring tips in line with the
measuring object (battery, circuit, etc.). The respec-
tive polarity of the measuring value is displayed
together with the current measuring value on the
display (1).
For measuring alternate currents, proceed as follows:
- Connect the black measuring cable with the COM socket (7) and the red measur-
ing cable with the mA socket (8).
- you want to measure currents up to max. 4 mA, set the range selection switch (5)
to position "µA" respectively up to max. 400 mA to position "mA".
- Press the button "SELECT" to change to the AC range, renewed pressing returns
you to the DC range.
- connect the two measuring tips in line with the measuring object (generator, cir-
cuit, etc.). The measuring value is displayed on the display (1).
In the mA range, do not measure any currents above 400 mA under
any circumstances!
j) Current Measuring in the 10 A Range (AC = True RMS)
This range allows you to measure currents up to 10 A DC/AC. The current measuring
range is protected against overload.
In the AC range, the measuring value is measured as True RMS.
39
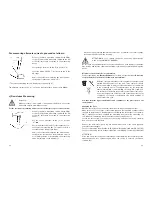
For measuring direct currents, proceed as follows:
- Connect the black measuring cable with the COM
socket (7) and the red measuring cable with the 10 A
socket (9).
- Set the range selection switch (5) to position "A".
- Now connect the two measuring tips in line with the
measuring object (battery, circuit, etc.). The respec-
tive polarity of the measuring value is displayed
together with the current measuring value on the
display (1).
For measuring alternate currents, proceed as follows:
- Connect the black measuring cable with the COM socket (7) and the red measur-
ing cable with the 10 A socket (9).
- Set the range selection switch (5) to position "A".
- Press the button "SELECT" to change to the AC range, renewed pressing returns
you to the DC range.
- Now connect the two measuring tips in line with the measuring object (generator,
circuit, etc.). The measuring value is displayed on the display (1).
Do not measure currents in excess of 10 A under any circum-
stances.
Measurements in the 10 A range may only last a maximum of 10
seconds and be performed in intervals of 15 minutes (cool-down
phase for the shunt).
k) Touchless Voltage Tester (EF)
In this range, the measuring device works without measuring cables as a touchless
voltage tester with acoustic indicator.
You can detect voltages from 50 to 400 V ~.
Only use this function on insulated cables in order to prevent
poss. touching.


