background image

125

Intake and exhaust system

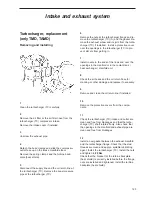
Turbocharger, replacement
(only TMD, TAMD)

Removing and installing

1

Clean the turbocharger (TC) carefully.

2

Remove the air filter or the air filter hose from the
turbocharger (TC) compressor intake.

Remove the intake cover if installed.

3

Unscrew the exhaust pipe.

4

Detach the hose clamps and slide the compressor
outlet hose up on the intake manifold elbow.

Remove the spring clamps and the turbine back-
plate (heat shield).

5

Disconnect the supply line and the oil return line at
the turbocharger (TC). Remove the boost pressure
pipe at the turbocharger (TC).

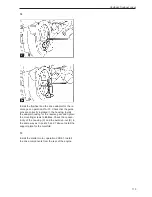
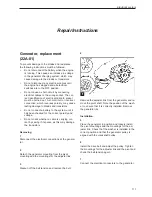
6

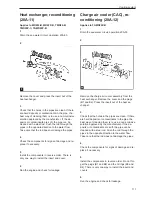
Remove the nuts at the turbocharger flange and re-
move the turbocharger (TC) (A) and the gasket. Re-
move the exhaust elbow and its joint from the turbo-
charger (TC) if installed.  Install a protective cover
over the openings in the turbocharger (TC) to pre-
vent dirt etc from getting in.

7

Install covers in the ends of the lines and over the
openings in the manifold or in the coolant tank /
heat exchanger / manifold unit.

8

Check the air hoses and the oil return hose for
cracking or other damage and replace if necessary.

9

Remove and clean the oil return line if installed.

10

Remove the protective covers from the compo-
nents.

11

Check the turbocharger (TC) intake and outlet are
clean and free from blockages and that the turbo-
charger (TC) shaft rotates freely. Also check that
the openings in the manifold and exhaust pipe are
clean and free from blockages.

12

Install a new gasket between the exhaust manifold
and the turbocharger flange. Check that the stud
threads are clean and apply a suitable lubricating
agent. Install the turbocharger (TC), install the nuts
and tighten to 22 Nm.

Check that the bracket for the turbine backplate
(heat shield) is correctly installed before the flange
nuts are installed and tightened. Install the turbine
backplate (heat shield).

Summary of Contents for MD22

Page 1: ...Engine repair MD22 TMD22 TAMD22 Workshop Manual 2 0 A ...

Page 2: ......

Page 3: ...ly replacement 13A 03 36 Piston rings replacement 13A 04 39 Piston and connecting rod assembly dismantling 13A 05 40 Piston and piston rings inspection 13A 06 41 Connecting rod inspection 13A 07 42 Connecting rod bushing replacement 13A 08 42 Crankshaft assembly General 43 Repair Instructions Crankshaft pulley replacement 14A 01 44 Front sealing ring replacement 14A 02 45 Rear sealing ring replace...

Page 4: ...t draining 20A 01 95 Coolant filling 20A 2 96 Sea water circuit draining 20A 03 97 Thermostat replacement 20A 04 98 Thermostat checking 98 Circulation pump replacement 20A 05 99 Sea water pump replacement 20A 06 100 Sea water pump reconditioning 20A 07 101 Installation and adapter plate for seawater pump replacement 20A 08 104 Oil cooler replacement 20A 09 105 Heat exchanger manifold coolant tank ...

Page 5: ...ury Avoid burns Take pre cautions to avoid hot surfaces exhausts tur bochargers charge air pipes and starter ele ments etc and liquids in supply lines and hoses when the engine is running or has been turned off immediately prior to starting work on it Reinstall all protective parts removed during service operations before starting the engine Check that the warning or information decals on the prod...

Page 6: ...en from batteries are easily inflammable and explosive Smoking is prohibited Ensure that ventilation is good and that the necessary safety precautions have been taken before carrying out welding or grinding work Always have a fire extinguisher to hand in the work place Store oil and fuel soaked rags and fuel and oil filters safely In certain conditions oil soaked rags can spontaneously ignite Repl...

Page 7: ... heavy components alone even where secure lifting equipment such as se cured blocks are being used Even where lift ing equipment is being used it is best to carry out the work with two people one to operate the lifting equipment and the other to ensure that components are not trapped and damaged when being lifted When working on board ensure that there is sufficient space to remove components with...

Page 8: ...rmat MD22A MD22L A MD22L B MD22P B TMD22A TMD22 A TMD22 B TMD22P C TAMD22P B This Service Manual can show op erations carried out on any of the engines listed above As a result the illustrations and pictures in the manual showing certain engines components do not in some cases apply to all the engines listed above However the repair and service operations described are the same in all essential de...

Page 9: ...on The result can be malfunction or a shorter operational life Our Joint responsibility Every engine consists of many systems and com ponents that work together If one component devi ates from the technical specifications this can have dramatic consequences on the environmental im pact of the engine even if it is otherwise in good running order It is therefore vital that wear toler ances are maint...

Page 10: ...ent ma terials and gap sizes in the engines To ensure service work is correctly carried out it is important that the correct sealant and locking fluid type is used on the joint where the agents are re quired In this Volvo Penta Service Manual the user will find that each section where these agents are applied in production states which type was used on the en gine During service operations use the...

Page 11: ...ed in a fire The seals must never be burned off when disassembling or be burnt af terwards in anything other than a special dis posal site Always used chloroprene rubber gloves gloves for handling chemicals and protective goggles Treat removed seals in the same way as corro sive acid All remains even the ash can be ex tremely corrosive Never use compressed air jets for blowing clean Put old seal r...

Page 12: ...885024 0 Camshaft mounting seats set of three 885025 7 Camshaft locking 885 030 885 028 885 027 885 029 885 031 885026 5 Puller for front stuffing box camshaft 885027 3 Puller for injection pump and crankshaft pulleys main tool 885028 1 Dismantling assembly wrench for the stop solenoid for the fuel injection pump 885029 9 Adapters for use with 885027 885030 7 Protective socket for rear stuffing bo...

Page 13: ... stuffing box crankshaft 885034 9 Puller for rear stuffing box crankshaft 885035 6 Installation tool for rear stuffing box crankshaft 885036 4 Belt tension gauge for timing belt 885037 2 Adjustment drifts for the camshaft and crankshaft 885038 0 Alignment adapter for installing the sea water pump 885041 4 Adapter for checking compression 885139 6 Dial gauge assembly TMD22P TAMD22 only ...

Page 14: ...ification plate Engine Product designation 1 Serial number 2 Product number 3 Certification number 4 Drive Shield Reverse gear Product designation 5 Serial number 6 Product number 7 Gear ratio 8 General information Engine and transmission decal xxx 5 8 xxxxxx 7 No xxxxxxxxxx 6 XXXXXX 7 XXX 5 XXXXXXXXXX 6 XX 8 xxxx 1 xxxxxx 3 No xxxxxxxxxx 2 SX drive Shield xxxxxxxxxx 4 EMISSION APPROVED IN ACCORDA...

Page 15: ...rator 7 Injection pump 8 Fuel feed pump 9 Dipstick engine 10 Oil filler cap engine 11 Fuel filter 12 Sea water pump 13 Central electronics unit 14 Topping up oil drive 15 Oil dipstick drive 16 Seacock 17 Sacrificial anode 18 Draining oil drive 19 Seawater intake 13 8 9 10 11 12 7 6 5 16 MD22L 120S General information Engine presentation ...

Page 16: ...14 2 3 4 5 7 MD22P MS25 18 19 21 17 11 12 13 14 15 10 9 8 20 17 11 12 13 14 15 10 9 8 20 TMD22 MS2 2 3 4 5 7 TMD22P HS25 1 21 18 19 17 11 12 13 14 15 10 9 8 20 21 19 18 2 3 4 5 7 1 General information ...

Page 17: ...r motor 9 Generator 10 Injection pump 11 Fuel feed pump 12 Dipstick engine 13 Oil filler cap engine 14 Fuel filter 15 Sea water pump 16 Seawater filter SX 17 Central electronics unit 18 Oil dipstick reverse gear SX 19 Oil filler reverse gear SX 20 Oil cooler reverse gear 21 Seawater intake 22 Trim cylinder SX 23 Draining oil SX 24 Servo pump SX 25 Sacrificial anode SX 26 Sacrificial anode SX 27 Tr...

Page 18: ...ocalize the camshaft bearing The cam shaft cams lie directly above the valves and affect them using the valve lifters which are mounted on top of the valves The shims are installed between the valve lifters and the top of the valves so that ad justment is possible The cylinder head has two valves per cylinder Each valve is installed with a single valve spring The valves move in cast valve guides w...

Page 19: ...s driven from the rear end of the camshaft remove the rear cover and install the camshaft lock 885025 B1 This ensures that the camshaft does not tilt when the camshaft cover is removed 4 Remove the fuel supply pump operation 19A 03 5 Remove the camshaft cover screws evenly in re verse order to that given in illustration D Remove the screws and the cover B Ensure that the thrust washer B2 remains i...

Page 20: ...n 20A 08 10 Install and tighten the screws securing the timing cover to the camshaft cover Install the cover to the timing cover if required 11 Ensure that the adjustment hole in the front of the camshaft front bearing journal corresponds with the hole in the camshaft cover Install the fuel supply pump operation 19A 03 Install the screw in the ad justing hole in the camshaft cover Install the engi...

Page 21: ...camshaft 12A 07 A Remove the stuffing boxes from the camshaft Install the camshaft mountings 885024 A1 to hold the camshaft and mount the mountings with the rel evant mounting screws for the cover It is vital to move the rear camshaft stuffing box on the cam shaft to secure sufficient clearance between the rear mounting and the stuffing box Ensure that the sprung pads are correctly installed on th...

Page 22: ...aft mountings and check that the valve clearance is correct operation 12A 02 10 If the play is correct remove the camshaft pulley hub and the camshaft mountings Turn the crank shaft a quarter turn counter clockwise Install the adjustment drift and the locking tool on the flywheel Lubricate the valve lifters and the camshaft bearing journals and cams 11 Install the camshaft cover operations 12A 01 ...

Page 23: ...e stuffing box Turn the tool clockwise to ensure that the it is se cure in the stuffing box and tighten the center screw against the plug to remove the stuffing box 7 Ensure that the stuffing box and the camshaft are clean and undamaged Lubricate the new stuffing box with fresh engine oil and insert it into position with the seal lip inwards Use installation tool 885026 B1 and a hammer with a soft...

Page 24: ...wise to ensure that the it is secure in the stuffing box and tighten the center screw against the plug to remove the stuffing box 4 Ensure that the stuffing box and the camshaft are clean and undamaged Lubricate the new stuffing box with fresh engine oil and insert it into position with the seal lip inwards Use installation tool 885020 D1 and a hammer with a soft face to drive the stuffing box int...

Page 25: ...haft cover operations 12A 01 7 Remove the camshaft A and remove the camshaft sealing rings 8 Check the camshaft for wear and damage and re place it if required 9 Ensure that the camshaft is clean and lubricated with fresh engine oil Install the camshaft in position and check the valve clearance if necessary see operation 12A 02 10 Install the camshaft cover operations 12A 01 11 Check the camshaft ...

Page 26: ... thermostat housing If necessary remove the by pass hose at the bottom of the thermostat housing 4 Detach all wiring at the cylinder head and thermo stat housing 5 Detach the intake manifold and exhaust pipe 6 If the cylinder head is being dismantled Remove the intake manifold and the heat exchanger manifold coolant tank assembly operation 20A 12 7 Detach the fuel supply pump 8 Detach the fuel fil...

Page 27: ...e the screws and dismantle the cylinder head B ensure that the camshaft does not come into contact with the timing cover Place the cylin der head on even surface that will not damage the cylinder head surface 16 Check the upper side of each screw head for punch marks If there are four punch marks on the screw heads it means that the screws have been post tightened four times and cannot be reused C...

Page 28: ...er head C2 with 90 clockwise offset in relation to the markings on the screws Tighten each screw in the correct order until the markings on the screw match the markings on the cylinder head C3 The screws do not need to be post tight ened with the engine at operating temperature or af ter a certain period of operation If the original screws have been reinstalled mark the top of each screw with a pu...

Page 29: ... the fuel delivery lines and tighten the connec tor nuts to 18 Nm Ensure that a separate wrench is used to prevent movement in the outgoing connec tions from the fuel injection pump 30 Install the fuel filter and the low pressure fuel lines between the fuel injection pump and the fuel filter 31 Install the fuel supply pump if necessary operation 19A 03 Connect the wiring to the fuel supply pump 32...

Page 30: ...Press the valve springs together with the valve spring tensioners A1 Ensure that the spring is pressed straight downwards so that the valve stem is not damaged Remove the valve cotter B1 8 Take the load off the valve spring tensioner and re move the valve spring washer B2 valve spring B3 valve stem seal B4 and the spring seat washer B5 Remove the exhaust valve B6 or the inlet valve B7 9 Repeat poi...

Page 31: ...d underside are clean Install the valve depth gauge on the cylinder head surface and zero the gauge Install the valve depth gauge carefully in position above each valve crown A and note the value The parameter values for valve crown depth are given in the Workshop Manual Technical Data If a valve is deeper than the maximum value check the valve depth using a new valve If the valve depth is still o...

Page 32: ...guide using reamer 885022 C Valve guides replacement 12A 11 1 Ensure that the surface of the cylinder head and the storage surface in a suitable press are clean 2 Heat the whole cylinder head slowly and evenly to approximately 100 C and lay the head with the sur face downwards Ensure that the surface is not damaged during handling WARNING Use suitable gloves as protection against the hot metal 3 I...

Page 33: ...reas around the valve seats and the holes for in jector nozzles 10 Use a straight edged ruler and a feeler gauge to check the latitudinal longitudinal and diagonal flat ness of the bottom surface of the cylinder head A If deformation is greater than 0 10 mm the bottom surface can be machined Remove the minimum amount of material and check that the cylinder head height will not be less than 119 85 ...

Page 34: ... seawater pump operation 20A 06 18 Install the thermostat housing 19 Install the cylinder head assembly operation 12A 07 Install the mill on the locating pin with 46 side against the valve seat and install the handle A Do not let the mill head fall down towards the seat this can damage the blade 4 Turn the mill carefully clockwise Only remove as much material as is necessary to achieve a seal Keep...

Page 35: ...ately 100 C and if possible cool the seat with liquid nitrogen to 35 C If liquid nitrogen is not accessible cool the seat down as much as possible in a freezer Install the seat with exterior bevel turned to the inside of the head Ensure that the bottom of the seat has good contact with the bottom of the position in the cylinder head WARNING Use suitable gloves as protection against the hot metal a...

Page 36: ...lves and the glow plugs The pistons have two compression rings and one oil scavenger ring The groove for the top ring is in a hard metal insert to minimize the groove wear Axial guidance of the floating piston pins occurs using snap rings There is a steel insert in the piston man tle to check the pistons dilation The connecting rods are H section forged steel The bearing caps are located to the co...

Page 37: ...g rod screw to protect the big end Carefully slide the connecting rod up the cylinder enough so that the upper bearing shell can be accessed Remove the bearing shell from the connecting rod Place the big end shells with the re spective bearing caps 8 Clean the bearing surfaces on the connecting rods and big end journals 9 Clean the bearing shells and lubricate the bearing surfaces and big end jour...

Page 38: ...g rod as sembly replacement 13A 03 1 Drain the engine oil and the engine coolant system 2 Remove the cylinder head assembly operations 12A 07 3 Turn the crankshaft until the pistons are at the same height in the cylinder bores Place a suitable clean rag over the piston to fill the cylinder bores Remove all soot from the upper section of the cylin der bore with a coarse emery cloth The emery cloth ...

Page 39: ...al with engine oil 12 Install a plastic or rubber tube of suitable length on each respective connecting rod screw to protect the big end Install the upper bearing shell on the con necting rod Ensure that the locking lug is slid well into the cut out A1 Lubricate the bearing with en gine oil 13 Ensure that the piston ring gaps are offset by 120 and press the rings together with a piston ring com pr...

Page 40: ...surface with the piston height measuring tool A Place the measuring tool on a flat surface and zero the measuring scale Turn the crankshaft until the piston is approximately at top dead center Locate the measuring tool over the cylinder bore with the dial gauge measuring point in contact with the pis ton Turn the crankshaft so that the piston moves to its highest position and note the value The co...

Page 41: ...t the ring gap is lo cated with a 180 offset to the catch 2 Install the cast iron rings with the conical surface in the second piston ring groove with the word TOP or the manufacturers symbol towards the top The new piston rings have a green identification mark This must lie to the left of the ring gap when the ring is installed and the piston is raised Install the barrel face ring with the molybd...

Page 42: ...e origi nal cylinder If a new piston is installed ensure that it is the correct height class There are six different height classes in production The classes are desig nated with numbers which are stamped on the top of piston A Number 1 is the highest piston and number 6 the lowest Only classes 3 and 6 are available for service purposes Class 3 must be used if the original piston has the markings ...

Page 43: ...ston for wear and damage 2 Check that the piston rings can move freely in its groove and that no ring is broken 3 Remove the piston rings operation 13A 04 Clean the piston ring and the piston ring grooves 4 Install the new piston rings in the piston ring groove and check the ring groove wear using the feeler gauge A Compare the piston ring play in the groove to the values that apply to new compone...

Page 44: ...connect ing rod and replaced The new screw must be in stalled with the locating arrows or recognition marks on the screw head turned to the outside of the connecting rod big end C Ensure that the screw head has good contact with the connecting rod Connecting rod bushing replacement 13A 08 1 Press out the old bushing with an appropriate drift 2 Clean the bearing recess in the connecting rod and rem...

Page 45: ...f Viton and oil return grooves on the inside of the lip The front stuffing box is installed on the front side of the lubricating oil pump On most engines the rear stuffing box is located directly in the fly wheel cover or the back plate The crankshaft front end has two separate key grooves The rear keygroove is for the lubricating oil pump which is installed around the crankhaft The front keygroov...

Page 46: ... the front end of the crankshaft using Loctite 648 and can only be re moved using a puller 6 Clean the components and check them for damage Replace damaged components as necessary 7 Install the pulley to the belt drive and tighten and finger tighten the four mounting screws 8 Install the center screw black P N 3581332 and tighten to 180 Nm Use a large screwdriver or simi lar tool as a counterhold ...

Page 47: ...nkshaft pulley operation 14A 01A or 14A 01B and remove the cap for the transmis sion cover operation 15A 01 6 Install two screws M6 x 50 to secure the pulley to the injection pump and remove the timing belt oper ation 15A 04 7 Remove the drive pulley from the crankshaft opera tion 15A 07 8 Remove the front key from the crankshaft 9 Install the adapter A1 from the tool 885031 at the front end of th...

Page 48: ...ve pulley on the crankshaft operation 15A 07 If the brush seal is not installed in the cap for the timing cover install the crankshaft pulley operation 14A 01 or 14A 01B 13 Install the timing belt and adjust the belt tension see section 15 14 Remove the adjustment drifts and the pulley drifts Check the fuel injection pump adjustment opera tions 17A 03 15 Turn the crankshaft two revolutions to ensu...

Page 49: ...haft and machine the flange see Workshop Manual Technical Data 5 Slacken off the screw A1 in the puller tool so that it does not reach the crankshaft Insert the tool in the sealing ring and turn it clockwise so that it fas tens in the sealing ring Use an adjustable spanner to turn the tool body so that it fastens securely in the sealing ring Tighten the screw against the rear end of the crankshaft...

Page 50: ...ht ened in stages and evenly 11 Remove the tools and install the flywheel operation 21A 01 12 Install the drive components on the rear end of the engine and connect the battery Crankshaft axial clearance checking 14A 04 The axial play of the crankshaft is controlled by two sectioned thrust washers on each side of the cen tral main bearing B The axial clearance can be checked with a feeler gauge be...

Page 51: ...er halves in the main bearings with the lugs in their respective cut outs Check that the lubrication grooves in the thrust washers are turned away from the bearing cap B 7 Check that the guide sleeves are correctly installed in the bearing cap or in the cylinder block 8 Check that the bearing shell is correctly installed in the cap and that the main bearing journals are clean Lubricate the bearing...

Page 52: ...pective bearing shell locations 5 Clean the upper bearing shell and lubricate the bearing surface with fresh engine oil NOTE There is only a lubrication hole in the upper bearing shell and it must therefore be placed against the cylinder block The bearing shells for the central main bearing are wider than the other bearing shells A The bearing shells for the central main bearing also have differen...

Page 53: ...ove the oil screen and extractor pipe 18A 04 3 Remove the crankshaft pulley operation 14A 01 Remove the water pump pulley 4 Remove the cap of the timing cover operation 15A 01 5 Remove the flywheel and flywheel cover section 21 6 Turn the crankshaft until the pistons are at the same height in the cylinder bores 7 Temporarily mark the timing belt and the appropri ate teeth on the crankshaft pulley ...

Page 54: ...hers and lu bricate them with fresh engine oil Install the thrust washers against the central main bearing cap with the oil grooves turned away from the cap Check that the guide sleeves of the cap are in the correct position Install the cap on the cylinder block with the word FRONT turned towards the timing cover end of the engine Tighten the screws for the cap in stages and evenly to 112 Nm 22 In...

Page 55: ...all the pulley for the water pump 34 Install the starter motor operation 22B 01 35 After the engine is installed fill the oil pan to the cor rect level with an approved engine oil Fill the en gine coolant system 23 Check the axial clearance of the crankshaft and re place the thrust washer if necessary 24 Remove the protective tubes from the connecting rod screws 25 Install the big end caps see ope...

Page 56: ...e of sintered iron with 2 copper and the belt is made of neoprene and glass fibre A flat idler pulley A5 ensures good belt position and an adjustable tension pulley controls the belt tension The pulley for the fuel injection pump has two key grooves one for turbo charged engines and the oth er for naturally aspirated engines The pulleys and belt are covered by a timing cover and a cap which is mad...

Page 57: ... timing cover 15A 04 A 5 Remove the clips for the cover and remove the cap A 6 Check that the cap is clean and that all the spring clips are fastened at the timing cover 7 Install the cap on the timing cover and ensure that all the clips are in position 8 Install the inspection hatch on the timing cover and the cap 9 Install the water pump belt 10 Install the generator GEN belt operation 22A 03 11...

Page 58: ...cessary operation 15A 04 Remove the temporary mark 3 Press the ball end of the belt tension gauge and in stall the gauge over the belt Ensure that the gauge foot is located under the belt and between two teeth B Slowly release the ball end and read off the gauge Turn the crankshaft slightly in each direction until a stable read off is obtained The correct value for a new belt is 425 465 N and for ...

Page 59: ...e belt tension using a hexago nal key in the hexagonal socket in the roller C The correct tension for a new belt is 425 465 N and for a used belt 340 370 N When the tension is cor rect tighten the domed screws to 45 Nm and then recheck the belt tension 6 Tighten the mounting screws for the camshaft pul ley to the correct torque see Workshop manual Technical data and check that the belt tension is ...

Page 60: ...ce the belt if any fault is found 8 Install the timing belt over the crankshaft camshaft and fuel injection pump pulleys Ensure that the di rection arrows show a clockwise direction of rota tion when seen from the front 15A 04 A 9 Install the idler pulley and tighten to 43 Nm 10 Install the tension pulley in position and install the roller domed screw There are two threaded holes for the domed scr...

Page 61: ...r the adjustment hole in the camshaft cover Turn the crankshaft until the ad justment hole in the front of the camshaft corre sponds with the hole in the cover Install the adjust ment drifts 885037 in the camshaft and the flywheel 3 Remove the cap of the timing cover operation 15A 01 4 Slacken off and remove the nut for the fuel injection pump pulley Unscrew the mounting screws for the camshaft pu...

Page 62: ...that it does not move and tighten the nut to press the pulley into position 11 Check that the tooth with the correct marking see paragraph 2 is closest to the arrow on the timing cover B3 Install the two screws M6 x 50 through the smooth holes in the pulley and in the pump bracket 12 Install the timing belt operation 15A 04 Remove the fixing pin for the pulley and adjust the belt ten sion operatio...

Page 63: ...15A 04 7 Remove the mounting screws for the pulley and re move the pulley Remove the pulley hub B1 and the guide pin B2 8 Check the pulley for wear cracks and other dam age Replace it if required 9 Check that the guide pin B2 is in position on the camshaft Install the hub and the mounting screws but do not tighten the screw completely Install the pulley on the hub if necessary but do not tighten t...

Page 64: ...037 1 Disconnect the battery 2 Remove the screw over the adjustment hole in the camshaft cover Turn the crankshaft until the ad justment hole in the front of the camshaft corre sponds with the hole in the cover Install the adjust ment drifts 885037 in the camshaft and the flywheel 3 Remove the starter motor 4 Remove the crankshaft pulley operation 14A 01 5 Remove the cap of the timing cover operat...

Page 65: ...nt end of the crankshaft are dry and free of grease cleaning agent and external inhibitors 12 Apply a bead of Loctite 648 A3 in a complete cir cle internally in the hole in the pulley A4 6 5 mm from the rear end panel 13 Install the pulley on the crankshaft but do not align the keygroove 14 Spray Loctite 648 into the keygroove A2 in the pul ley Ensure that the pulley is pressed against the project...

Page 66: ...ed screws 36 Nm NOTE Loctite 648 starts to cure after seven min utes at 22 C It is important to tighten the these mounting screws within the given time limit 21 Install the timing belt operation 15A 04 Remove the fixing pin for the fuel injection pump pulley and adjust the belt tension operation 15A 03 22 Check the fuel injection pump adjustment opera tions 17A 03 23 Carefully turn the crankshaft ...

Page 67: ...es in the fuel injection pump pulley and in the pump bracket 7 Remove the timing belt operation 15A 04 8 Remove the fuel injection pump pulley operation 15A 05 and the camshaft pulley operation 15A 06 9 Unscrew the screws securing the timing cover to the cylinder head the cylinder block the fuel injec tion pump bracket and the oil pump Remove the timing cover A 10 Check the timing cover for cracks...

Page 68: ...d adjust the belt tension operation 15A 03 15 Remove the adjustment drifts from the camshaft and the flywheel 16 Check the fuel injection pump adjustment opera tions 17A 03 17 Turn the crankshaft two revolutions to ensure that there is nothing preventing free movement 18 Install the cap of the timing cover operation 15A 01 and install the inspection hatch 19 Install the screw in the adjustment hol...

Page 69: ...e oil and the engine coolant system 2 Remove the generator GEN drive belt the genera tor GEN and the mounting brackets see 22 3 Remove the starter motor operation 22B 01 4 Remove the crankshaft pulley operation 14A 01A 5 Remove the cap for the timing cover the timing belt belt pulleys and timing cover see section 15 6 Remove the oil pump and filter unit operation 18A 06 7 Remove the fuel filter in...

Page 70: ...are clear and clean Ensure that the plug is installed in the rear end of the pressure channel 19 If the cooler nozzle is not used install the mounting screws and washers to drain the oil hole and tighten the screws to 22 Nm 20 Install the fuel injection pump bracket Check that the guide pins A1 is correctly installed Tighten the mounting screws to 43 Nm 21 Install the crankshaft and if necessary t...

Page 71: ... Fill the oil pump to the correct level with an ap proved engine oil 37 Bleed the fuel injection system operation 19A 08 Cylinder block inspection 16A 02 1 Clean the coolant and lubrication channels 2 Check the cylinder block for cracks and other dam age The upper surface of the cylinder block cannot nor mally be machined because it affects the height of the pistons above the cylinder block surfac...

Page 72: ... but do not push the tool down into the cylinder bore until it has begun to operate 5 Allow the tool to operate and move it up and down in the cylinder bore once a second for 30 50 seconds Pull the tool up while it is rotating 6 Clean the cylinder bore carefully to remove all dirt from the machining use a hard brush and kerosene 7 Dry the cylinder bore and carefully remove all the covers used to p...

Page 73: ...lywheel cover and the camshaft cover the cylinder 1 piston should be in the Top dead center TDC position of the compression stroke The fuel injection pump pulley has two adjustment marks A and B and two keygrooves The key groove on the same side as the relevant adjustment mark must always be used Setting the fuel injection pump must always be checked after the timing belt tension has been ad juste...

Page 74: ... If both the adjust ment drifts can be installed the valve timing is cor rect If only one of the drifts can be installed adjust the valve timings as follows 1 If necessary remove the drift from the flywheel turn the crankshaft to align the adjustment hole in the crankshaft to the hole in the camshaft cover and in stall the adjustment drift for the camshaft 2 Remove the cap of the timing cover oper...

Page 75: ...A 01 Remove the ad justment drifts 2 Remove the plug and the washer from the center of the fuel injection pump rear plate and install the gauge Set the gauge so that it reads approximately 3 0 mm Ensure that there is sufficient play between the gauge and the oil filler pipe to allow for any ra dial movement in the pump 3 Turn the crankshaft slowly counter clockwise seen from the front of the engin...

Page 76: ... the screws for the bracket If the read off value is too high turn the pump coun ter clockwise as seen from the rear past the cor rect setting and then back clockwise to the correct position Tighten the flange nuts and the screws for the bracket Remove the adjustment drift from the flywheel and turn the crankshaft counter clockwise approximate ly 45 Check that the gauge still displays zero and che...

Page 77: ...too high This allows a certain amount of the oil on the output side to be returned to the intake side of the pump From the pump the oil passes through a filter mounted on the pump housing After the filter the oil passes into the pressure channel which is drilled the length of the cylinder block From the pressure channel the oil passe to the crankshaft main bearings and through the channels in the ...

Page 78: ...Remove the filter holder with a strap wrench or a similar tool Ensure that the adapter A1 remains in the filter head and discard the holder 3 Clean the filter head 4 Fill the new reservoir with fresh engine oil Give the oil time to fill the holder through the filter element 5 Lubricate the upper side of the filter holder gasket with fresh engine oil 6 Install the new filter holder hand tighten onl...

Page 79: ...ly the sealing compound on the ends of the re spective gasket halves and ensure that the ends are correctly mounted on each other Install the oil pan and ensure correct positioning using a mounting screw on each side Install the remaining screws and tighten all the screws to 22 Nm Install the drain plug and washer if required and tighten the plug to 43 Nm 6 Install the dipstick Connect the crankca...

Page 80: ... pipe 4 Install the suction pipe bracket loosely to the cor rect main bearing cap Install the suction pipe to the oil pump with a new O ring Tighten the screws Tighten the mounting screws for the suction pipe bracket ensure that the suction pipe is not subject ed to tension 5 Install the oil pan operation 18A 03 and fill it to MAX on the dipstick with an approved engine oil Oil screen and suction ...

Page 81: ...y 5 Remove the crankshaft pulley operation 14A 01A 6 Remove the cap of the timing cover operation 15A 01 7 Remove the timing belt pulleys and timing cover section 15 8 Remove the front key in the crankshaft 9 Unscrew the mounting screws for the oil pump in stages and evenly and in reverse order to that shown in the illustration D 10 Remove the oil pump A 11 Check that the mating surfaces of the oi...

Page 82: ...e screws in stages and even ly to the correct tightening torques see Workshop Manual Technical Data in the correct order D 16 Install the front stuffing box in the pump if neces sary see operation 14A 02 17 Install a new front key on the crankshaft 18 Install the timing cover operation 15A 08 19 Remove the pulleys and timing belt see section 15 Check the fuel injection pump adjustment opera tions ...

Page 83: ...tors and press the sealing ring out of the housing The pump is easier to install on the engine with the sealing ring uninstalled and the sealing ring can be installed on the installed pump see operation 14A 02 If necessary the sealing ring can be installed on the dismantled pump Ensure that the sealing lip is turned in towards the pump and that the sealing is inserted flat to the pump Use a suitab...

Page 84: ...e split pin the O ring A5 and the end plug if a hole has been drilled in it 5 Check that all the components are clean and lubri cate them with fresh engine oil Install a new O ring on the end plug 6 Install the piston in the sleeve with the open end of the piston turned inwards Install the spring over the lug on the end of the piston Install the end plug with the sprung end inserted in the cutout ...

Page 85: ...the shims above the spring The fuel injection equipment may only be checked and adjusted by personnel who have the necessary training The supply pump is the membrane type and is me chanically driven It is mounted on the right side of the camshaft cover and is driven by an eccentric cam on the camshaft The pump is equipped with a lever for hand pumping It is important that no contaminants enter the...

Page 86: ...tainer 2 Use a strap wrench or similar to remove the filter B 3 Ensure that the threaded adapter B1 is steady in the filter head and that the inside of the head is clean 4 Lightly lubricate the new holder top gasket with fresh fuel Install the new filter holder onto the filter head hand tighten only 5 Bleed the air from the fuel filter see operation 19A 10 NOTE It is extremely important that only ...

Page 87: ... seat gasket 5 Check that the injector guide ring C5 is in position in the cylinder head and install the new injector and seat gasket Check that the injector is not crooked Install the holder unit and the spacer with holder arms placed at right angles on the injector s projec tion Tighten the holder mounting screws to 43 Nm 6 Install the delivery lines and tighten the connector nuts to 18 Nm Hold ...

Page 88: ... from the pump lever 3 Unscrew the mounting screws and remove the sup ply pump A 4 Clean the sealing surfaces on the supply pump and camshaft cover and install the pump with a new gasket Install the mounting screws and tighten in stages and evenly to 22 Nm 5 Connect the fuel lines 6 Slacken off the bleed screw in the fuel filter head Hand pump with the lever on the supply pump to eliminate any air...

Page 89: ...the return spring Check the components for wear and other damage 7 Clean the valve housing thoroughly Install new seat washers B3 and slide the new valves B4 into po sition Because the valves are similar but one valve is installed in the opposite direction in relation to the others it is possible to install the valves up side down To ensure that the valves are installed correctly follow illustrati...

Page 90: ...ctly installed Install the screw of the cap and the sealing washer and tighten the screw Fuel supply pressure checking 19A 05 If there is fuel leakage through the hole in the pump housing 19A 04 C3 it means that the diaphragm is damaged If there is an oil leakage it means that the seal is damaged 1 Remove the outlet pipe for the fuel at the supply pump Install a manometer for 0 70 kPa to the out p...

Page 91: ... slackened off 6 Remove the screws holding the support bracket at the rear of the pump against the installation bracket 7 Remove the locknuts and remove the pump B ensure that the key does not fall out of the drive shaft NOTE If a new or repaired pump is to be installed the pump shaft should be installed in the correct po sition in relation to the engine with cylinder 1 at top dead center on the c...

Page 92: ... on the side of the pump and install the spacer under the screw Tighten the mounting screw to 12 Nm Tighten the nut for pump pulley to 60 Nm Check the fuel injec tion pump adjustment operations 17A 03 If the pump shaft is not secure Ensure that the tooth with the correct marking turned towards the arrow on the timing cover and install the adjustment drifts through the smooth holes in the pump pull...

Page 93: ...e The maximum idling speed is taken from the last section of the fuel injection pump setting code The setting code can be found on the type plate on the side of the fuel injection pump A typical setting code is 2643H000CE 1 3200 In this example the maximum idle speed is 3200 rpm If necessary this speed can be adjusted with the outer adjuster screw B2 Slacken off the locknut and turn the screw coun...

Page 94: ... injectors 4 Operate the starter motor until air free fuel is forced out of the delivery line connectors If a separate switch is used for the starter motor ensure that the switch for the engine electrical system is in the ON position at this moment 5 Tighten the delivery lines connections 6 The engine is now ready to be started If the engine runs as it should for a short period of time and then st...

Page 95: ...e intake side of the pump When the coolant temperature increases the ther mostat valve opens the by pass connection closes and the coolant passes through the heat exchanger In the heat exchanger the coolant passes along the outside of the pipes and is cooled by the sea water in the pipes The coolant then leaves the heat ex changer and enters the tank unit where it cools the exhaust manifold which ...

Page 96: ...D22 B TMD22P C TAMD22P B 5 Freshwater pump 6 Sea water pump 7 Outlet bend 8 Charge air cooler only TAMD22 1 Cylinder block 2 Thermostat 3 The combined coolant tank heat exchanger and exhaust manifold 4 Engine oil cooler MD22P TMD22 TAMD22 ...

Page 97: ...es to MD22A MD22L A TMD22A WARNING Do not drain coolant when the en gine is still warm and the system is pressu rized as dangerous hot coolant may spray out 1 Remove the coolant tank filler cap 2 Drain the coolant by removing the plug A1 on the starboard side of the engine block Ensure that the drain hole is not blocked by contaminants 3 Drain the heat exchanger manifold coolant tank assembly by r...

Page 98: ...sition as the coolant al ready being used in the system Coolant filling 20A 2 Applies to MD22A MD22L A TMD22A 1 Coolant filling 20A 2 Applies to MD22L B MD22P B TMD22 B TMD22P C TAMD22P B 1 Remove the bleed plug from the outlet connection for the coolant B2 2 Remove the filler cap B1 from the coolant tank and fill the tank with coolant to the level of the filler pipe 3 Install the ventilation plug...

Page 99: ...e to check that the sea water pump is empty 5 Connect the hoses and close the cock Sea water circuit draining 20A 03 Applies to MD22L B MD22P B TMD22 B TMD22P C TAMD22P B 1 Check that the seacock is closed 2 Disconnect both hoses from the sea water pump 3 Drain the water from the heat exchanger MD TMD through the cock C1 On the TAMD22 the water is drained through the cock D2 on the charge air cool...

Page 100: ...the new thermostat in position in the housing 6 Install the coolant outlet connection for the with a new gasket and tighten the mounting screws 7 Connect the upper hose and fill the coolant system with the correct coolant see the relevant manual Thermostat checking 1 Suspend the thermostat in a suitable container filled with water 2 Warm the water slowly Use a thermometer to measure at what water ...

Page 101: ...n the pump mating surfaces on the impeller side of the mounting holes B1 If the old mounting screws are to be used clean the threads of the screw which is to be installed at the 10 o clock position A1 and apply sealant to the thread Place the pump in position and tighten the mounting screws immediately after applying the sealant Tighten the screws evenly in stages using the correct torque see sect...

Page 102: ... Clean the mating surfaces on the pump housing and adapter plate 5 Clean the pump drive components and check them for wear Replace worn components if necessary If the flange has been removed from the camshaft tighten the flange screws to 9 Nm 6 Apply grease with a high melting point eg Shell Al vania R2 on the drive components and fill the in side of the drive housing 7 Align the cut out in the pu...

Page 103: ... to 41 Nm 6 Apply grease with a high melting point eg Shell Al vania R2 on the drive components and fill the in side of the drive housing 7 Install the pump on the engine with two screws A1 and A2 and install the belt At the correct tension it should be possible to press in the belt approxi mately 5 mm between the pulleys A torque wrench is required for making adjustments Place the square plug of ...

Page 104: ... the bearing housing with the lip against the side of the bearing Lubricate the sealing lip a little 13 Support the pump by the end of the cover and press the shaft and bearing unit into the bearing housing If the shaft and bearing unit is pressed in correctly the outer bearing should protrude 2 13 2 73 mm from the mating surface see illustration B 14 Slide the O ring B8 up on the shaft until it i...

Page 105: ...re clean 10 Press the bearing A9 on the shaft A11 The bear ings are permanently lubricated 11 Press the stuffing box A7 into position in the bear ing housing Lubricate the sealing lip a little 12 Support the pump by the end of the cover and press the shaft and bearing unit into the bearing housing Install the snap ring A10 13 Slide the O ring A8 up on the shaft until it is locat ed in the middle o...

Page 106: ...llation and adapter plate 4 Check the components for cracks or other damage 5 Remove the screws then remove the flange from the camshaft 6 Position the installation and adapter plate in place and install the mounting screws without tightening them 7 Position alignment tool 885038 A1 with the narrow diameter in the camshaft and the wider diameter in the adapter plate Tighten the mounting screws eve...

Page 107: ...ove the clamp and the oil cooler A from the suspension bracket 6 Check the components for signs of damage and re place if necessary 7 If the oil cooler and suspension bracket have been removed Hold the unit in position and install the two front mounting screws Install the rear mounting screw through the bracket to the main oil pump and the spacer sleeve into the cylinder block Ensure that the oil ...

Page 108: ...the oil pipes hose from the cooler 2 Make a mark on the flanges A1 and the coolant tank so that the flanges can be reinstalled in the same position 3 Remove the four mounting screws and remove the oil cooler 4 Check the components for signs of damage and re place if necessary 5 Reinstall the components in reverse order and con nect the oil lines 6 Run the engine and check that there is no leakage ...

Page 109: ...an the mating surfaces on the unit the cylinder head and the coolant pipes Check the components for signs of damage and re place if necessary If the heat exchanger insert needs replacing see operation 20A 11 8 Place a new manifold gasket in position over the guide pins in the cylinder head A1 You do not need to use any sealing compound Check that the gasket is correctly installed 9 Unscrew the scr...

Page 110: ...t tank replacement 20A 10 Applies to MD22L B MD22P B TMD22 B TMD22P C TAMD22P B 1 Drain the coolant circuit operation 20A 01 and the sea water circuit operation 20A 03 2 Remove the pipe to the oil cooler and all the con necting hoses 3 Remove the support bracket which is installed be tween the rear end of the bracket and the adapter housing for the reverse gear 4 Unscrew the screws which secure th...

Page 111: ...exchanger installed on the engine if the space behind or in front of the heat exchanger is at least 555 mm 1 Drain the coolant circuit operation 20A 01 and the sea water circuit operation 20A 03 2 Detach the support clamp which holds the output pipe from the heat exchanger to the bottom of the intake manifold Remove the outlet pipe 3 Remove the rubber ends by detaching the hose clamps 4 Press out ...

Page 112: ...utlet pipes to the heat exchanger The output pipe must be pushed in so that the end of the pipe is in the center of rubber end of the heat exchanger Tighten the clamp to the outlet pipe 12 Fill the coolant circuit operation 20A 02 and open the seacock 13 Run the engine and check for leakage If a rubber sleeve is used lubricate it with a little soap solution Place the sleeve end of the assembly in ...

Page 113: ...mage and re place if necessary 5 Install the components in reverse order There is only one way to install the insert and cover 6 Run the engine and check for leakage Remove the charge air cooler assembly from the heat exchanger Remove the cover and the plugs B1 and B2 Press the insert out of the heat ex changer 3 Check that the holes in the pipes are clean If there are hard deposits or contaminant...

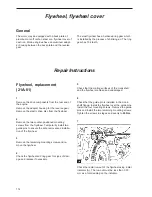
Page 114: ... counter positioned mounting screws from the flywheel Temporarily install two guide pins to ensure the safe removal and installa tion of the flywheel 3 Remove the remaining mounting screws and re move the flywheel 4 Check the flywheel and ring gear for signs of dam age and replace if necessary 5 Check that the mating surfaces of the crankshaft and the flywheel are clean and undamaged 6 Check that ...

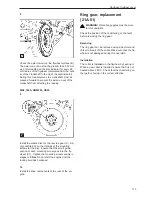
Page 115: ... the small guide section of each mounting screw goes into the fly wheel C1 Tighten the mounting screws evenly in stages to 9 Nm Do not start the engine until the locking fluid has hardened 10 Install the drive components at the rear of the en gine Ring gear replacement 21A 01 WARNING Protective goggles must be worn for this operation Check the position of the chamfering on the teeth before removin...

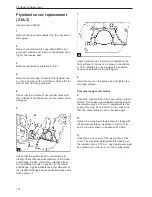
Page 116: ...e outer diameter of the crankshaft flange and the protective sleeve with fresh engine oil 7 Apply a continuous 1 5 mm line of sealant on the front surface of the cover as shown in illustration A This operation is not necessary if a separate housing is installed for the stuffing box 8 Install the cover on the guide pins and tighten the mounting screws Only reverse gear and S drive 9 Check the conce...

Page 117: ...ed in the housing Install the adapter housing for the reverse gear and tighten the mounting screws to 43 Nm Check the concen tricity of the housing C and the axial run out D in the same way as in points 5 and 7 above Install the support plate for the manifold 13 Install the starter motor operation 22B 01 Install the drive components from the rear of the engine ...

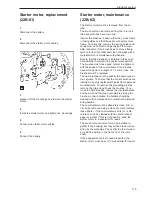
Page 118: ...r motor is kept in the engaged po sition These starter motors are equipped with needle bearings to allow for higher loads Glow plugs The starting aid for these engines consists of a set of glow plugs one for each cylinder The glow plugs are installed in the cylinder head next to the injectors The tip of the glow plug pro trudes into the combustion chamber in the piston when the piston is at TDC Th...

Page 119: ...been checked for the correct polarity and voltage Do not check whether a cable is carrying cur rent by seeing if it sparks as this may damage the transistors Removing 1 Disconnect the electrical connections at the genera tor 2 Detach the generator mounting from the pivot mounting and the mountings for the adjuster link 3 Slacken off the belt tension and remove the belt 4 Remove the adjuster link f...

Page 120: ...llowing action must be taken 1 Check that the battery is charged 2 Connect a good quality voltmeter with a range of 0 50 V across the generator and the negative termi nals If an ammeter is not connected in the circuit Con nect a good quality ammeter with a range of 0 100 A to the lead between the generator and the battery positive terminal 3 Turn the switch for the warning lamp to the ON po sition...

Page 121: ...f the commutator If the brushes have worn down to a length of 3 5 mm or less the brushes must be replaced The new brushes must be exactly the same type as the originals To ensure that the correct brushes are installed use only replacement parts from approved manufacturers To remove the grounding brushes remove the clip and pull back the brushes To re move the field brushes remove the insulation pl...

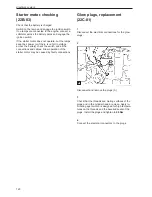
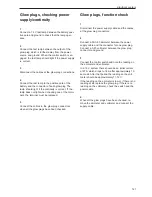
Page 122: ...ss the battery check the switch and all the connections and cables Slow operation of the starter motor may be caused by faulty connections Glow plugs replacement 22C 01 1 Disconnect the electrical connections for the glow plugs 2 Disconnect and remove the plugs A 3 Check that the threads and mating surfaces of the plugs and in the cylinder head are clean Apply lu bricating agent which is designed ...

Page 123: ...cables to the glow plug connectors when all the glow plugs have been checked Glow plugs function check 1 Disconnect the power supply cable and the cables at the glow plug connectors 2 Connect a 50 0 50 ammeter between the power supply cable and the connector for one glow plug Connect a 0 20 voltmeter between the glow plug connector and ground 3 Connect the control switch and note the reading on th...

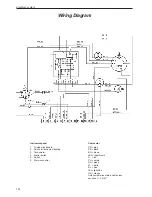
Page 124: ...ch for instrument lighting 3 Tachometer 4 Starter button 5 Button 5 Alarm connector Cable color GR gray SB black BN brown LBN light brown R red PU purple GN green W white BL blue LBL light blue OR orange Unless otherwise stated cable cross sections 1 5 mm2 Wiring Diagram ...

Page 125: ...lectrical system Instrument panel 1 Voltmeter 2 Oil pressure gauge 3 Engine coolant temperature gauge 4 Printed circuit board 5 Button 6 Switch for instrument lighting 7 Tachometer 8 Ignition switch 9 Alarm ...

Page 126: ...2 Coolant temperature switch 3 Oil pressure sensor 4 Pre heating 5 Relay 6 Ground fuse 7 Fuses Cable color GR gray SB black BN brown LBN light brown R red PU purple GN green W white BL blue LBL light blue OR orange Unless otherwise stated cable cross sections 1 5 mm2 ...

Page 127: ...ger TC to pre vent dirt etc from getting in 7 Install covers in the ends of the lines and over the openings in the manifold or in the coolant tank heat exchanger manifold unit 8 Check the air hoses and the oil return hose for cracking or other damage and replace if necessary 9 Remove and clean the oil return line if installed 10 Remove the protective covers from the compo nents 11 Check the turboc...

Page 128: ...re The engine must be run at low speed for 3 or 4 minutes to start the oil circulating before the engine speed is increased Boost pressure control valve checking If the by pass valve in the boost pressure control valve does not open at the correct pressure this will affect the performance of the engine A low pressure setting can cause black exhaust emissions at the marked engine speed and power lo...

Page 129: ...127 Notes ...

Page 130: ...128 Notes ...

Page 131: ...of this page write your comments down and post it to us The address is at the bottom of the page We would prefer you to write in English or Swedish From Refers to publication Publication no Issued Suggestion reasons Date Name AB Volvo Penta Customer Support Dept 42200 SE 405 08 Gothenburg Sweden ...

Page 132: ...7738684 5 English 04 1999 ...

Reviews: