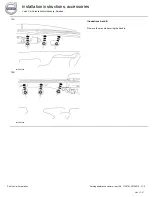
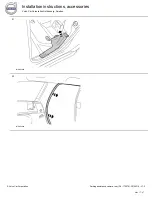
background image

Equipment

IMG-242205

IMG-345497

IMG-239664

IMG-239660

IMG-239981

IMG-326754

IMG-326756

IMG-326757

IMG-352231


IMG-328933


Installation instructions, accessories


Volvo Car Corporation Gothenburg, Sweden


© Volvo Car Corporation

Parking assistance, camera, rear, (Ch -175378)- 30756319 - V1.2

Side 2 / 87

Summary of Contents for 30756314

Page 1: ...175378 IMG 302783 Instruction No Version Part No 30756319 1 2 30756314 31201135 Parking assistance camera rear Ch 175378 IMG 302783 Installation instructions accessories Volvo Car Corporation Gothenbu...

Page 2: ...IMG 239660 IMG 239981 IMG 326754 IMG 326756 IMG 326757 IMG 352231 IMG 328933 Installation instructions accessories Volvo Car Corporation Gothenburg Sweden Volvo Car Corporation Parking assistance cam...

Page 3: ...IMG 302785 Installation instructions accessories Volvo Car Corporation Gothenburg Sweden Volvo Car Corporation Parking assistance camera rear Ch 175378 30756319 V1 2 Side 3 87...

Page 4: ...IMG 328934 Installation instructions accessories Volvo Car Corporation Gothenburg Sweden Volvo Car Corporation Parking assistance camera rear Ch 175378 30756319 V1 2 Side 4 87...

Page 5: ...ry text is also given for more complicated steps In the event of any problems with the instructions or the accessory contact your local Volvo dealer Note Some steps in these installation instructions...

Page 6: ...2 IMG 291603 3 IMG 291604 Installation instructions accessories Volvo Car Corporation Gothenburg Sweden Volvo Car Corporation Parking assistance camera rear Ch 175378 30756319 V1 2 Side 6 87...

Page 7: ...lustrations A and B Detach the panel s lower outer and inner ends from the lower panel and pull it from the clip at the sides Repeat the operation on the other side Installation instructions accessori...

Page 8: ...rstrip tool until the clips release Place the panel to one side 7 IMG 302983 Remove the panel for the boot lid s lock Installation instructions accessories Volvo Car Corporation Gothenburg Sweden Volv...

Page 9: ...B IMG 302985 Illustrations A and B Carefully pry off the lighting detach the connector and place to one side Installation instructions accessories Volvo Car Corporation Gothenburg Sweden Volvo Car Cor...

Page 10: ...Carefully pry off the connector from the panel using a weatherstrip tool Unplug the connector from the contact and place to one side Installation instructions accessories Volvo Car Corporation Gothenb...

Page 11: ...nel off carefully insert a pair of flat nosed pliers press the locking pin s hooks together and pull the locking pin out Continue to pull the panel down carefully until the four upper clips release In...

Page 12: ...Illustrations A and B Remove the six nuts securing the handle Installation instructions accessories Volvo Car Corporation Gothenburg Sweden Volvo Car Corporation Parking assistance camera rear Ch 175...

Page 13: ...to one side New handle can be found in the kit 14 IMG 281472 Carefully pry off the rear roof panel at the rear edge until the clip on the inside releases and then pull backward Place the panel to one...

Page 14: ...old the boot lid s sill at the crossmember a few turns Carefully pull off the trunk lid s sill panel The panel is secured by six clips Installation instructions accessories Volvo Car Corporation Gothe...

Page 15: ...on the other side 18 IMG 328944 Applies to cars with electrically heated seat cushions Disconnect the connectors by the sides at the rear edge of the seat cushion Installation instructions accessories...

Page 16: ...per edge until the hooks 1 release Then pull it inwards slightly until the hook 2 releases and upwards until the locating pin 3 disengages from the mounting at the rear edge Installation instructions...

Page 17: ...21 IMG 303083 22 IMG 303084 Installation instructions accessories Volvo Car Corporation Gothenburg Sweden Volvo Car Corporation Parking assistance camera rear Ch 175378 30756319 V1 2 Side 17 87...

Page 18: ...rom the roof panel 24 IMG 303104 Take the angled end of a scriber and pull off the cover washers for the screws for the load securing eyelets Remove the screws for the load securing eyelets and the sc...

Page 19: ...car body Lift up the panel and pull it to one side The panel is secured by six clips 26 IMG 328958 Take the camera new handle and screws from the kit Tighten the camera to the handle Installation ins...

Page 20: ...dle was 28 IMG 328959 Pull the cable harness through the right hand hole in the boot lid Connect the cable harness connector to the camera Ensure that the catch engaged again properly Installation ins...

Page 21: ...amera into the hole on the right side of the boot lid Connect the connector on the left hand side and press the handle into place Installation instructions accessories Volvo Car Corporation Gothenburg...

Page 22: ...he rear window towards the right hand side of the boot lid Route it along the right hand side of the boot lid window up to the upper edge of it clamp it using a cable tie from the kit and pieces of bu...

Page 23: ...h clips into the drilled holes Press the cable into a piece of butyl tape above the right hand hole for the panel s clips so that it does not get trapped when the panel is reinstalled Tighten the cabl...

Page 24: ...the hole in the boot lid and out through the hole in which the rubber grommet was located Note Reinforcements are located on the inside upper edge of the boot lid which can become blocked Therefore f...

Page 25: ...the connector and a piece of the cable at the wire Lubricate the taped connector with low temperature grease Note The low temperature grease must not contain water Remove the tape and wire spring Ins...

Page 26: ...he connector until a click is heard Press the catch securely into the receptacle housing Note The components are small and fragile so take care when aligning the connector and receptacle housing with...

Page 27: ...sure that the cable does not chafe against the panel edge in the body where it exits the rubber grommet in its right hand mounting Insert a piece of wire under the rear edge on the load floor support...

Page 28: ...e and under the fuse holder 43 IMG 298164 Bend off the covers over the seat s attachments and remove the screws Installation instructions accessories Volvo Car Corporation Gothenburg Sweden Volvo Car...

Page 29: ...ont floor mat at the trailing edge 45 IMG 297972 Remove the rear sill panel at the left front door by first prying loose the clips starting at the front and working back Unhook the panel at the rear e...

Page 30: ...loose the panel with air blower all round The panel is secured by five clips on the sides and at the top and with four mounting springs on the lower edge Installation instructions accessories Volvo C...

Page 31: ...small screwdriver in the gap on the media player Press in the inner catch and carefully pry off the surround on one side using a weatherstrip tool Repeat on the other side and remove it Installation...

Page 32: ...of the panel 51 IMG 303365 Push in the catches on the cover fold it downwards and remove Installation instructions accessories Volvo Car Corporation Gothenburg Sweden Volvo Car Corporation Parking ass...

Page 33: ...IMG 282530 Remove the three remaining screws from the reverse of the centre console Installation instructions accessories Volvo Car Corporation Gothenburg Sweden Volvo Car Corporation Parking assista...

Page 34: ...edge The side panel is secured with five clips on the inside 55 IMG 282533 Fold the floor mat to one side by the left hand side of the tunnel console Installation instructions accessories Volvo Car Co...

Page 35: ...t the connectors for the CCM 57 IMG 282544 Loosen the connector to the keypad for CCD if the car is equipped with this Installation instructions accessories Volvo Car Corporation Gothenburg Sweden Vol...

Page 36: ...sion 59 IMG 296140 Release the shift lock function Move the gear selector to position D Installation instructions accessories Volvo Car Corporation Gothenburg Sweden Volvo Car Corporation Parking assi...

Page 37: ...by two clips along the long sides and four hooks around the gear lever s panel Lift it up slightly and make sure that all cables are free from the gear lever carrier and components in the tunnel cons...

Page 38: ...r out slightly and unplug the connectors on the rear side Place the CD player to one side 63 IMG 303384 Installation instructions accessories Volvo Car Corporation Gothenburg Sweden Volvo Car Corporat...

Page 39: ...the front edge of the storage compartment which holds the tunnel console at the body Installation instructions accessories Volvo Car Corporation Gothenburg Sweden Volvo Car Corporation Parking assista...

Page 40: ...IMG 275076 Illustrations A and B Remove the screws that hold the tunnel console at the dashboard s bracket on both sides Installation instructions accessories Volvo Car Corporation Gothenburg Sweden V...

Page 41: ...ne end of the mounting bracket so that the entire centre console moves backwards a few centimetres until the bracket engages the air ducts on both sides Installation instructions accessories Volvo Car...

Page 42: ...crews for the display can be accessed Note Ensure that the two locating pins small image exit their holes and are not bent when the panel is bent backwards If necessary press the tunnel and centre con...

Page 43: ...t the two connectors from the display and place them to one side Note The cables may be short Installation instructions accessories Volvo Car Corporation Gothenburg Sweden Volvo Car Corporation Parkin...

Page 44: ...n the boot lid under the insulation mat at the existing cable duct and to the door opening in the left hand rear door Illustration B Pull out the B post panel at the lower edge until the two clips rel...

Page 45: ...in front of the air ducts and out on the other side If necessary use a piece of wire to route the cables through 77 IMG 329255 Applies to right hand drive cars Note Check that the correct connector is...

Page 46: ...ill be installed later on Pull up the shorter ground lead 2 from the mat joint so that approximately 350 mm 13 3 4 protrudes from the mat joint Continue to route the longer of the ground leads the sam...

Page 47: ...not at risk of being trapped or cut by sharp edges or similar 81 IMG 329260 Clamp the ground cable using cable ties at the rear edge of the cable duct Press two cable ties with edge clips in the brac...

Page 48: ...pieces of silver or woven tape along the rear crossmember and to the floor Note The ground lead must only be taped at the rear crossmember it must not be secured by the thick cable harness Installatio...

Page 49: ...ground screw Tighten to 10 Nm 7 5 lbf ft 85 IMG 329261 Cut off the cable terminal on the short ground lead in cable harness C A new cable terminal is in the kit Installation instructions accessories V...

Page 50: ...Red 0 5 1 0 6 Blue 1 0 2 5 7 Yellow 4 0 6 0 7 Splice the black ground lead in cable harness C and the cable splice from the kit Illustration B Strip the the cable end in accordance with the above tabl...

Page 51: ...Note Make sure that the cable insulation does not come into the press area of the sleeve or that the stripped part or the cable extends outside of the sleeve Illustrations B and C Press the legs of th...

Page 52: ...he crimping sleeve be securely crimped around the cable You should be able to see that a little bit of glue has been forced out around the cable Illustration B 89 IMG 329262 Applies to all models Take...

Page 53: ...Take special tool part no 9512637 and carefully press into the hole above the cable terminal in position 1 to release the catch Pull out the existing black cable Installation instructions accessories...

Page 54: ...tor Press the connector s catch securely into place 93 IMG 329266 Insulate and tape the excess cable terminal at the connector s cable harness Installation instructions accessories Volvo Car Corporati...

Page 55: ...329272 take control module bracket and two screws from the kit Tighten the control module to the bracket Installation instructions accessories Volvo Car Corporation Gothenburg Sweden Volvo Car Corpora...

Page 56: ...wer hole 97 IMG 329274 Take the control module with bracket and connect all pre routed cables to it Installation instructions accessories Volvo Car Corporation Gothenburg Sweden Volvo Car Corporation...

Page 57: ...ioned and bent at the connectors If necessary insert any excess inside the floor mat 99 IMG 329276 Install the control module with bracket using screws from the kit Installation instructions accessori...

Page 58: ...100 IMG 298584 101 IMG 298586 Installation instructions accessories Volvo Car Corporation Gothenburg Sweden Volvo Car Corporation Parking assistance camera rear Ch 175378 30756319 V1 2 Side 58 87...

Page 59: ...ole on the right hand side in the compartment where the display is to be positioned Tape the connector and a piece of the cable s at the spring wire Route the cable s on the right hand side in the com...

Page 60: ...ioned Tape the connector and a piece of the cable at the wire spring Route the cable s on the left hand side in the compartment where the media player was located Pull the cable s forward 104 IMG 3522...

Page 61: ...new display can be installed Note Ensure that the two locating pins small image exit their holes and are not bent when the panel is bent backwards If necessary press the tunnel and centre console bac...

Page 62: ...outed cable for the power supply to display 108 IMG 352256 Connect the connector on the routed cable to display Installation instructions accessories Volvo Car Corporation Gothenburg Sweden Volvo Car...

Page 63: ...the display Note Do not damage the display and panel 110 IMG 303888 Move the panel back into place and ensure that the locating pins enter their holes Installation instructions accessories Volvo Car...

Page 64: ...cers 112 IMG 303890 Move the centre console back into position Installation instructions accessories Volvo Car Corporation Gothenburg Sweden Volvo Car Corporation Parking assistance camera rear Ch 175...

Page 65: ...G 303891 114A IMG 303892 114B IMG 303893 Installation instructions accessories Volvo Car Corporation Gothenburg Sweden Volvo Car Corporation Parking assistance camera rear Ch 175378 30756319 V1 2 Side...

Page 66: ...115 IMG 303894 116 IMG 303895 Installation instructions accessories Volvo Car Corporation Gothenburg Sweden Volvo Car Corporation Parking assistance camera rear Ch 175378 30756319 V1 2 Side 66 87...

Page 67: ...117 IMG 303896 118 IMG 303897 Installation instructions accessories Volvo Car Corporation Gothenburg Sweden Volvo Car Corporation Parking assistance camera rear Ch 175378 30756319 V1 2 Side 67 87...

Page 68: ...Place it at the upper edge and secure it with clips at the rear edge Secure the panel in the centre console Make sure that all clips engage 120 IMG 282559 Installation instructions accessories Volvo...

Page 69: ...o all cars that have a pre mounted display 122 IMG 282561 Installation instructions accessories Volvo Car Corporation Gothenburg Sweden Volvo Car Corporation Parking assistance camera rear Ch 175378 3...

Page 70: ...the tunnel console Connect the remaining connectors to each other Wrap foam tape around the loose connectors and position them inside the mats so that they do not move Secure the long cables at the e...

Page 71: ...125 IMG 303966 126 IMG 282566 Installation instructions accessories Volvo Car Corporation Gothenburg Sweden Volvo Car Corporation Parking assistance camera rear Ch 175378 30756319 V1 2 Side 71 87...

Page 72: ...127 IMG 282564 128 IMG 282565 Installation instructions accessories Volvo Car Corporation Gothenburg Sweden Volvo Car Corporation Parking assistance camera rear Ch 175378 30756319 V1 2 Side 72 87...

Page 73: ...own the air nozzle and unhook it from the four mounting eyelets at the lower edge of the panel 130 IMG 303985 Poke the catches on the hazard warning button in and push the button out Place the panel t...

Page 74: ...131 IMG 303987 132 IMG 303988 Installation instructions accessories Volvo Car Corporation Gothenburg Sweden Volvo Car Corporation Parking assistance camera rear Ch 175378 30756319 V1 2 Side 74 87...

Page 75: ...ure the panel Make sure that all air nozzles align correctly in the air ducts in the dashboard and that all clips and catches engage Installation instructions accessories Volvo Car Corporation Gothenb...

Page 76: ...l the tunnel console s panel on both sides 136 IMG 255787 Installation instructions accessories Volvo Car Corporation Gothenburg Sweden Volvo Car Corporation Parking assistance camera rear Ch 175378 3...

Page 77: ...137 IMG 304003 138 IMG 304005 Installation instructions accessories Volvo Car Corporation Gothenburg Sweden Volvo Car Corporation Parking assistance camera rear Ch 175378 30756319 V1 2 Side 77 87...

Page 78: ...139 IMG 304007 140 IMG 304008 Installation instructions accessories Volvo Car Corporation Gothenburg Sweden Volvo Car Corporation Parking assistance camera rear Ch 175378 30756319 V1 2 Side 78 87...

Page 79: ...141 IMG 304009 142 IMG 268064 Installation instructions accessories Volvo Car Corporation Gothenburg Sweden Volvo Car Corporation Parking assistance camera rear Ch 175378 30756319 V1 2 Side 79 87...

Page 80: ...8944 Applies to cars with electrically heated seat cushions Installation instructions accessories Volvo Car Corporation Gothenburg Sweden Volvo Car Corporation Parking assistance camera rear Ch 175378...

Page 81: ...68107 Applies to all models 146 IMG 304010 Installation instructions accessories Volvo Car Corporation Gothenburg Sweden Volvo Car Corporation Parking assistance camera rear Ch 175378 30756319 V1 2 Si...

Page 82: ...147 IMG 304011 148 IMG 304012 Installation instructions accessories Volvo Car Corporation Gothenburg Sweden Volvo Car Corporation Parking assistance camera rear Ch 175378 30756319 V1 2 Side 82 87...

Page 83: ...ar is equipped with a KV antenna connect its connector Secure the panel and ensure that all clips have engaged 150A IMG 304014 150B IMG 304015 Applies to cars with electric opener for boot lid Install...

Page 84: ...plies to all models 152A IMG 304017 152B IMG 304018 Installation instructions accessories Volvo Car Corporation Gothenburg Sweden Volvo Car Corporation Parking assistance camera rear Ch 175378 3075631...

Page 85: ...irst pressing the upper edge and then the sides at the same time as aligning the lower panel Note Make sure that the clips align with their holes 154 IMG 291605 Installation instructions accessories V...

Page 86: ...6 IMG 332195 Set the ignition switch to position II Installation instructions accessories Volvo Car Corporation Gothenburg Sweden Volvo Car Corporation Parking assistance camera rear Ch 175378 3075631...

Page 87: ...accessories catalogue for article number on software 158 Calibrate according to DIAGNOSTICS VEHICLE COMMUNICATION Advanced PAC Service calibration parking camera Installation instructions accessories...

Reviews: