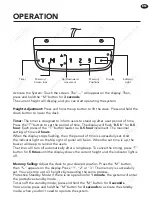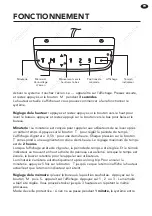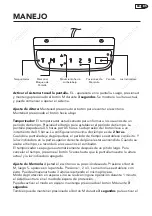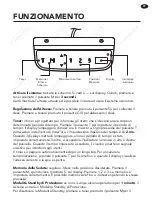
Activate the System: Touch the screen. The”---” will appear on the display. Then,
press and hold the “M” button for
3 seconds
.
The current height will display, and you can start operating the system.
Height Adjustment:
Press and hold the up button to lift the desk. Press and hold the
down button to lower the desk.
Timer:
The timer is designed to inform users to stand up after a set period of time.
Press the “T” button to set the period of time. The display will flash “
0.5 h
” for
0.5
hour
. Each press of the “T” button leads to a
0.5 hour
increment. The maximal
setting of time is
2 hours
.
When the display stops flashing, then the period of time is successfully set. And
the indicator light on the top right of panel will be on. When the set time is up, the
buzzer will beep to remind the users.
The timer will turn off automatically after a long beep. To cancel the timing, press “T”
button for
5 times
until the display shows the current height and the indicator light is
off.
Memory Selling:
Adjust the desk to your desired position. Press the “M” button,
then “S-” appears on the display. Press “1”, “2” or “3”. The memory is successfully
set. You can store up to 3 heights by repeating the same process.
Protective Standby Mode: If there is no operation for
1 minute
, the system will enter
the protective standby mode.
To turn off the standby mode, press and hold the “M” button for
3 seconds
.
You can also press and hold the “M” button for
3 seconds
to activate the standby
mode, when you don’t need to operate the system.
OPERATION
Timer
Up/Downward
movement
Memory/
Screen lock
Memory
Positions
Display
Indicator
Light
EN
Summary of Contents for 3000102
Page 1: ...ELECTRONIC SIT STAND DESK FRAME 3000102 GREY 3000130 WHITE Instruction Manual 01 0818 ...
Page 2: ...Safety Instructions 1 Components 2 Assembly 3 10 Warranty 11 CONTENTS ...
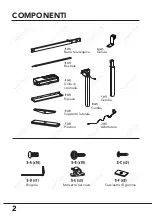
Page 4: ...2 COMPONENTS ...
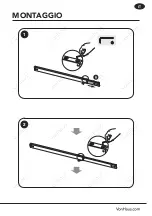
Page 5: ...ASSEMBLY 1 2 ENG ...
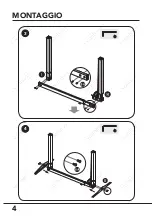
Page 6: ...ASSEMBLY 4 3 4 ...
Page 7: ...ASSEMBLY 5 6 ENG ...
Page 8: ...6 ASSEMBLY 7 8 ...
Page 9: ...ASSEMBLY 9 10 11 ENG ...
Page 10: ...ASSEMBLY 12 13 8 ...
Page 11: ...ASSEMBLY 14 15 ENG ...
Page 12: ...ASSEMBLY 10 ASSEMBLY 16 17 DESKTOP SKU 3000131 NOT SUPPLIED NEEDED FOR THESE STEPS ...
Page 15: ...Consignes de sécurité 1 Pièces 2 Assemblage 3 10 Garantie 11 SOMMAIRE FR ...
Page 18: ...ASSEMBLAGE 1 2 ...
Page 19: ...ASSEMBLAGE 4 3 4 FR ...
Page 20: ...ASSEMBLAGE 5 6 ...
Page 21: ...6 ASSEMBLAGE 7 8 FR ...
Page 22: ...ASSEMBLAGE 9 10 11 ...
Page 23: ...ASSEMBLAGE 12 13 8 FR ...
Page 24: ...ASSEMBLAGE 14 15 ...
Page 25: ...ASSEMBLAGE 10 16 17 Bureau UGS 3000131 NON FOURNI NÉCESSAIRE POUR CES ÉTAPES FR ...
Page 28: ...Sicherheitshinweise 1 Komponenten 2 Versammlung 3 10 Garantie 11 INHALT ...
Page 31: ...ZUSAMMENBAU 1 2 DE ...
Page 32: ...ZUSAMMENBAU 4 3 4 ...
Page 33: ...ZUSAMMENBAU 5 6 DE ...
Page 34: ...6 ZUSAMMENBAU 7 8 ...
Page 35: ...ZUSAMMENBAU 9 10 11 DE ...
Page 36: ...ZUSAMMENBAU 12 13 8 ...
Page 37: ...ZUSAMMENBAU 14 15 DE ...
Page 38: ...ZUSAMMENBAU 10 16 17 DESKTOP SKU 3000131 NICHT LIEFERBAR FÜR DIESE SCHRITTE BENÖTIGT ...
Page 41: ...Instrucciones de seguridad 1 Componentes 2 Montaje 3 10 Garantía 11 CONTENIDO ESP ...
Page 44: ...MONTAJE 1 2 ...
Page 45: ...MONTAJE 4 3 4 ESP ...
Page 46: ...MONTAJE 5 6 ...
Page 47: ...6 MONTAJE 7 8 ESP ...
Page 48: ...MONTAJE 9 10 11 ...
Page 49: ...MONTAJE 12 13 8 ESP ...
Page 50: ...MONTAJE 14 15 ...
Page 51: ...MONTAJE 10 16 17 ESCRITORIO SKU 3000131 NO SUMINISTRADO NECESARIO PARA ESTOS PASOS ESP ...
Page 54: ...Istruzioni di sicurezza 1 Componenti 2 Montaggio 3 10 Garanzia 11 INDICE ...
Page 57: ...MONTAGGIO 1 2 IT ...
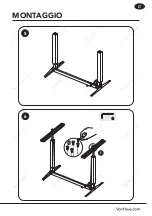
Page 58: ...MONTAGGIO 4 3 4 ...
Page 59: ...MONTAGGIO 5 6 IT ...
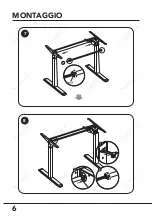
Page 60: ...6 MONTAGGIO 7 8 ...
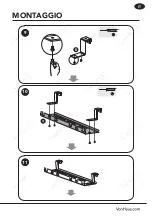
Page 61: ...MONTAGGIO 9 10 11 IT ...
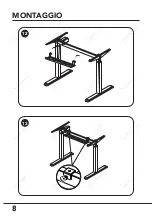
Page 62: ...MONTAGGIO 12 13 8 ...
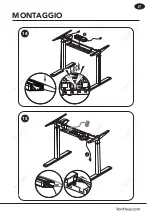
Page 63: ...MONTAGGIO 14 15 IT ...
Page 64: ...MONTAGGIO 10 16 17 DESKTOP SKU 3000131 NON FORNITO NECESSARIO PER QUESTI PASSAGGI ...


