Please read all instructions carefully
before use and retain for future
reference.
WARNING!
Do not exceed the
maximum stated load capacity of
8kg/17.6lbs x4.
Installing appliances
heavier than recommended may
result in damage or serious injury.
Suitable for screens up to
32 inches
in size.
CAUTION:
To ensure continued
safety, check the unit is secure and
safe to use at regular intervals (every
3 months) take appropriate action to
rectify any unstable or unsafe units.
Appropriate safety gear and
precautions must be taken when
installing this unit.
This unit is not a toy. Children should
not be allowed to play with the unit.
Children should be supervised at all
times around this unit.
This unit contains small parts and
components, which pose a choking
hazard to children and animals. Keep
these parts clear from children and
pets.
Ensure the supporting surface will
safely support the combined weight
of the equipment and all hardware
and supporting components before
installation. If unsure, contact a
qualified contractor for guidance.
Do not over tighten the mounting
Screws.
This unit is intended for indoor use
only.
If you do not understand these
directions, or have any doubts
regarding the safety of the
installation, please seek advice and
guidance from a qualified contractor.
Check the contents of the packaging
against this manual to ensure there
are no missing or defective parts.
Never use defective parts.
Improper installation may cause
damage or serious injury.
Install only as instructed within this
manual. Any deviation or short-cut
may lead to improper installation,
incorrect assembly or be considered
customer misuse.
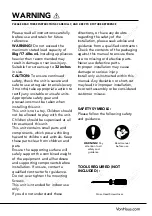
WARNING
PLEASE READ THESE INSTRUCTIONS CAREFULLY, AND KEEP FOR FUTURE REFERENCE
WARNING!
Pay
attention to all
safety and
guidance
Read manual
before use
SAFETY SYMBOLS:
TOOLS REQUIRED (NOT
INCLUDED) :
Please follow the following safety
and guidance.
Cross-Head Screwdriver
Summary of Contents for 3000113
Page 1: ...QUAD MONITOR MOUNT 3000113 Instruction Manual 01 0718 ...
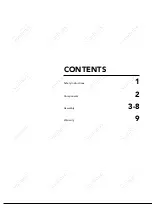
Page 2: ...CONTENTS Safety Instructions 1 Components 2 Assembly 3 8 Warranty 9 ...
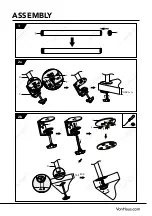
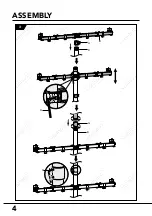
Page 5: ...C L I N 10 8 8mm D ASSEMBLY 1 2a 2b P M C L 10 88m m D ...
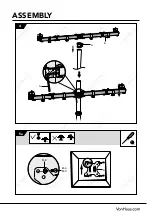
Page 6: ...ASSEMBLY 4 3 D G O H B D Q ...
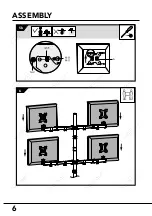
Page 7: ...M A M C M E TV TV TV A ASSEMBLY 4 5a H Q B ...
Page 8: ...6 ASSEMBLY 5b 6 ...
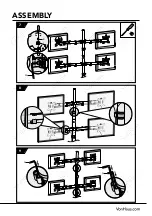
Page 9: ...ASSEMBLY 7 8 9 1 K J Q 2 P Q O ...
Page 10: ...ASSEMBLY 8 10 11 Q 45 45 360 45 45 360 45 45 360 45 45 360 ...


