background image

MOUNTING TO THE TABLE

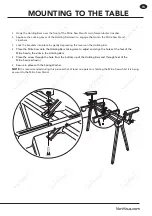
•  Hook the Holding Bars over the front of the Mitre Saw Stand’s main frame tubular crossbar. 

•  Squeeze the Locking Lever of the Holding Bar down to engage them onto the Mitre Saw Stand  


 crossbars. 

•  Lock the brackets into place by gently depressing the levers on the Holding Bar. 

•  Place the Mitre Saw onto the Holding Bars, taking care to adjust and align the holes at the feet of the  
 

Mitre Saw to the slots in the Holding Bars.

•  Place the screw through the hole from the bottom up of the Holding Bars and through feet of the    
 

Mitre Saw (as shown).

•  Secure in place with the Spring Washer.

NOTE

 It is recommended during this process that at least one person is holding the Mitre Saw whilst it is being  

secured to the Mitre Saw Stand.

EN

Summary of Contents for 3500103

Page 1: ...MITRE SAW STAND 3500103 Instruction Manual EN...

Page 2: ...CONTENTS Safety Instructions 1 Components 2 Assembly 3 Assembly 4 Mounting to the Stand 5 Warranty 6...

Page 3: ...or serious injury Do not use power tools for assembly These can cause damage to the product and impair future use and stability Do not over tighten any parts during assembly as this will damage the u...

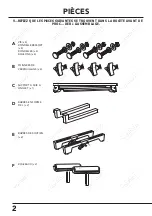
Page 4: ...URE THE FOLLOWING COMPONENTS ARE IN THE BOX BEFORE PROCEEDING WITH ASSEMBLY SCREWS x4 SPRING WASHERS x4 WASHERS x4 BOLTS x4 C A MITRE SAW STAND x1 D L SHAPED BARS x2 E HOLDING BARS x2 F ROLLERS x2 B L...

Page 5: ...the Mitre Saw Stand upright 4 Loosen by turning anti clockwise the Locking Grips on either ends of the Mitre Saw Stand to allow enough space to slide the L Shaped Roller Bar Holders into Tighten by tu...

Page 6: ...andle will secure the Holding Bar onto the stand IMPORTANT Check all Screws Bolts and Locking Grips are secure and that the Mitre Saw Stand is sturdy before use IMPORTANT Do not over tighten any compo...

Page 7: ...ers on the Holding Bar Place the Mitre Saw onto the Holding Bars taking care to adjust and align the holes at the feet of the Mitre Saw to the slots in the Holding Bars Place the screw through the hol...

Page 8: ...proof of the purchase date The warranty only applies if the product is used solely in the manner indicated in this manual and all instructions have been followed accurately Any abuse of the product or...

Page 9: ...USER NOTES EN...

Page 10: ...VonHaus is a registered trademark of DOMU Brands Ltd Made in China for DOMU Brands Ltd M24 2RW Thank you for purchasing the Mitre Saw Stand EN...

Page 11: ...SUPPORT DE SCIE ONGLET 3500103 Mode d emploi FR...

Page 12: ...SOMMAIRE Consignes de s curit 1 Pi ces 2 Assemblage 3 Assemblage 4 Fixation sur le support 5 Garantie 6...

Page 13: ...lisez pas d outils lectriques pour l assemblage Ils pourraient endommager le produit et alt rer une utilisation future et la stabilit Ne serrez pas trop les pi ces en cours d assemblage Ceci endommage...

Page 14: ...SE TROUVENT DANS LA BO TE AVANT DE PROC DER L ASSEMBLAGE VIS x 4 RONDELLE RESSORT x 8 RONDELLES x 4 BOULONS x 4 C A SUPPORT SCIE ONGLET x 1 D BARRES EN FORME DE L x 2 E BARRES DE SOUTIEN x 2 F ROULEA...

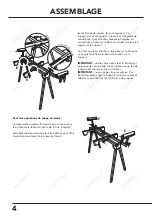
Page 15: ...ant dans le sens inverse des aiguilles d une montre les Poign es de verrouillage de chaque c t du Support de scie onglet pour laisser suffisamment de place pour y glisser les Porte barres rouleaux en...

Page 16: ...soutien sur le Support IMPORTANT v rifiez que toutes les vis boulons et poign es de verrouillage sont en place et que la Scie onglet est robuste avant de l utiliser IMPORTANT ne serrez pas trop les pi...

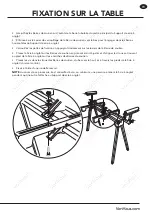
Page 17: ...sur les leviers de la Barre de soutien Placez la Scie onglet sur les Barres de soutien en prenant soin d ajuster et d aligner les trous se trouvant au pied de la Scie onglet sur les encoches des Barr...

Page 18: ...prouver la date de l achat La garantie ne s applique que si le produit a t utilis de la mani re indiqu e dans ce manuel et que toutes les instructions ont t suivies de mani re pr cise Tous les abus r...

Page 19: ...NOTES DE L UTILISATEUR FR...

Page 20: ...VonHaus est une marque d pos e de DOMU Brands Ltd Fabriqu en Chine pour DOMU Brands Ltd M24 2RW Merci d avoir achet le Support de scie onglet FR...

Page 21: ...KAPP UND GEHRUNGSS GE ST NDER 3500103 Bedienungsanleitung DE...

Page 22: ...CONTENTS Sicherheitshinweise 1 Komponenten 2 Zusammenbau 3 Zusammenbau 4 Montage auf dem St nder 5 Garantie 6...

Page 23: ...tzungen f hren Verwenden Sie keine Elektrowerkzeuge f r die Montage Diese k nnen das Produkt besch digen und die zuk nftige Verwendung und Stabilit t beeintr chtigen Ziehen Sie w hrend der Montage kei...

Page 24: ...ASS DIE FOLGENDEN KOMPONENTEN VOR DER MONTAGE IN DER BOX BEFINDEN SIND SCHRAUBEN x4 FEDERSCHEIBEN X4 Unterlegscheiben x4 SCHRAUBENVERSCHLUSS x4 C A S GE STAND x1 D L GEFORMTE ST BE x2 E HALTESTANGE x2...

Page 25: ...r aufrecht hin 4 Lockern Sie durch Drehen entgegen dem Uhrzeigersinn die Verriegelungsgriffe an beiden Enden des Gehrungss genst nders um gen gend Platz f r das Verschieben der L f rmigen Rollenhalter...

Page 26: ...n Sie ob alle Schrauben Schrauben und Verriegelungsgriffe sicher sind und ob der Gehrungss genst nder richtig positioniert ist E robust vor dem Gebrauch WICHTIG Ziehen Sie keine Komponenten zu fest an...

Page 27: ...ltestange dr cken Setzen Sie die Gehrungss ge auf die Haltest be achten Sie darauf die L cher an den F en der Gehrungss ge an die Schlitze in den Haltest ben anzupassen und auszurichten Setzen Sie die...

Page 28: ...wenn das Produkt ausschlie lich in der auf der Gebrauchsanweisung angegebenen Weise verwendet wird und alle anderen Anweisungen genau befolgt wurden Jeder Missbrauch des Produkts oder die Art und Wei...

Page 29: ...BENUTZERANMERKUNGEN DE...

Page 30: ...VonHaus ist ein eingetragenes Warenzeichen von DOMU Brands Ltd Made in China f r DOMU Brands Ltd M24 2RW Vielen Dank f r den Kauf des Kapp und Gehrungss ge St nder DE...

Page 31: ...SOPORTE DE SIERRA DE INGLETE 3500103 Manual de Instrucciones ES...

Page 32: ...CONTENIDO Instrucciones de Seguridad 1 Componentes 2 Montaje 3 Montaje 4 Montaje en el soporte 5 Garant a 6...

Page 33: ...ensamblaje Estos pueden causar da os al producto y perjudicar su uso y estabilidad en el futuro No apriete demasiado las piezas durante el montaje ya que esto da ar la unidad IMPORTANTE El Soporte De...

Page 34: ...TES COMPONENTES EST N EN LA CAJA ANTES DE PROCEDER CON EL MONTAJE TORNILLOS x4 ARANDELAS DE MUELLE x4 ARANDELAS x4 PERNOS x4 C A SOPORTE DE SIERRA DE INGLETE x1 D BARRAS EN L x2 E BARRAS DE SUJECION x...

Page 35: ...anera vertical 4 Afloje girando en sentido contrario a las agujas del reloj los agarres de bloqueo en cada extremo del soporte de la sierra ingletadora para dejar suficiente espacio para deslizar los...

Page 36: ...porte IMPORTANTE Verifique que todos los tornillos pernos y agarres de bloqueo sean seguros y que el soporte de la sierra ingletadora sea resistente antes de su uso IMPORTANTE No apriete demasiado los...

Page 37: ...a barra de sujeci n Coloque la sierra ingletadora en las barras de sujeci n teniendo cuidado de ajustar y alinear los orificios a los pies de la sierra ingletadora a las ranuras de las barras de sujec...

Page 38: ...ha de compra La garant a solo se aplica si el producto se utiliza nicamente de la manera indicada en la p gina de Advertencias de este y todas las dem s instrucciones se han seguido con precisi n Cual...

Page 39: ...NOTAS DE USUARIO ES...

Page 40: ...VonHaus es una marca registrada de DOMU Brands Ltd Hecho en China para DOMU Brands Ltd M24 2RW Gracias por comprar el Soporte de Sierra Ingletadora ES...

Page 41: ...SUPPORTO PER TRONCATRICE 3500103 Manuale di istruzioni IT...

Page 42: ...INDICE Informazioni di sicurezza 1 Componenti 2 Montaggio 3 Montaggio 4 Montaggio sul supporto 5 Garanzia 6...

Page 43: ...neo pu provocare danni o causare gravi lesioni Per il montaggio non utilizzare attrezzi elettrici Ci pu causare danni al prodotto e compromettere l uso futuro e la stabilit Durante il montaggio non av...

Page 44: ...MONTAGGIO CONTROLLARE CHE NELLA CONFEZIONE SIANO PRESENTI I SEGUENTI COMPONENTI VITI 4 RONDELLE A MOLLA 4 RONDELLE 4 BULLONI 4 C A SUPPORTO PER TRONCATRICE 1 D STAFFE A L 2 E BARRE DI CONTENIMENTO 2 F...

Page 45: ...n verticale 4 Allentare ruotando in senso anti orario le Manopole di bloccaggio su entrambe le estremit del Supporto per troncatrice per consentire spazio sufficiente per far scivolare all interno i P...

Page 46: ...er sul supporto IMPORTANTE Controllare che tutte le Viti Bulloni e Manopole di bloccaggio siano strette e che il Supporto per troncatrice sia robusto prima dell uso IMPORTANTE Non stringere troppo alc...

Page 47: ...e leve sulla Barra di contenimento Posizionare la Troncatrice sulle Barre di contenimento prestando attenzione a regolare e allineare i fori sui piedini della Troncatrice con le fessure sulle Barre di...

Page 48: ...lla data d acquisto La garanzia si applica solo se il prodotto viene utilizzato esclusivamente come indicato in questo manuale e se tutte le altre informazioni vengano accuratamente seguite Qualsiasi...

Page 49: ...NOTE DELL UTENTE IT...

Page 50: ...VonHaus un marchio registrato di DOMU Brands Ltd Made in Cina per DOMU Brands Ltd M24 2RW Grazie per aver acquistato il Supporto per troncatrice IT...

Reviews: