background image


UNPACKING INSTRUCTION 


CAUTION!

 Carefully unpack the box upon receipt. Check the contents to ensure that all parts are present and have been 

received in good condition. Notify the shipper immediately and retain packaging material if any parts appear damaged from 
shipping or the package itself shows signs of mishandling. Save the package and all packaging materials. If the product must be 
returned, it is important that the product is returned in the original factory box and packaging. 
 
If the device has been exposed to drastic temperature fluctuation (e.g. after transportation), do not switch it on immediately. The 
arising condensation water might damage your device. Leave the device switched off until it has reached room temperature. 


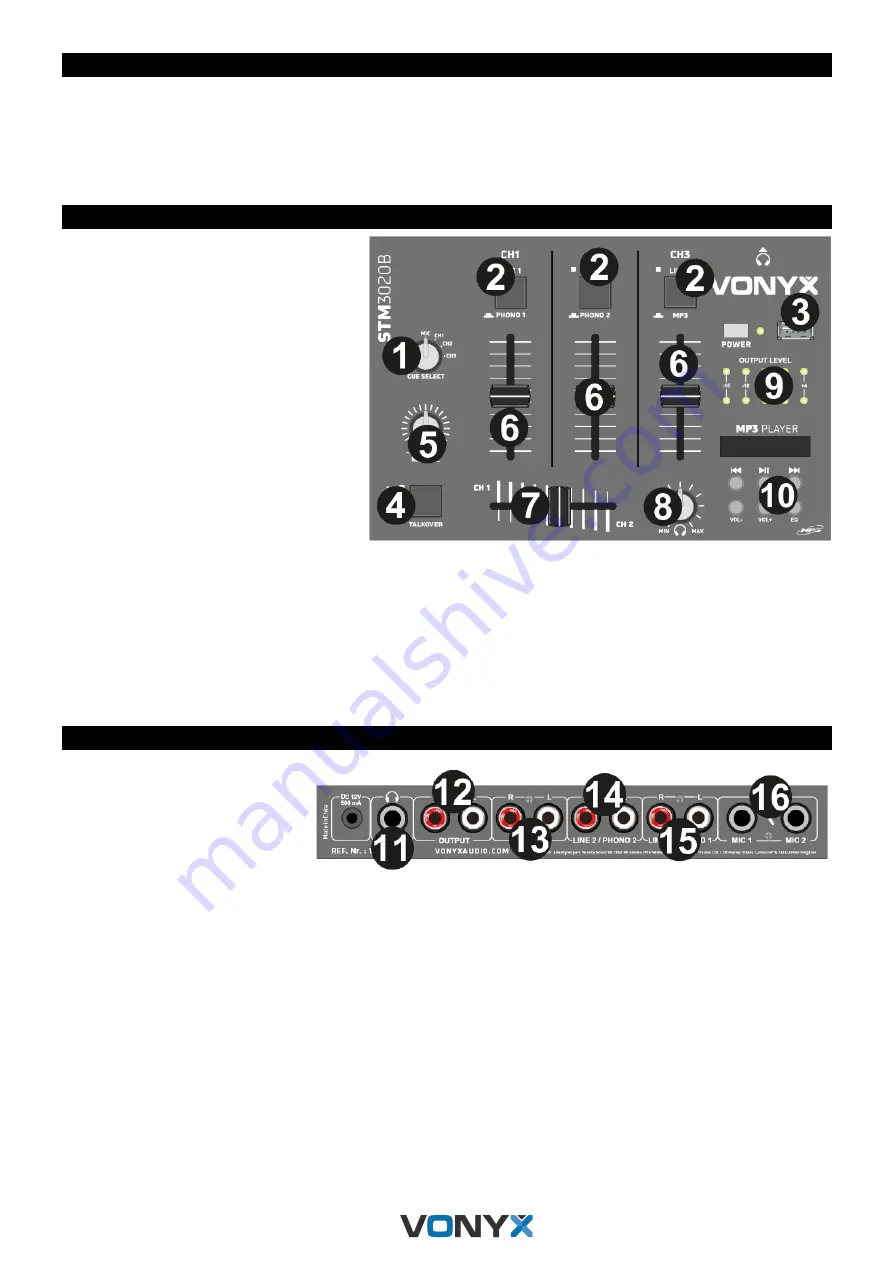
CONTROL PANEL 

1.  CUE 

Rotate to select the channel you want to listen 
to via headphones. 

2.  INPUT SELECTOR CHANNEL 1, 2 & 3 

Press to select the input source on the 
corresponding 

channel. The “PHONO” setting is 

intended for turntables. For all other signal 
sources, i.e. a CD player, use 

the “LINE” option. 

3.  USB PORT 
4.  TALKOVER  

Press this button to automatically lower the 
volume level of the input sources when using 
the microphones. 

5.  MICROPHONE LEVEL 

Adjust the volume level of the microphone 
signal. 

6.  CHANNEL VOLUME SLIDERS 

Adjust the channel volumes separately. 

7.  CROSSFADER CH1 / CH2 

Adjust the balance between channel 1 and 2. 

8.  PHONES LEVEL 

Adjust the volume level of the headphone output signal. 

9.  VU METER 

Indicates the output levels of left and right master channels. 

10. MP3 PLAYER 

Previous - press to change to previous track. 
Play/pause - press to start/resume and pause playback. 
Next - press to skip to next track. 
Vol- - press to decrease volume. 
Vol+ - press to increase volume. 
EQ - press to change equalizer preset. 
 

CONNECTIONS 

11. HEADPHONE OUTPUT SOCKET 

6.3mm headphone output jack. 

12. OUTPUT 

RCA output connectors. 

13. LINE 3 INPUT 

RCA input connectors. 

14. LINE 2/PHONO 2 INPUT 

RCA input connectors. 

15. LINE 1/PHONO 1 INPUT 

RCA input connectors. 

16. MIC 1 & MIC 2 INPUTS 

6.3mm microphone input jacks. 


Summary of Contents for 172.976

Page 1: ...STM 3020B 6 Channel Mixer Ref nr 172 976 INSTRUCTION MANUAL GEBRUIKSAANWIJZING GEBRAUCHSANLEITUNG MANUAL DE INSTRUCCIONES MANUEL D INSTRUCTIONS INSTRUKCJA OBS UGI V1 4...

Page 2: ...2...

Page 3: ...seek advice from a specialist Do not force the controls If this product is with speaker inside which can cause magnetic field Keep the product at least 60cm away from computer or TV If this product h...

Page 4: ...g channel The PHONO setting is intended for turntables For all other signal sources i e a CD player use the LINE option 3 USB PORT 4 TALKOVER Press this button to automatically lower the volume level...

Page 5: ...ngen worden gevolgd Het apparaat buiten bereik van kinderen houden Bovendien mag het apparaat nooit onbeheerd gelaten worden Gebruik geen schoonmaakspray om de schakelaars te reinigen Restanten van de...

Page 6: ...CD speler gebruikt u de optie LINE 3 USB POORT 4 TALKOVER Druk op deze toets om het volume van de ingangsbronnen automatisch te verlagen bij gebruik van de microfoons 5 MICROFOONNIVEAU Pas het volumen...

Page 7: ...ichweite von Kindern halten Das Ger t niemals unbeaufsichtigt lassen Die Regler nicht mit Reinigungssprays reinigen Diese hinterlassen R ckst nde die zu Staub und Fettansammlungen f hren Bei St rungen...

Page 8: ...e Taste um den Lautst rkepegel der Eingangsquellen automatisch abzusenken wenn Sie die Mikrofone verwenden 5 MIKROFON LAUTST RKE Stellen Sie den Lautst rkepegel des Mikrofonsignals ein 6 SCHIEBEREGLER...

Page 9: ...tiempo de vida Mantenga el aparato fuera del alcance de los ni os No deje el aparato sin vigilancia No utilice sprays limpiadores para limpiar los interruptores Los residuos de estos sprays producen d...

Page 10: ...e PHONO est pensado para giradiscos Para todas las dem s fuentes de se al por ejemplo un reproductor de CD utilice la opci n LINE 3 PUERTO USB 4 TALKOVER Pulse este bot n para bajar autom ticamente el...

Page 11: ...areil contient un haut parleur pouvant engendrer des champs magn tiques Tenez cet appareil 60 cm au moins d un t l viseur ou ordinateur Si le produit comprend un accumulateur int gr plomb acide rechar...

Page 12: ...ce bouton pour r duire automatiquement le niveau de volume des sources d entr e lorsque vous utilisez les microphones 5 NIVEAU DU MICROPHONE R glez le niveau de volume du signal du microphone 6 CURSEU...

Page 13: ...m wolnej przestrzeni z ka dej strony aby zapewni odpowiednie ch odzenie Urz dzenie posiada diody LED wysokiej mocy Nie patrz bezpo rednio na diody aby nie uszkodzi wzroku Nie w czaj i wy czaj urz dzen...

Page 14: ...ch r de sygna u tj odtwarzacz CD nale y u y opcji LINE 3 Z CZE USB 4 TALKOVER Naci nij ten przycisk aby automatycznie obni y poziom g o no ci r de wej ciowych podczas korzystania z mikrofon w 5 POZIOM...

Page 15: ...el Headphone 200mW Power supply 220 240VAC 50Hz 12V Adapter Dimensions L x W x H 132 x 267 x 55mm Weight 1 20 The specifications are typical The actual values can slightly change from one unit to the...

Page 16: ...16 Specifications and design are subject to change without prior notice www tronios com Copyright 2022 by Tronios The Netherlands...

Reviews: