Voom Technologies, Inc. © 2004-2018 Proprietary
4 Shadow Setup
This chapter describes how to connect the Shadow 3 to a computer system.
Caution for multiple hard drive systems:
Shadow 3 prevents data from being written to a
single computer hard drive. If more than one
hard drive is used in a suspect computer, then
please refer to the
section.
4.1 Single Hard Drive System
This section describes how to connect Shadow to a standard SATA system.
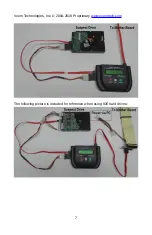
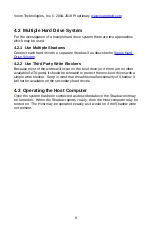
Please use the
on the next page as a reference during setup.
Step 1: Suspect Computer Preparation
1.
Disconnect the computer AC power cable, and remove the computer
cover.
2.
Disconnect the DC power cable from the suspect hard drive.
3.
Disconnect the SATA cable from the suspect hard drive. Leave it
connected to the motherboard.
Step 2: Shadow Setup
1.
Connect the SATA cable that was disconnected from the hard drive in
Step 1-3 to the Shadow 3 port labeled “Motherboard”.
2.
Connect one end of the Voom supplied SATA cable to the Shadow 3
port labeled “Suspect Drive,” and connect the other end to the suspect
hard drive.
3.
Connect the Voom supplied DC power cable from the Shadow 3 to the
Suspect drive.
4.
Plug the Voom supplied AC adapter between the Shadow 3 and an AC
power outlet. (Not shown in picture.)
5.
Reconnect the suspect computer AC power.
6.
Turn on the Shadow 3.
7.
Once the Shadow 3 is turned on and reports
ready
the suspect
system may be booted.
6


