


EN
1
2
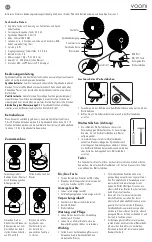
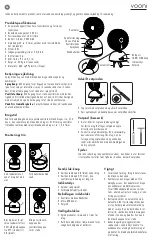
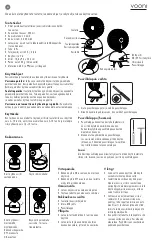
Fan
Mist stream
Fan button
Spray button
Water tank
Contact pin
USB-port
ON/OFF button
Indicator light
Cotton swab
Product Specifications
• Separate buttons to control the fan and the mist function
• Tank capacity: 200 ml
• Misting capacity: 35 ml/hour
• Battery: Lithium, 2000mAh
• Charging time: approx. 4 hours, charge with (micro USB
cable (included)
• Power: 8 W
• Input voltage/current: 5V/0.8A
• Operating current: 2A
• Dimensions: 10.8 x 9.5 x 20.3 cm
• Weight: approx. 300 grams (without water)
• Material: ABS and PP plastics, silica gel
Before operating this product, please read these instructions completely and save this manual for future use.
1
2
1
2
1
2
1
2
Operating Instructions
Spray mode and Fan mode can be used both separate and combined.
Spray button:
Click once to start continuous spraying; click again to
start the interval spraying (spray for 3 seconds and stop for 3 seconds);
click a third time to turn off the spraying mode.
Fan button:
Click once to start the low fan speed; switch to medium
speed with a second click; switch to high speed with a third click; and
click a fourth time to turn off the fan.
Anhydrous power cut:
Spraying mode turns off when the water level
is below the contact pin.
Usage time
When fully charged, the separate fan mode can be used for about 2-10
hours, the separate spray mode can be used for 5-10 hours and the fan
mode along with the spray mode can be used for about 1.5-4 hours.
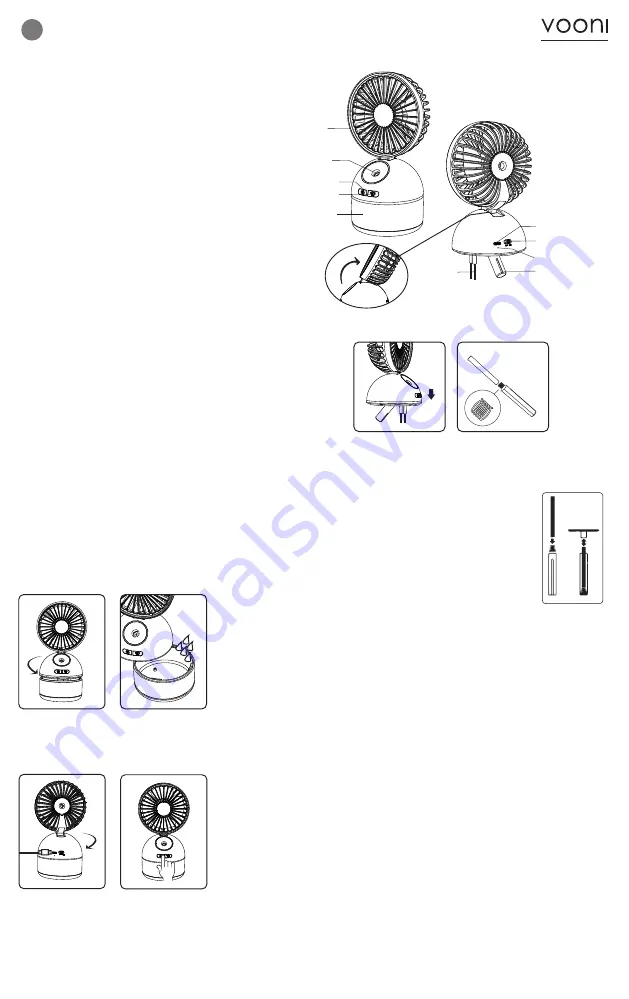
Assembly Steps
Replace the cotton swab
Unscrew the top
cover by turning it
counterclockwise.
Fill the tank with
water.
Rotate clockwise
to tighten the top
cover. Switch the
power button from
OFF to ON.
Click the Mist or Fan
button to start.
1. Remove the cotton swab tube and replace the cotton swab.
2. Pay attention to the bottom springwhen replacing the swab.
Power Button
• Turn the switch to ON when in use.
• Turn the switch to OFF if it is not used for
a long time.
Indicator Light
• Charging: red light on
• Fully charged: red light off
Package Contents
• Fan with water tank base
• Micro USB cable
• Cotton swab
Maintenance
• Charge the product for more than 2 hours
before use.
• Keep it charged every three months to
avoid battery damage.
Important
• Add water before use. Do not use the
mist function without water.
• The fan can be used with a small amount
of essence, it is recommended to use a
water-based aromatherapy essence. Do
NOT add any oil-based essences such as
essential oils, to avoid oil from blocking
the system.
• This product has an automatic power-off
function. When the time of mist mode is
up, the product will stop spraying auto-
matically. If you need to continue using,
please observe the amount of water in
the tank, and then press the function
button to start.
• When cleaning, do not immerse rinse it
directly with a tap to avoid possible short
circuit of the product. Soft cotton cloth is
recommended for wiping.
Cotton swab (attention)
• It is best to wet the cotton swab thoroughly for
the first time of using. It takes a few minutes
for the cotton swab to absorb water.
• An extra cotton swab is included.If the spray
quantity reduces after a long period of use,
you can try to remove the cotton swab turn it
around, or replace it with the included spare
cotton swab.
Spring
Do not lose (or use the fan without) the spring attached to the cotton
swab. Firstly install the spring at the bottom, then the cotton swab.
Summary of Contents for 17241
Page 8: ......


