background image

6

English

replacement fuse, please contact Vornado Consumer Service. 

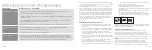
4. Once the replacement is received, use a small 

fl

 at-head 

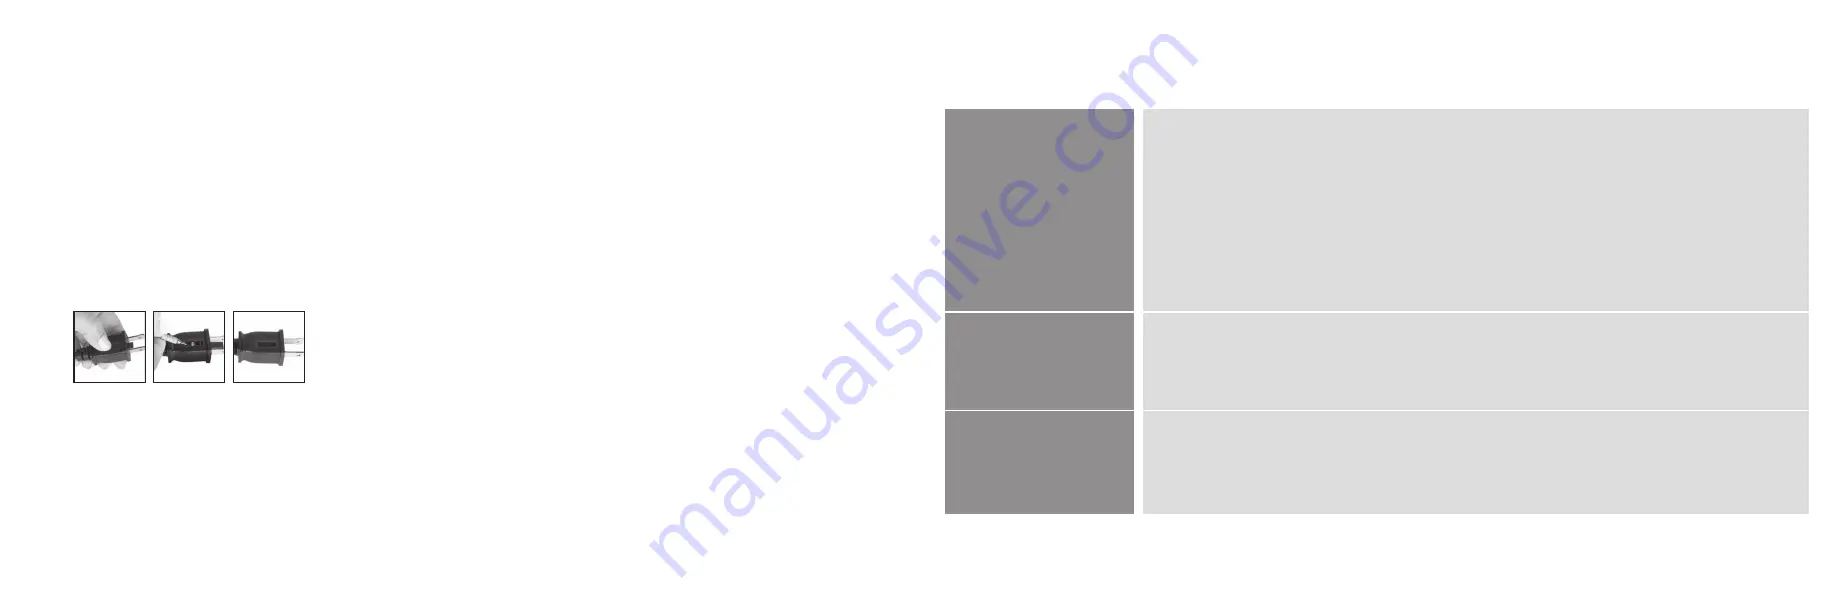
screwdriver to slide open the fuse cover (located on the plug) 

(See Fig. A). 

5. Remove fuse by using the screwdriver to gently lift each end of 

the fuse (See Fig. B).

6. Install the replacement fuse by using the screwdriver to gently 

push each metal end of the fuse into the receptacle one at a 

time. Do not push on the center of the fuse—it is fragile and 

may break.

7. Slide the fuse cover closed using the screwdriver. When 

closed, the cover should 

fi

 t completely in the plug. No part of 

the cover should stick out (See Fig. C). 

8. Plug your appliance into the outlet and turn the power on. 

9. If the replacement fuse blows, a short-circuit may be present 

and the product should be discarded or returned to an 

authorized service facility for examination and/or repair.

Risk of 

fi

 re. Do not replace attachment plug. Contains a safety device 

(fuse, AFCI, LCDI) that should not be removed. Discard product if the 

attachment plug is damaged. 

FCC Compliance Statement

This device complies with Part 15 of the FCC Rules. Operation is 

subject to the following two conditions: (1) This device may not cause 

harmful interference, and (2) this device must accept any interference 

received, including interference that may cause undesired operation.

NOTE: 

This equipment has been tested and found to comply with the 

limits for a Class B digital device, pursuant to part 15 of the FCC Rules. 

These limits are designed to provide reasonable protection against 

harmful interference in a residential installation. This equipment 

generates, uses and can radiate radio frequency energy and, if not 

installed and used in accordance with the instructions, may cause 

harmful interference to radio communications. However, there is no 

guarantee that interference will not occur in a particular installation. If 

this equipment does cause harmful interference to radio or television 

reception, which can be determined by turning the equipment off and 

on, the user is encouraged to try to correct the interference by one or 

more of the following measures:

-   Reorient or relocate the receiving antenna.

-   Increase the separation between the equipment and receiver.

-   Connect the equipment into an outlet on a circuit different from that 

to which the receiver is connected. 

-   Contact Vornado Customer Service or dealer or an experienced 

radio/TV technician for help.

This Class B digital apparatus complies with Canadian ICES-003.

Changes or modi

fi

 cations not expressly approved by the party 

responsible for compliance could void the user’s authority to operate 

the equipment.

Supplier’s FCC Declaration of Conformity

Unique Identi

fi

 er: Vornado Model PIVOT6

Responsible Party: Vornado Air LLC

Mailing Address: 415 E. 13th St., Andover, KS 67002

Contact: www.vornado.com

Fig. A

Fig. B

Fig. C

39

Français

DÉPANNAGE

CAUSE POSSIBLE ET SOLUTION

PROBLÈME

L’appareil n’est pas branché. Branchez le cordon d’alimentation dans une prise électrique.

Assurez-vous d’avoir sélectionné un réglage de vitesse.

Le fusible de la 

fi

 che électrique a sauté. Remplacez le fusible (voir INSTRUCTIONS DE RÉPARATION À 

L’INTENTION DE L’UTILISATEUR à la page 30).

L’appareil est endommagé ou il doit être réparé. Cessez d’utiliser l’appareil et débranchez-le. Contactez 

le service à la clientèle pour obtenir de l’aide.

La prise est usée ou endommagée. Essayez d’utiliser une autre prise ou contactez un électricien compétent.

L’appareil a été réglé à vitesse faible. Utilisez une vitesse plus élevée.

La circulation d’air est entravée. Enlevez ce qui entrave la circulation d’air.

Dirigez la circulation d’air vers l’utilisateur.

Dans certaines conditions, il est possible qu’un DDFT (disjoncteur de fuite de terre) avec touche de 

réinitialisation soit déclenché quand l’utilisateur change la vitesse d’un ventilateur Vornado. Dans ce cas, 

branchez l’appareil dans une prise non reliée à un DDFT. Le problème peut aussi indiquer que la prise 

reliée au DDFT est faible ou défectueuse. Contactez un électricien compétent pour faire véri

fi

 er la prise 

reliée au DDFT.

L’appareil ne se met pas 

sous tension.

La circulation d’air est 

faible ou lente.

Le DDFT a été déclenché.

Summary of Contents for PIVOT6

Page 1: ...com model PIVOT6 vornado com WHOLE ROOM CIRCULATOR OWNER S GUIDE GU A DEL PROPIETARIO DEL CIRCULADOR DE AIRE PARA TODA LA HABITACI N GUIDE DE L UTILISATEUR DU VENTILATEUR INT GRAL DE PI CE READ AND S...

Page 2: ...2 English vornado com 800 234 0604 help vornado com we expect this product to be PERFECT if it s not WE will make it right...

Page 3: ...3 English Important Safety Instructions 4 Features 8 How to Use 9 Remote Control 10 Cleaning 11 Troubleshooting 13 Warranty 14 Espa ol p 15 Fran ais p 28 CONTENTS...

Page 4: ...ad to death in as little as 2 hours Always completely secure the battery compartment If the battery compartment does not close securely stop using the product remove the batteries and keep it away fro...

Page 5: ...techniques des donn es et des instructions d installation de branchement et de fonctionnement du pr sent guide d utilisation sont conformes aux informations les plus r centes au moment de l impressio...

Page 6: ...e determined by turning the equipment off and on the user is encouraged to try to correct the interference by one or more of the following measures Reorient or relocate the receiving antenna Increase...

Page 7: ...n marteau car il pourrait endommager les pi ces Reposez l crou AVERTISSEMENT Afin de r duire le risque de d charge lectrique et de blessures d branchez le ventilateur avant d enlever la pale Enlevez L...

Page 8: ...uvent aux positions correspondant environ 2 h 5 h et 9 h sur un cadran Sur le ventilateur une fl che t indique l emplacement des vis 2 poussetez la grillee d entr e avant ou lavez la au moyen d un d t...

Page 9: ...ile s il y a lieu puis ins rez la pile dans la t l commande le c t o appara t le signe doit tre tourn vers le haut Assurez vous que la pile est install e correctement en ce qui a trait la polarit Reme...

Page 10: ...e battery is installed correctly with regard to polarity Replace the battery door and screw Note Remove battery from the remote control when not in use for an extended period of time and always remove...

Page 11: ...z les r glages en toute commodit et avec facilit 11 English 1 Remove the 3 screws located in between the ribs of the inlet grille at roughly 2 5 and 9 o clock positions Screw locations are also indica...

Page 12: ...nuira aux communications radiophoniques Il est toutefois impossible de garantir qu il ne se produira pas de brouillage dans un environnement particulier Si cet appareil cause brouillage qui nuit la r...

Page 13: ...tournevis soulever doucement chacune des extr mit s du fusible pour enlever le fusible de l alv ole Fig B 6 Ins rer le fusible de rechange dans l alv ole en poussant doucement chacune des extr mit s...

Page 14: ...re Here To Help 800 234 0604 vornado com help vornado com 2020 Vornado Air LLC Andover KS 67002 U S Patent Pending Speci cations subject to change without notice Vornado is a trademark owned by Vornad...

Page 15: ...USAG ES HORS DE LA PORT E DES ENFANTS Ce produit contient une pile bouton au lithium Si une pile bouton neuve ou usag e est aval e ou qu elle p n tre l organisme elle peut causer de graves br lures in...

Page 16: ...sticas 21 C mo Usar 22 Control Remoto 23 Limpieza 24 Resoluci n De Problemas 26 Garant a 27 CONTENIDO 29 Fran ais Consignes De S curit Importantes 30 Caract ristiques 34 Utilisation 35 T l commande 3...

Page 17: ...madura qu mica Mantenga las pilas fuera del alcance de los ni os ADVERTENCIA MANTENGA LAS PILAS NUEVAS Y USADAS FUERA DEL ALCANCE DE LOS NI OS Este producto contiene una pila de bot n de litio Si la p...

Page 18: ...Servicio de garant a o reparaci n Llame al 1 800 234 0604 o env e un correo electr nico a help vornado com para obtener un formulario de Autorizaci n de Devoluci n RA por sus siglas en ingl s Cuando s...

Page 19: ...para que examine o repare el producto Instrucciones De Reparaci n Para El Usuario 1 Utilizando los controles del producto apague el artefacto 2 Tome el enchufe no el cable y descon ctelo de la toma de...

Page 20: ...com DESECHO DE LAS PILAS Deseche las pilas de acuerdo con las leyes y normas locales de su regi n y manteni ndolas fuera del alcance de los ni os Algunas pilas pueden ser recicladas y aceptadas para...

Page 21: ...circulator before removing grille Utilice el cepillo del aspirador para aspirar cualquier polvo acumulado en la rejilla frontal y en las entradas de aire Nota El motor siempre se mantiene lubricado p...

Page 22: ...i fuese necesario limpie los contactos de la pila y tambi n los del dispositivo antes de colocar la pila Quite el protector pl stico de la pila y col quela en el control remoto con el lado hacia afuer...

Reviews: