background image

23

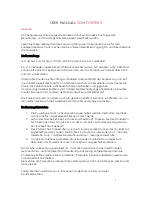
Option HA (fig.26)

This  option  is  available  only  on  models  with  HA  module
Selecting HA by pressing SET, the settings for HA operating 
mode are accessed. The parameters are:  
-

En

(Enable): possible values are:  

PROF: enables HA mode with profiles  
ON: enables HA mode continuously  
OFF: disables HA mode  
HOL:  enables  HOLIDAY  mode:  two  hours  antibacterial
operation per day, two hours refresh, 20 hours stand-by. If
EN  PROF  has  been  selected,  the  following  parameters
are also enabled:

-

ST

: start time, profile P1 interval 

-

END

: end time, profile P1 interval 

-

ST1

: start time, profile P2 interval 1 

-

EN1

: end time, profile P2 interval 1 

-

ST2

: start time, profile P2 interval 2 

-

EN2

: end time, profile P2 interval 2 

-

MON

: allocation of profile to Monday: possible values are P1 and P2 

-

TUE

: allocation of profile to Tuesday: possible values are P1 and P2  

-

WED

: allocation of profile to Wednesday: possible values are P1 and P2  

-

THU

: allocation of profile to Thursday: possible values are P1 and P2 

-

FRI

: allocation of profile to Friday: possible values are P1 and P2 

-

SAT

: allocation of profile to Saturday: possible values are P1 and P2 

-

SUN

: allocation of profile to Sunday: possible values are P1 and P2

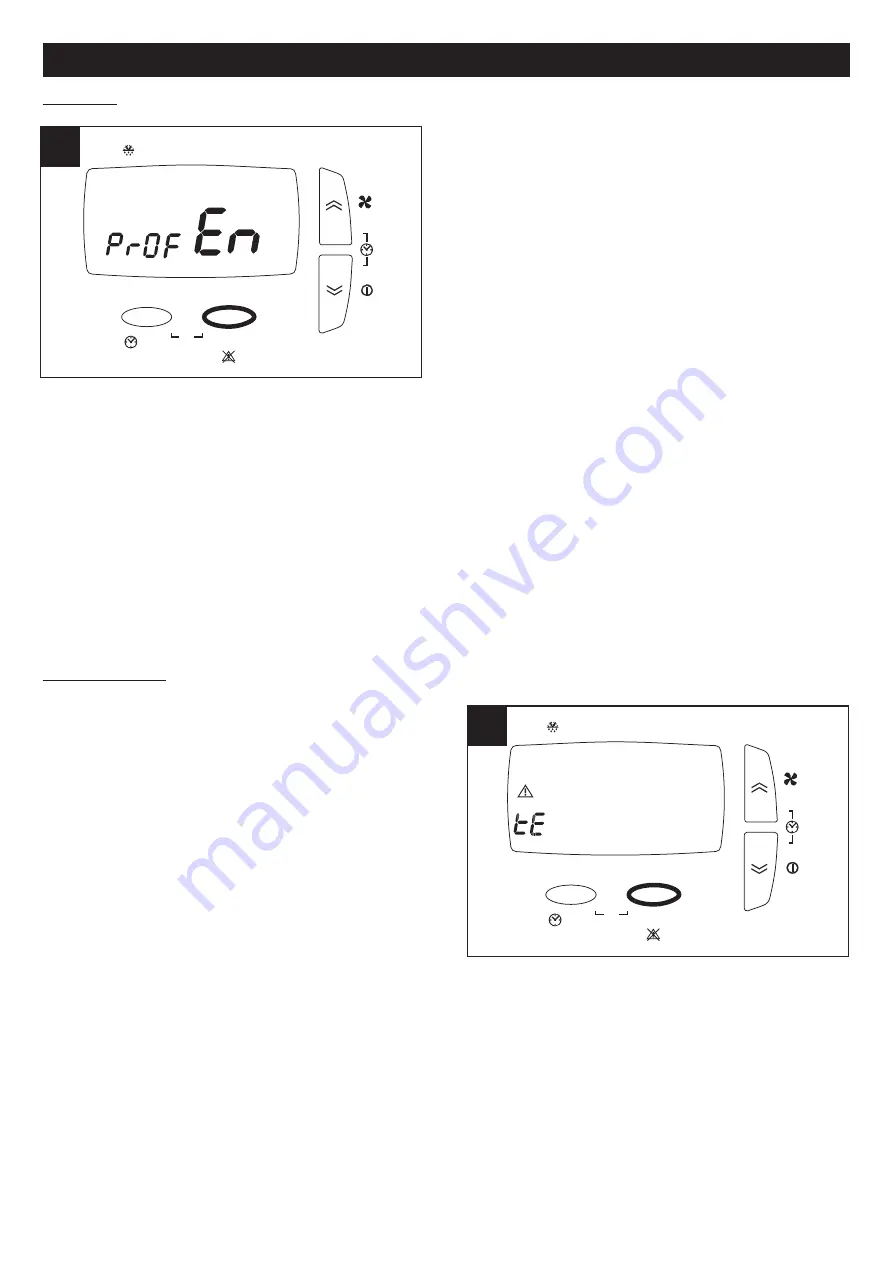
View alarm menu

(fig.27)

Before proceeding with the steps indicated below, press the
ESC  button  to  exit  and  return  to  the  initial  menu.  The
indication of any alarm conditions that may have been tripped
can be displayed as follows: 
--press and hold the SET button 
--press  and  release  the  UP  or  DOWN  button  to  view  the
ALRM menu 
--press  and  release  the  SET  button  to  view  the  active  error
code The various alarm situations that can affect the system
are displayed on the user panel as follows: 

ti

:  indoor  temperature  sensor  faulty;  contact  Technical

Support for assistance; 

tout

::  outdoor  temperature  sensor  faulty;  contact  Technical

Support for assistance; 

te

:  exhaust  air  temperature  sensor  faulty;  contact  Technical

Support for assistance; 

preh

: preheater faulty or missing (if applicable); contact Technical Support for assistance; 

Hito

: outdoor temperature higher than 45 °C; contact Technical Support for assistance; 

Hiti

: indoor temperature higher than 45 °C; contact Technical Support for assistance; 

Filt

: clogged filters need replacing (3 months). Once new filters have been fitted, the error can be reset by the user: this is

done simply by pressing and holding the UP and DOWN buttons together.

N.B. 

Manually resettable errors can be removed by pressing and holding the UP and DOWN buttons together.

ENGLISH

esc

set

By-Pass

/ °C

1

2

3

4

5

6

7

FILT

P2

Prg

 26

 26

P1

HA

esc

set

By-Pass

/ °C

1

2

3

4

5

6

7

FILT

P1

P2

Prg

 27

 27

HA

Summary of Contents for VORT HR 250 NETI

Page 1: ...VORT HR 250 NETI Libretto istruzioni Instructions Booklet Haszn lati utas t s HA COD 5 471 084 814 29 09 2017...

Page 2: ...de by the instructions given in this booklet Following these instructions will ensure a long service life and overall electrical and mechanical reliability Keep this instruction booklet in a safe plac...

Page 3: ...sone con ridotte capacit fisiche sensoriali o mentali o prive di esperienza o della necessaria conoscenza purch sotto sorveglianza oppure dopo che le stesse abbiano ricevuto istruzioni relative all us...

Page 4: ...ell apparecchio deve essere effettuata da parte di personale professionalmente qualificato Per l installazione occorre prevedere un interruttore onnipolare con distanza di apertura dei contatti uguale...

Page 5: ...retto L apparecchio deve essere installato su una superficie o parete interne all abitazione e strutturalmente adatte a reggerne il peso max 30 Kg La posa in opera dell apparecchio non pu dipendere da...

Page 6: ...e funzionamento sul fondo dell apparecchio si raccoglie condensa all interno di una doppia vaschetta che ha due scarichi verso l esterno I punti di connessione sono posti sulla parte bassa del retro d...

Page 7: ...Vedi anche paragrafo Manutenzione pulizia 10 10 Ingressi scatola elettrica fig 11 2 Alimentazione 3 Cavo LAN 4 Cavo Boost 5 Cavo preheater 11 11 3 4 5 2 1 12 12 INSTALLER USER CONTROL PANEL PANNELLO I...

Page 8: ...ccensione delle icone fisse indica a quale delle 3 velocit sta funzionando l apparecchio 15 stato di stand by del sistema l accensione dell icona fissa indica che l apparecchio in stand by acceso ma c...

Page 9: ...rrente possono essere impostati nel modo seguente pressione breve simultanea dei pulsanti up e down pressione breve pulsanti up e down per regolazione parametro ora HH pressione breve pulsante SET per...

Page 10: ...o la funzione rimarr attiva per 12 ore dopo di che l apparecchio torner al funzionamento automatico Menu utente fig 24 Prima di eseguire i passi indicati nel seguito premere il tasto ESC per uscire e...

Page 11: ...artedi i valori possibili sono P1 e P2 UED assegnazione profilo al giorno mercoledi i valori possibili sono P1 e P2 THR assegnazione profilo al giorno giovedi i valori possibili sono P1 e P2 FRY asseg...

Page 12: ...t degli errori a riarmo manuale possibile tramite pressione lunga del tasto UP e DOWN Manutenzione e pulizia Prima di iniziare qualsiasi operazione accertarsi che il prodotto sia scollegato dalla rete...

Page 13: ...o di una nuova apparecchiatura equivalente L utente responsabile del conferimento dell apparecchio a fine vita alle appropriate strutture di raccolta pena le sanzioni previste dalla vigente legislazio...

Page 14: ...rvised or have been instructed in safe use of the appliance and understand the associated risks Children must not play with the appliance Cleaning and maintenance procedures for which the user is resp...

Page 15: ...d to the power supply by way of a multi pole isolating switch with a gap of at least 3 mm between contacts Items supplied The main parts of the appliance are an outer casing made using an expanded pol...

Page 16: ...ctions in this booklet The appliance must be installed on an internal surface or wall of the home structurally suited to holding its weight max 30 kg The appliance cannot be positioned and secured in...

Page 17: ...sate collects at the bottom of the appliance in a double tray provided with two drain outlets The connection points are located at the back of the appliance towards the bottom The condensate drain can...

Page 18: ...unction box inputs fig 11 2 Power Supply 3 LAN cable 4 Boost cable 5 Preheater cable 15 15 From NETI Dall unit NETI nero black blu blue marrone brown RD L1 N1 BL N2 PLC HA Supply Supply TTL BK DI1 DI2...

Page 19: ...dicate which of the 3 speeds is currently selected 15 system stand by status the icon lights up permanently to indicate that the appliance is in stand by powered up but with the motors off due to the...

Page 20: ...ing appliance configuration and can be selected by pressing the UP button briefly 1 min speed 2 med speed 3 max speed ENGLISH esc set By Pass C 1 2 3 4 5 6 7 FILT P1 P2 Prg 20 20 HA Before proceeding...

Page 21: ...tive for 12 hours after which the appliance will revert to automatic operation User Menu fig 24 Before proceeding with the steps indicated below press ESC to exit and return to the opening screen As a...

Page 22: ...ility of operation in HA mode OFF disables operation with profiles If EN ON has been selected the following parameters are also enabled ST start time profile P1 interval END end time profile P1 interv...

Page 23: ...7 Before proceeding with the steps indicated below press the ESC button to exit and return to the initial menu The indication of any alarm conditions that may have been tripped can be displayed as fol...

Page 24: ...3 or 12 months UK 3 or 24 months NO UK depending on the value set by the installer a pre alarm message will appear on the display to remind the user of the need for the filters to be replaced The fil...

Page 25: ...ase of a replacement It is the user s responsibility to dispose of this appliance through the appropriate channels at the end of its useful life Failure to do so may incur the penalties established by...

Page 26: ...retekkel rendelkez szem lyek nem haszn lhatj k kiv ve fel gyelet alatt vagy ha a berendez s biztons gos haszn lat ra vonatkoz utas t sokat k zhez kapt k s az ebb l fakad vesz lyeket meg rtett k A gyer...

Page 27: ...t v gezze Gondoskodjon t bbp lus kapcsol r l a telep t s el tt amely legal bb 3 mm re legyen az rintkez k ny l s t l Szerkezet s berendez sek A berendez s f r szei expand lt polipropil n burkolattal l...

Page 28: ...ben olvashat utas t sok betart s val v gezze A berendez st telep tse a lak s fel let re vagy fal ra amely szerkezetileg k pes megtartani a s ly t max 30 kg A berendez s telep t se nem f gghet ragaszt...

Page 29: ...ez s alj n kondenzv z k pz dik egy kett s k dban amelynek kifel k t r t je van A csatlakoz si pontok a berendez s h ts r sz nek alj n vannak A kondenzvizet a kb 16 mm es bels tm r j rugalmas cs vekhez...

Page 30: ...n RD L1 N1 BL N2 PLC HA Supply Supply TTL BK DI1 DI2 AO3 AO4 AO5 12V AI1 AI2 AI3 AI4 AI5 GND DO1 DO2 DO3 6 LAN BL RD BK 13 13 3 2 1 TM N L L N CAVO BOOSTER Nero Black Rosso Red C TIMER cod 12999 C TEM...

Page 31: ...lek 14 jelenlegi m k d si sebess g az lland f ny ikon bekapcsol sa jelzi hogy a 3 sebess g k z l melyiknek m k dik a berendez s 15 a rendszer k szenl ti llapota az lland f ny ikon jelzi hogy a berende...

Page 32: ...ESC gombot a kil p shez s a kezd men be l p shez A m k d si sebess get amelyet a konfigur ci alatt el re be ll tott a fel gomb r vid megnyom s val lehet kiv lasztani 1 Vel min 2 Vel med 3 Vel max MAG...

Page 33: ...r n kereszt l marad akt v ami ut n a berendez s automatikus m k d sbe l p vissza Felhaszn l men 24 bra Az al bbiakban megadott l p sek v grehajt sa el tt nyomja meg az ESC gombot a kil p shez s a kezd...

Page 34: ...d lyezi s a fentiek szerint automatikusan kikapcsol az esetleges m k d s HA m dban OFF a profilok m k d s t kapcsolja ki Ha az EN ON lett kiv lasztva akkor a k vetkez param tereket is be lehet kapcsol...

Page 35: ...P2 Riaszt sok men megjelen t se 27 bra Az al bbiakban megadott l p sek v grehajt sa el tt nyomja meg az ESC gombot a kil p shez s a kezd men be l p shez A riaszt sok jelz se esetleg a k vetkez k ppen...

Page 36: ...p csak az Egyes lt Kir lys gon k v li orsz gokban a telep t telep t si f zis ban be ll tott l f gg en a k perny n megjelenik egy el zetes riaszt s amely a felhaszn l t rtes ti hogy a sz r ket ki kell...

Page 37: ...Jos CHINA PO Box 10 1251 vortice china com Tel 506 2201 6242 vortice vortice china com COSTA RICA vortice latam com info vortice latam com Fontos inform ci a k rnyezetv delemnek megfelel rtalmatlan t...

Page 38: ...38 Note...

Page 39: ...39 Note...

Page 40: ...40 Note...

Page 41: ...41...

Page 42: ...RVENTION TIMBRO CENTRO ASSISTENZA STAMP OF TECHNICAL ASSISTANCE CENTRE CACHET SERVICE APRES VENTE TAGLIANDO INTERVENTO IN GARANZIA CERTIFICATE OF WORK PERFORMED UNDER GUARANTEE COUPON INTERVENTION SOU...

Page 43: ...valida su tutto il territorio italiano Modalit e condizioni di attivazione della garanzia Gli interventi in garanzia riparazioni o sostituzioni del prodotto ovvero delle parti difettose saranno esegu...

Page 44: ...UARANTEE GARANTIE DA CONSERVARE TO BE RETAINED A CONSERVER Esclusioni La presente garanzia non copre Le rotture provocate dal trasporto I difetti o guasti derivanti da uso non corretto o improprio da...

Reviews: