16
Fans and booster modes settings
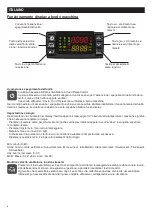
By pressing the fans key for 3 seconds, it will appear the flashing fan and it will be possible to vary the speed of
renewal fans and expulsion (in parallel management) using the keys UP and DOWN.
Whenever the speed is selected, after 1 second the appliance makes the actual fan speed variation.
The booster can be activated via digital input via connections made by the installer.
Functions menu (State viewing, alarm, alarm log etc...)
Entering into the functions menu (pressing the key “menu”) gives acces to :
Display the seasonal operation mode selected by the unit (ModE)
Display sensor values (Pb)
Showing and resetting the alarms (ALrM)
Display and clear the alarm history (ALOG)
Load the instrument parameters on USB-drive (UPL)
Display the percentage of proportional operation of the outputs for controlling the speed of renewal fans and ejection .
Pressing again the menu key , allows you to go back to the previous menu.
Temperature display (Functions menu)
Once in fuctions menu scroll with the arrows Up and Down, select the menu
Pb
and confirm with enter.
This menu displays alla the probes installed in the appliance:
Pb1 - Ambient recovery probe
Pb2 - Ambient supply probe
Pb3 - Exhaust probe
Pb4 - Outdoor air probe
To exit the temperature display , press the menu key again or wait the time-out time.
Alarms in progress display (Functions menu)
Once in fuctions menu scroll with the arrows Up and Down, select the menu
ALrM
and confirm with enter:
- Press enter (If no alarm is present , the enter key will not be enabled)
- The lower display shows the label with the alarm code, the upper display the rSt label if the alarm can be
reset, NO label if it is not resettable.
Sroll all present alarms using UP or DOWN.
Pressing the enter in correspondence with the label rSt allows the alarm to be reset and will transition to the next one ; if
this alarm is stil resettable , the alarm will be reset and the next alarm will be displayed. Pressing the enter key in the pre-
sence of a non-resettable alarm (NO label) does not allow to reset it.
To exit the ALrM menu , press the menu key again or wait the time-out time.
Alarm history menu (Functions menu)
If an alarm occurs, the device records the alarm code; the last recorded alarm is stored with the higher progres-
sive index.
Once in fuctions menu scroll with the arrows Up and Down, select the menu
Alog
and confirm with enter:
- The lower display shows the alarm label and the upper display shows the label "n" followed by sequential num-
ber from 00 to 99.
If 2 or more alarms have occurred , pressing the Up and Down keys allows to display them.
To exit the Alog menu , press the menu key again or wait the time-out time.
Deleting Alarm history (Menu funzioni)
The procedure to delete the alarm log is as it follows
Once in fuctions menu scroll with the arrows Up and Down, select the menu
Alog
and confirm with enter:
Scroll through the alarms with the UP or DOWN (the value of the password is rappresented from the paramen-
ter AL60) until you see the label "ArSt" lower display; the upper display shows the label "PAS"
Press the Enter key; the lower display shows the label "PAS" and the upper display the digit "0" flashing. Enter the pas-
sword value using the "UP" and "DOWN"; if the value of the password is correct, the label "ArSt" flashes for 5 sec, and the
alarm history is deleted, if the value of the password is not correct you will see the label "PAS" in the lower display and the
digit "0" in the upper display
To exit the Alog menu , press the menu key again or wait the time-out time.
The number of alarms stored in memory is 100; each additional alarm that will be detected at above this number, automa-
tically delete the oldest alarm in memory.
To exit the Alog menu , press the menu key again or wait the time-out time.
The stored alarms are max. 100; every new alarm that the machine detects after 100 will delete the oldest alarm and will
overwrite it .
Auto
ENGLISH
Summary of Contents for VORT HR 550 AVEL
Page 1: ...VORT HR 550 AVEL Libretto istruzioni Instructions Booklet COD 5 571 084 131 12 12 2018...
Page 21: ...21 FIGURE A C B D A 1 2 3 OK 4 5...
Page 22: ...22 7 8 6...
Page 24: ...24 Note...
Page 25: ...25...


