background image

IMPORTANT 

1.  Read this instruction booklet carefully. 
2.  Before using  the  appliance,  check  if the  mains  power  voltage  corresponds  to  the  voltage 
shown on the rating plate. 
3.  The appliance should be connected to a correctly-earthed 10A power socket. 
4.  Always remove the plug from the power socket when the appliance is not in use and before 
cleaning or maintenance. 
5.  Always remove the plug from the power socket before opening the appliance. 
6.  Never use methylated spirits or other solvents for cleaning the appliance. 
7.  Do not use the appliance to vacuum liquids. 
8.  Never leave the appliance unattended when it is switched on. Keep the appliance out of the 
reach of children or infirm. 
9.  This appliance is only for household use. Use as described in this instruction booklet. 
10. Do not switch the appliance on if it appears to be faulty in any way. 
11.  For repairing or accessories, contact your dealer or an authorized Service Center. 
12. If the supply cord is damaged, it must be replaced by the manufacturer, its service agent or 
similarly qualified persons in order to avoid a hazard. 
13. This  appliance  can  be  used  by  children  aged  from  8  years  and  above  and  persons  with 
reduced  physical,  sensory  or  mental  capabilities  or  lack  of  experience  and  knowledge  if they 
have been given supervision or instruction concerning use of the appliance in a safe way and 
understand the hazards involved. Children shall not play with the appliance. Cleaning and user 
maintenance shall not be made by children without supervision. 
14. Keep the appliance and its cord out of reach of children younger than 8 years. 
15. Do not remove the plug from the socket by pulling the cable or the appliance itself. 
16. Do not use the appliance to vacuum lighted matches, cigarette ends and hot ash. 


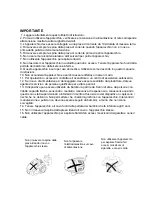
Do not remove the plug from            Do not run the appliance              Do not use the appliance to

the socket by pulling the cable


over the power cable                    vacuum lighted matches,

or the appliance itself                                                                                    cigarette ends or hot ash.


Summary of Contents for SL-159

Page 1: ...ANER MANUALE DI ISTRUZIONI ASPIRAPOLVERE BEDIENUNGSANLEITUNG STAUBSAUGER UPUTSTVO ZA UPOTREBU USISIVA MANUAL DE USUARIO ASPIRADORA MANUAL DO USU RIO ASPIRADOR I I IO NAVODILA ZA UPORABO SESALNIK UPUTE...

Page 2: ...GBR INSTRUCTION MANUAL VACUUM CLEANER SL 159 Please save and read this instruction manual carefully before use...

Page 3: ...DESCRIPTION A Handle F Hose connector B Hose G Dustbin C Wind force adjuster H Power switch D Tube I Cord rewind button E Floor brush J Light indicator...

Page 4: ...your dealer or an authorized Service Center 12 If the supply cord is damaged it must be replaced by the manufacturer its service agent or similarly qualified persons in order to avoid a hazard 13 This...

Page 5: ...G THE VACUUM CLEANER Removing the flexible tube Remove the plug from the power socket To release the flexible Tube press the button on the end of the tube and pull the tube firmly from the air intake...

Page 6: ...nd insert the plug into the power socket Do not extend the cable beyond the RED mark To rewind the power cable press the rewind button with one hand and guide the other hand to ensure that it does not...

Page 7: ...floor brush Pos 1 bristles extended for hard floors Pos 2 bristles retracted for carpets Narrow nozzle Small brush for cleaning radiators corners edges drawers etc for cleaning curtains shelves books...

Page 8: ...he dust cup Clean the foam 1 Take out the foam when it gets dirty 2 Clean it in water and dry naturally before next use DISPOSAL Environmental Protection Waste electrical production should not be disp...

Page 9: ...ITA MANUALE DI ISTRUZIONI ASPIRAPOLVERE SL 159 Conservare e leggere attentamente questo manuale di istruzioni prima dell uso...

Page 10: ...ONE A Maniglia F Connettore del tubo B Tubo flessibile G Pattumiera C Regolatore del flusso d aria H Pulsante di accessione D Tubo I Pulsante riavvolgimento cavo E Spazzola per pavimenti J Indicatore...

Page 11: ...tare il rivenditore o un centro di assistenza autorizzato 12 Se il cavo di alimentazione danneggiato deve essere sostituito dal produttore dal suo agente di servizio o da persone qualificate per evita...

Page 12: ...ubo dal condotto di aspirazione dell aria Montaggio dei tubi di prolunga e degli accessori Montaggio del tubo di Montaggio dei tubi di prolunga Montaggio degli accessori prolunga sulla maniglia al tub...

Page 13: ...nserire la spina nella presa di corrente Non estendere il cavo oltre il segno ROSSO Per riavvolgere il cavo di alimentazione premere il pulsante di riavvolgimento con una mano e guidare il cavo con l...

Page 14: ...pia posizione Pos 1 setole estese per pavimenti duri Pos 2 setole ritratte per tappeti Ugello stretto Pennellino pulizia di radiatori angoli bordi cassetti ecc pulizia di tende mensole libri mobili in...

Page 15: ...della polvere Pulire la schiuma 1 Rimuovere la schiuma quando si sporca 2 Pulirlo in acqua e asciugarlo naturalmente prima del prossimo utilizzo SMALTIMENTO Protezione dell ambiente I rifiuti di prod...

Page 16: ...DEU BEDIENUNGSANLEITUNG STAUBSAUGER SL 159 Lesen Sie diese Bedienungsanleitung sorgf ltig durch und bewahren Sie sie f r die weitere Nutzung auf...

Page 17: ...BESCHREIBUNG A Griff F Rohranschluss B Schlauch G Staubbeutel C Luftstromregler H Schalter D Rohr I Schalter f r Kabelaufwicklung E B rste f r Boden J Indikator Licht...

Page 18: ...utorisierten H ndler f r alle Ger teh hne und Zubeh r 12 Wenn das Netzkabel besch digt ist muss es von einem Hersteller oder einer Servicestelle oder einer hnlich qualifizierten Person ausgetauscht we...

Page 19: ...ntfernen des flexiblen Schlauchs auf das Schlauchende und ziehen Sie den Schlauch fest aus dem Lufteinlass Zusammenschluss von Rohren und Zubeh r Aufbau der Verl ngerungsrohre mit dem Griff Lufteintri...

Page 20: ...ose bevor Sie das Ger t benutzen Ziehen Sie das Kabel nicht ber das ROTE Etikett Um das Kabel zu drehen dr cken Sie mit der einen und der anderen Hand auf den Wickelknopf um das Dabisy Kabel anzuzeige...

Page 21: ...rtb den mit herausgestellten Borsten Pos 2 Teppichb den mit versenkten Borsten Fugend senaufsatz Heizk rper Ecken Kanten Schubladen u reinigen Kleine B rste Reinigung von Kleiderb geln Regalen B chern...

Page 22: ...einigen Sie den Schaumstofffilter 1 Nehmen Sie den Schaumstoff heraus wenn er schmutzig wird 2 Reinigen Sie ihn im Wasser und lassen Sie ihn vor dem n chsten Gebrauch an der Luft trocknen ENTSORGUNG S...

Page 23: ...RUS SL 159...

Page 24: ...A F B G C H D I E J...

Page 25: ...1 2 3 10 4 5 6 7 8 9 10 11 12 13 8 8 14 15 16...

Page 26: ......

Page 27: ...1 2...

Page 28: ...1 2...

Page 29: ...1 2 3 1 2...

Page 30: ...SRB UPUTSTVO ZA UPOTREBU USISIVA SL 159 Pa ljivo pro itajte ovo uputstvo pre kori enja i sa uvajte ga za kasniju upotrebu...

Page 31: ...OPIS A Ru ka F Crevo za povezivanje B Crevo G Rezervoar za pra inu C Regulator snage vazduha H Prekida D Cev I Prekida za vra anje kabla u ku i te E etka za i enje poda J Svetlosni indikator...

Page 32: ...eg prodavca ili ovla eni Servisni centar 12 Ukoliko je naponski kabl o te en mora biti zamenjen od strane proizvo a a ili njegovog ovla enog servisera ili druge kvalifikovane osobe kako biste izbegli...

Page 33: ...koje se nalazi na kraju cevi i povucite ga vrsto iz otvora za protok vazduha Pode avanje cevi i dodataka Sklapanje produ ne cevi sa Sklapanje produ ne cevi Spajanje dodataka sa cevi ru kom Nemojte ko...

Page 34: ...ite utika u zidnu uti nicu Nemojte izvla iti kabl preko CRVENE oznake na njemu Da biste izvukli naponski kabl pritisnite dugme za odmotavanje jednom rukom a drugom izvla ite kabl kako biste izbegli d...

Page 35: ...epih pod Polo aj 1 etkasti deo napolje za Polo aj 2 etkasti deo uvu en za tepihe vrste povr ine Uzani usisni dodatak Mala etka Za i enje radijatora o kova ivica fioka itd Za i enje zavesa polica knjig...

Page 36: ...stog filtera 1 Uklonite penasti filter kada se zaprlja 2 Operite ga u vodi Osu ite ga u potpunosti pre slede e upotrebe ODLAGANJE Za tita ivotne sredine Elektronski otpad ne sme se odlagati zajedno sa...

Page 37: ...ESP MANUAL DE INSTRUCCIONES ASPIRADORA SL 159 Guarde y lea este manual de instrucciones detenidamente antes de usar la unidad...

Page 38: ...DESCRIPCI N A Mango F Conector de manguera B Manguera G Bolsa de polvo C Ajustador de flujo de aire H Interruptor de encendido D Tubo I Bot n de rebobinado del cable E Cepillo de suelo J Indicador...

Page 39: ...su distribuidor o con un Centro de Servicio autorizado 12 Si el cable de alimentaci n est da ado debe ser reemplazado por el fabricante su agente de servicio o personas con calificaciones similares pa...

Page 40: ...en el extremo del tubo y tire del tubo firmemente de la entrada del aire Montaje de los tubos de extensi n y accesorios Colocaci n del tubo de extensi n en el mango No obstruya la entrada de aire o l...

Page 41: ...erte el enchufe en la toma de corriente No extienda el cable m s all de la se al ROJA Para rebobinar el cable de alimentaci n presione el bot n de rebobinado con una mano y gu e el cable con la otra p...

Page 42: ...1 cerdas extendidas para pisos duros Pos 2 cerdas retra das para alfombras Boquilla estrecha limpieza de radiadores esquinas bordes cajones Cepillo peque o limpieza de cortinas estantes libros muebles...

Page 43: ...la espuma 1 Saque la espuma cuando se ensucie 2 L mpielo en agua y s quelo naturalmente antes del pr ximo uso ELIMINACI N Protecci n del medio ambiente La producci n de residuos el ctricos no debe el...

Page 44: ...PRT MANUAL DE INSTRU ES ASPIRADOR SL 159 Antes de usar o seu aspirador leia atentamente este manuale mantenha o guardado...

Page 45: ...DESCRI O A Pega F Conector do tubo B Tubo flex vel G Saco de p C Regulador fluxo de ar H Interruptor D Tubo I Bot o recolha do cabo E Escova J Indicador...

Page 46: ...ado 12 Se o cabo de alimenta o estiver danificado deve ser substitu do pelo fabricante seu agente de servi o ou t cnicos com qualifica es semelhantes a fim de evitar riscos 13 O aparelho s pode ser ut...

Page 47: ...ressione o bot o no final do tubo e puxe o com firmeza a partir do duto da entrada de ar Colocar os tubos de extens o e acess rios Colocar os tubos de extens o na pega N o obstrua a entrada ou sa da d...

Page 48: ...ficha na tomada A marca VERMELHA indica que N O deve estender para al m desse limite Para rebobinar o cabo de alimenta o pressione o bot o de rebobinar com uma m o e oriente o cabo com a outra evitand...

Page 49: ...Pos 1 Cerdas estendidas para soalhos duros Pos 2 Cerdas retra das para carpetes Bocal estreito limpeza de radiadores esquinas bordas gavetas etc Escova pequena limpeza de cortinas prateleiras livros...

Page 50: ...stiver suja 2 Limpe com gua e deixe secar ao natural antes de voltar a utilizar ELIMINA O Protec o ambiental Equipamentos el tricos dom sticos em fim de vida n o podem ser descartados com o restante l...

Page 51: ...GRC SL 159...

Page 52: ...A F B G C H D I E J...

Page 53: ...1 2 3 10 4 5 6 7 8 9 10 11 12 13 8 8 14 8 15 16...

Page 54: ......

Page 55: ...1 2 ON OFF...

Page 56: ...1 2...

Page 57: ...1 2 3 1 2...

Page 58: ...NAVODILA ZA UPORABO SESALNIK SL 159 Pred uporabo prosimo pozorno preu ite navodila SVN...

Page 59: ...OPIS A Ro aj F Nastavek za upogljivo cev B Upogljiva cev G Smetnjak C Regulator pretoka zraka H Stikalo za vklop izklop D Cev I Gumb za navijanje kabla E Krta a za tla J Svetlobni indikator...

Page 60: ...izvajalec poobla en serviser ali ustrezno usposobljeno osebje da ne bi pri lo do nevarne situacije 13 Aparat ni namenjen uporab od strani oseb vklju no z otroci z zmanj animi telesnimi zaznavnimi ali...

Page 61: ...ktri ne vti nice Da bi odstranili upogljivo cev pritisnite gumb na njenem koncu in cev trdno povlecite iz luknje za dovod zraka Nastavitev podalj evalne cevi in nastavkov Nastavitev podalj evalne cevi...

Page 62: ...volj kabla in vstavite vti v elektri no vti nico Ne odvijajte kabla ez RDE O oznako Da bi navili napajalni kabel pritisnite gumb za navijanje z eno roko z drugo pa vodite kabel da se ne bi zapletel 2...

Page 63: ...za tlak preproge Polo aj 1 spu ene etine za tlak in parket Polo aj 2 dvignjene etine za preproge Majhna krta a Za i enje zaves polic knjig rezbarjenega pohi tva in drugih ob utljivih predmetov Ozka o...

Page 64: ...uma e ga odstranite 2 O istite ga z vodo in pustite da se naravno osu i pred ponovno uporabo ODLAGANJE ODPADKOV Prispevajte k za iti okolja Odpadne elektri ne izdelke ne odlagajte skupaj z gospodinjsk...

Page 65: ...HRV UPUTE ZA UPORABU USISAVA SL 159 Pozorno pro itajte ove upute prije kori tenja i sa uvajte ih za kasniju upotrebu...

Page 66: ...OPIS A Dr ka F Crijevo za povezivanje B Crijevo G premnik za pra inu C Regulator snage zraka H Prekida D Cijev I Prekida za vra anje kabla u ku i te E Podni ista J Svjetlosni indikator...

Page 67: ...prodava a ili ovla teni Servisni centar 12 Ukoliko je naponski kabel o te en mora biti zamijenjen od strane proizvo a a ili njegovog ovla tenog servisera ili druge kvalificirane osobe kako biste izbje...

Page 68: ...koje se nalazi na kraju cijevi i povucite ga vrsto iz otvora za protok zraka Pode avanje cijevi i dodataka Spajanje produ ne cijevi sa Spajanje produ ne cijevi Spajanje dodataka sa cijevi ru kom Nemoj...

Page 69: ...ite utika u zidnu uti nicu Nemojte izvla iti kabel preko CRVENE oznake na njemu Da biste izvukli naponski kabel pritisnite gumb za odmotavanje jednom rukom a drugom izvla ite kabel kako biste izbjegli...

Page 70: ...h pod Polo aj 1 etkasti dio napolje za Polo aj 2 etkasti dio uvu en za tepihe vrste povr ine Uzani usisni dodatak Mala etka Za i enje radijatora kutova rubova ladica itd Za i enje zavjesa polica knjig...

Page 71: ...og filtra 1 Uklonite pjenasti filter kada se zaprlja 2 Operite ga u vodi Osu ite ga u potpunosti prije sljede e uporabe ODLAGANJE Za tita ivotne sredine Elektronski otpad ne smije se odlagati zajedno...

Page 72: ...www voxelectronics com...

Reviews: