background image


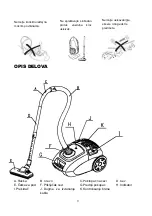
A. Handle


B. Hose


C. Tool cover


D. Tube   


E. Floor brush


F. Hose connector


G. Front cover


H. Indicator


I. Power switch


J. Cable rewind button


K. Speed controller


ASSEMBLY

Removing the flexible tube

Remove the plug from the power socket. To release
the flexible tube, press the button on the end of the
tube and pull the tube firmly from the air intake duct.


Fitting the extension tubes and accessories               


Fitting  the  extension 
tube to the handle 

Fitting 

the 

extension tubes   

Fitting  the  accessories 
to the extension tube 

Assemble 

the 

tool 

cover 

and 

handle 

together 

INSTRUCTION FOR USE


1.  Before using the appliance, unwind length of cable and insert the plug into the power socket. 

The  YELLOW mark  on  the  power  cable  shows  the  ideal  cable  length.  Do  not  extend  the 
cable beyond the RED mark. To rewind the power cable, press the rewind button with one 
hand and guide the cable with the other hand to avoid wrapping. 

2.  Press  the  ON/OFF  button  to  switch  the  appliance  on.  It  is  advisable  to  set  the  electronic 

power regulator to MIN before switching the appliance on. 

3.  By turning the speed control knob, the absorption power can be adjusted. 


Summary of Contents for SL-306N

Page 1: ...GBR SRB SL 306N OPERATING INSTRUCTIONS VACUUM CLEANER UPUTSTVO ZA UPOTREBU USISIVA...

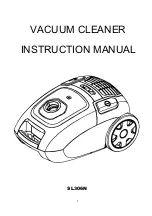
Page 2: ...GBR INSTRUCTION MANUAL VACUUM CLEANER MODEL SL 306N Please save and read this instruction manual carefully before use...

Page 3: ...1 VACUUM CLEANER INSTRUCTION MANUAL SL306N...

Page 4: ...it appears to be faulty in any way 11 For repairing or accessories contact your dealer or an authorized Service Center 12 If the supply cord is damaged it must be replaced by the manufacturer its serv...

Page 5: ...3 DESCRIPTION...

Page 6: ...Fitting the accessories to the extension tube Assemble the tool cover and handle together INSTRUCTION FOR USE 1 Before using the appliance unwind length of cable and insert the plug into the power so...

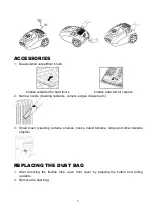
Page 7: ...carpets 2 Narrow nozzle cleaning radiators corners edges drawers etc 3 Small brush cleaning curtains shelves books inlaid furniture lamps and other delicate objects REPLACING THE DUST BAG 1 After rem...

Page 8: ...ent and put it back when it is completely dry 4 If you do not want to use this appliance for a period of time store it on a dry and well ventilated place Keep it out of reach of children DISPOSAL Envi...

Page 9: ...SRB UPUTSTVO ZA UPOTREBU USISIVA MODEL SL 306N Pa ljivo pro itajte ovo uputstvo pre kori enja i sa uvajte ga za kasniju upotrebu...

Page 10: ...7 USISIVA UPUTSTVO ZA UPOTREBU SL306N...

Page 11: ...opisano u uputstvu 10 Nemojte uklju ivati ure aj ukoliko je o te en na bilo koji na in 11 Za bilo kakvu popravku ili zamenu delova kontaktirajte Va eg prodavca ili ovla eni Servisni centar 12 Ukoliko...

Page 12: ...pod F Priklju ak cevi G Prednji pokopac H Indikator I Prekida J Dugme za izvla enje kabla K Kontrolisanje brzine Nemojte koristiti ure aj na mokrim povr inama Ne spre avajte slobodan protok vazduha k...

Page 13: ...cevi sa ru kom UPUTSTVO ZA UPOTREBU 1 Pre upotrebe ure aja odmotajte celu du inu kabla i ubacite utika u zidnu uti nicu UTA oznaka na kablu pokazuje idealnu du inu kabla Nemojte izvla iti kabl preko C...

Page 14: ...pihe 2 Uzani usisni dodatak i enje radijatora uglova ivica fioka itd 3 Mala etka i enje zavjesa polica knjiga namje taja lampi i drugih osetljivih predmeta ZAMENA KESE ZA PRA INU 1 Nakon uklanjanja pr...

Page 15: ...ga potpuno osu ite 4 Ukoliko neko vreme ne ete koristiti ure aj uvajte ga u suvoj i dobro provetrenoj prostoriji Dr ite ure aj van doma aja dece ODLAGANJE Za tita ivotne sredine Elektronski otpad ne...

Page 16: ...www voxelectronics com...

Reviews: