background image

P70

Digital Media

Player  Controller

&

81


ENGLI

SH

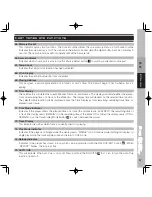
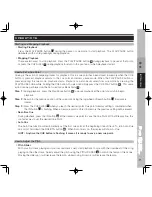
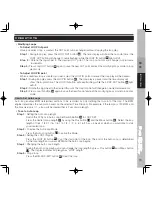
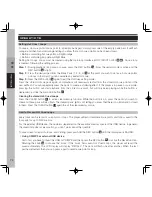
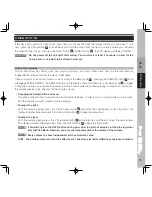
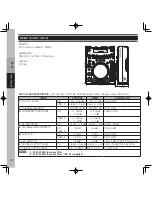
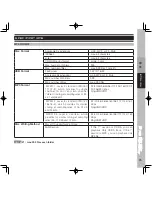
MIDI MAP

SW name

Type

MIDI

MIDI2

(Hold SHIFT)

Remarks


23

SW/ENC

2B/31

6A/70

CC TYPE = RELATIVE


22

SW/ENC

25/33

64/72

CC TYPE = RELATIVE

JOG 

24

SW/ENC

13/35

52/74

CC TYPE = RELATIVE


23

CW/CCW

31/32

70/71

CC TYPE = NOTE


22

CW/CCW

33/34

72/73

CC TYPE = NOTE

JOG 

24

CW/CCW

35/36

74/75

CC TYPE = NOTE


23

ENC/CENTER

31/0F

70/4E

CC TYPE = ABSOLUTE


24

ENC/CENTER

33/15

72/54

CC TYPE = ABSOLUTE

Pitch Slider   

9

VR/CENTER

PITCHBEND/18

76/57

START  

4

VR

27

66

BRAKE 

5

VR

2D

6C


16

SW/LED

02/02

41/02

CUE 

17

SW/LED

2E/2E

6D/2E

NEXT TRACK 

20

SW/LED

10/10

4F/10

HOLD 

35

SW/LED

11/11

50/11

FX TIME 

36

SW/LED

0B/0B

4A/0B

FX DEPTH 

40

SW/LED

2F/2F

6E/2F

ECHO 

37

SW/LED

05/05

44/05

FLANGER  

38

SW/LED

29/29

68/29

FILTER 

39

SW/LED

23/23

62/23

LOOP  

41

SW/LED

30/30

6F/30

IN     

43

SW/LED

04/04

43/04

OUT 

44


SW/LED

17/17

56/17

RELOOP  

45

SW/LED

1D/1D

5C/1D

REV      

42

SW/LED

0A/0A

49/0A

CLEAR 

15

SW/LED

08/08

47/08

REC.    

14

SW/LED

0E/0E

4D/0E

Summary of Contents for P70

Page 1: ...User Manual 使用說明書 數碼媒體播放 控制器 P70 Digital Media Player Controller ...

Page 2: ...色_MAIN FEATURES 主要特色 06 產品特色_FUNCTIONS FEATRUES 功能與特色 08 連接方式 10 連接方式_基本連接 11 連接方式_MIDI 控制器連接 12 部件名稱與功能_TOP PANEL控制面板 14 部件名稱與功能_後背板 22 部件名稱與功能_前面板 23 部件名稱與功能_顯示屏幕 24 功能設定選單 26 連接兩台P70播放器 28 操作控制 29 資料庫建立軟 36 MIDI 控制對應 MIDI MAP 39 規格 42 ...

Page 3: ...8 CONNECTIONS 50 CONNECTIONS_Basic Connection 51 CONNECTIONS_MIDI Controller Connection 52 PART NAMES AND FUNCTIONS_TOP PANEL 54 PART NAMES AND FUNCTIONS_REAR PANEL 64 PART NAMES AND FUNCTIONS_FRONT PANELL 65 PART NAMES AND FUNCTIONS_DISPLAY SECTION 66 UTILITY MENU 68 LINK UP Two P70s 70 OPERATIONS 71 DATA BASE BUILDE 79 MIDI MAP 81 SPECIFICATIONS 84 ...

Page 4: ...作 如果你不確定你住家的電源的種類 請諮詢你的產品賣家或當 地電力公司 若本產品需要用電池或其他電源 請參照操作說明書 10 接地與電極 本產品可能供給極化交流電插頭 插頭只有一個方向插入插座 這是一個安全裝置 如果沒 辦法完全插入插座 請試著把插頭反方向 如果插頭仍無法插入插座 請連絡電工來更換插座 請勿毀 損安全性為考量的插頭 11 電源線的保護 電源供應線應該妥善規劃佈線的路徑 避免被其他物件所纏繞 應特別注意所使用的插座 是否與電源供應線的插頭吻合 這插座要靠近本產品的使用地點 12 清潔 本產品須依照製造商所建議的方式做清潔 清潔本產品應使用柔軟的乾布清潔 13 交流電供電零件 維修完成後在交還產品給使用者前 應使用電阻測量表測量交流電插頭及所有暴露在外 的金屬零件 電阻值應大於100k歐姆 14 長時間未使用 本產品在長時間未使用的狀況下 應將插頭拔除 15 物體及液體進入 小...

Page 5: ...架 支撐架或桌 子 或是與本產品一起銷售的配件 必須依製造商指示安裝本產品 並且安裝的配件必須使用製造商所建 議的 21 閃電 為保護本產品在風雨期間不受到閃電的影響及侵害 當本產品長時間不使用時將插頭拔除 並拆除 天線 這將保護本產品免於受到閃電及電源突然增加的損害 22 替換零件 當需要替換零件時 請確保維修技術人員使用製造商所指定的零件或是與原零件具有相同特性 的替代品 未經授權的替代零件會導致過熱著火 電磁衝擊或其他嚴重的損害 23 安全性檢查 本產品在進行維修或任何服務時 請要求維修服務人員進行安全性檢查 以確保本產品在正 確地操作狀況下 重 要 安 全 指 示 警 告 嚴禁本產品暴露在下雨及潮濕的環境之中 以降低起火及觸電的危險 本產品避免暴露在會滴水及會濺到 水的環境中 裝有液體的容器絕對禁止放在本產品上 例如酒瓶 花瓶等等 注 意 為了杜絕觸電的危險 請勿使用不合規格的插座...

Page 6: ...AC 在新世紀的DJ表演中 越來越多的DJ採用筆記本電腦與DJ軟件來表演 為了滿足新世紀DJ的需求 P70設計了 MIDI界面可以控制目前大多數DJ應用軟件 DJ可以指定控制面板上的每一個按鍵 旋鈕與推子去啟動DJ軟件上的 功能 除此之外A B deck切換的設計 可以延伸控制讓一台播放器可以控制兩個deck 可被四個按鍵觸發的記憶點 P70 可以幫你記錄每首歌曲四個記憶點 這記憶點可以是起播點 Hot Cue 或是循環 LOOP 從CD MP3 光盤 中 P70可儲存多達2000個儲存點 當讀取已儲存記憶點資料的光盤時 你隨時可將記憶點重新呼叫出來 如果 將音樂儲存在U盤上 可儲存記憶點的數量完全取決於U盤空間的大小 你可儲存盡可能多的數量 記錄的功能就 像是一個小型的採樣器 可為你的DJ表演增加許多創意性與變化性 4 個獨立5秒樣本庫 Samples 創新設計的內建採樣功能提供DJ在表...

Page 7: ...獨立的控制旋鈕 可以調整控制音 樂播放啟動與停止煞車的時間 就好像傳統唱盤將馬達打開慢慢啟動及關閉馬達慢慢停止所表現出來的效果 全球獨創A C P 設計 特殊的設計讓P70播放器可以讓DJ同時控制多達5個Cue點 包含一個一般的Cue點及4個Hot Cues DJ能夠利用這 5個cue點在表演上做出豐富創意的音樂變化 A C P 是執行中Cue點的縮寫 是一個位於轉盤上12點鐘位置視覺 上的指示 為了協助DJ做刮盤時特別設計的 當DJ啟動Cue時 Cue點的位置就會立即被移到12點鐘位置 發光 環上並有一藍光表示 提供DJ在刮盤時直覺的提示增加刮盤的方便性 下一首音樂預選功能 獨特的功能設計讓DJ在同一台播放器上 在不中斷目前歌曲的播放 能夠預選下首歌曲 這個功能使得DJ能做出 完美及平順的不中斷播放 連接多台P70播放機 VOXOA所研發出的最新技術 LINK UP 連接功能 能夠讓你使...

Page 8: ...和推子均與MIDI相容 可切換 A B deck MIDI控制設定 支援ID3 TAG與光盤歌曲文字顯示 Playback播放功能 立即讀取技術 不中斷播放預選下一首音樂功能 Cue點立即播放功能 推子啟動播放功能 兩台播放器連續交替播放功能 單曲與連續播放模式 可調整啟動 停止速度模擬黑膠唱盤效果 倒播功能能產生特殊音效 回到Cue點立即播放按鍵設計 Data search 音樂資料搜尋 歌曲與資料夾搜尋系統 可透過轉盤來做一幀一幀精確搜尋 免費下載DATABASE BUILDER軟件 讓USB設備的音樂資料能快速搜尋 顯示音樂檔名與資料夾名稱 Cue Loop Cue點 音樂循環 全球獨創A C P 執行中Cue點指示系統 自動Cue點功能設定每首音樂起始點 無縫的循環 Loop 與再循環 Reloop 功能 可即時調整循環 Loop 的結束點 Out點 ...

Page 9: ...tch bend可調整到 100 音調鎖定能夠讓音樂速度改變但不會影響到音樂原本的音調 Jog Wheel 轉盤 專為刮盤設計的觸控轉盤 轉盤上發光環設計 提供立即視覺回饋 發光環有九種不同的顯示模式 多功能轉盤設計 可以用來刮盤 pitch bend 搜尋 frame Search 樣本調整 音效調整 轉盤有三種不同的模式 一般CDJ播放 CDJ 模擬唱盤 Vinyl 自動回到cue點刮盤 A Cue Scratch Cue Scratch Mode觸摸到轉盤表面 音樂就會立即回到Cue點設計 Effects聲音特效 3個極佳的節拍同步DSP數位音效 內鍵音效 Echo Flanger Filter 音效參數時間 Time 與深度 Depth 可透過轉盤調整 節拍選擇按鍵 用來選擇同步效果的節拍 Display顯示屏幕 高亮度顯示屏幕能夠顯示各操作功能 顯示目前播放位置 已播放 剩餘時間...

Page 10: ... 為使本產品產生最好的聲音品質 盡請使用高品質的音訊連接線 3 不要使用過長的連接線 並確保插頭與插座是穩固的連接 若插頭與插座連接過鬆 會造成哼聲 雜訊 或是斷 斷續續的聲音輸出 這將會對你的喇叭 造成極大的危害 4 使用RCA音訊連接線 連接本器材與混音器 注 意 請務必使用所提供的接線 使用其他類型的連接纜線恐會導致危險 連接到計算機 支援電腦系統包含Vista Window XP 及MAC OS X或是更新的版本 錄音機 硬盤 筆記本電腦 3 5mm 6 3mm RCA S PDIF USB Type A USB Type B ...

Page 11: ...P70 Digital Media Player Controller 11 中 文 E N G L I S H 連 接 方 式 基本連接 USB 連接 類比音訊連接 耳機 CD MP3 USB 播放機 混音器 CD MP3 播放機 監聽耳機 ...

Page 12: ...12 中 文 E N G L I S H 連 接 方 式 基本連接 MIDI 控制器連接 計算機 USB 連接 類比音訊連接 USB 連接 類比音訊連接 耳機 功率放大機 混音器 後級喇叭 CD MP3 USB 播放器 CD MP3 USB 播放器 USB音效卡 耳機 MIDI控制器 Deck A B 如VOXOA A30 ...

Page 13: ...layer Controller 13 中 文 E N G L I S H 連 接 方 式 MIDI 控制器連接 USB 連接 類比音訊連接 含音效卡 混音器 如VOXOA M60 如VOXOA A30 無音效卡 混音器 如VOXOA M10 功率放大機 後級喇叭 USB音效卡 MIDI控制器 Deck A MIDI控制器 Deck B MIDI控制器 Deck A MIDI控制器 Deck B 耳機 功率放大機 計算機 後級喇叭 計算機 ...

Page 14: ...14 中 文 E N G L I S H 部 件 名 稱 與 功 能 TOP PANEL控制面板 1 2 3 9 20 21 11 12 10 13 14 15 16 17 18 19 22 23 6 5 7 8 4 26 25 24 ...

Page 15: ...秒 切換進入MIDI 模式 4 唱盤起始速度START調整鈕 當在VINYL 唱盤 及A Cue Scratch 模式下 當按下播放鍵時 這個起始速度調整鈕 可控制調整由起始達 到正常播放速度的加速度 此旋鈕逆時針旋轉時 達到正常播放速度時間越快 此旋鈕順時針旋轉時 達到正 常播放速度時間越慢 5 唱盤煞車速度BRAKE調整鈕 當在VINYL 唱盤 及A Cue Scratch 模式下 當按下暫停播放時 這個煞車速度調整鈕 可控制調整由正常 播放速度到完全停止時的減速度 此旋鈕逆時針旋轉時 達到完全停止的時間越快 此旋鈕順時針旋轉時 達 到完全停止的時間越慢 6 拍子速度調整範圍 Tempo Range 指示 顯示目前由拍子速度調整範圍選擇按鍵 7 所選擇的拍子速度調整範圍 7 拍子速度調整範圍選擇按鍵 每按一次此按鍵 拍子速度改變推子的範圍變化 由 6 10 16 及 100 間切換 3...

Page 16: ...e時 按鍵的燈號是橙色 當儲存的是Loop時 按鍵的 燈號是藍色 注 意 當按鍵閃動時 表示可針對此按鍵所記錄的資料做編輯 14 Hot Cuee Loop 記錄 Record 與呼叫 Recall 按鍵 這個按鍵有以下兩種不同的操作方式 1 按下此鍵來啟動記錄模式 此時按鍵燈號亮起 再按下你所希望的記錄的Pads 13 去儲Cue或是Loop 用同 樣的方式可以覆蓋原本已有儲存的資料 再次按下此鍵離開記錄模式 2 儲存目前儲存按鍵組中所記錄的Cues與Loops到系統內存之中 以便下次可以再使用 按下此按鍵不放 約按住一秒鐘的時間 直到此鍵燈號閃動為止 顯示屏幕並會出現 Saving 的字樣 當燈號閃動結束表示 儲存完成 注 意 呼叫內存所儲存的Cues與Loops 在光盤或u盤中 播放器每首歌曲可儲存4個記憶點 光盤最多可儲 存到2000個記憶點 U盤的記憶點無限制完全決定於U盤的空間...

Page 17: ...鍵能夠立即回到Cue點並立即開始播放 這個按鍵的設計 是提高DJ操作的方便性 你可以輕鬆的表演 出BOP特效 所謂BOP特效 是透過連續回到Cue點並立即播放所造成的特別的效果 19 搜尋SEARCH鍵 搜尋鍵用來協助你快速的找到你所需要歌曲的位置 這個搜尋鍵能夠讓你快速的往退後搜尋 這個搜 尋鍵能夠讓你快速的往前進搜尋 20 預選下一首NEXT播放音樂 預選下一首音樂的功能是協助你準備下一首播放的音樂 但不中斷目前音樂的播放 這項功能大幅提升你在操 作時的效率 操作方式如下 步驟 1 按下此鍵啟動預選下一首音樂的功能 步驟 2 選擇下一首你所要播放的音樂 可以從現在播放的CD片或是USB的同一個目錄下選擇 使用音樂選擇 旋鈕 22 來選擇 步驟 3 按下Enter鍵 21確定你所選擇的音樂 系統並開始進行搜尋 步驟 4 當顯示屏幕出現 FOUND 表示系統已經準備好NEXT TRACK的...

Page 18: ...樂播放的速度 最多減 至 100 控制調整取決於轉動轉盤距離的多寡 3 模擬唱盤 在唱盤模式下 這轉盤的正面就有如黑膠唱盤一般 前後轉動可控制音播播放的位置 做出刮盤 的特效 轉盤外緣仍是當做是Pitch Bend的功能 4 音樂循環 Loop IN OUT點的調整 轉盤可用來當作音樂循環 Loop IN OUT點的調整 詳細的操作 請參考 有關操作的部分 5 音效Effects及樣本Sample參數的調整 啟動音效時 按下X鍵 36 再轉動轉盤可控制音效的X 時間 參數 按下Y鍵 40 轉盤可控制音效的Y參數 在播放樣本 Sample 模式下 轉盤可控制樣本的音量大小及播放 速度 25 轉盤發光環 轉盤上的發光環 有九種不同顯示方式 調整操做如下 步驟1 按下Enter鍵 21 進入設定選單模式 然後旋轉FOLDER轉鈕 23 選擇 1 JOG MODE 步驟2 旋轉TRACK轉鈕 22...

Page 19: ...憶點Yes or No 按鍵 在MIDI模式之下 按下這組按鈕 可用來切換控制A或是B的播放控制 在載入記憶點模式下 此組按鍵用來 做確定 Y 或是離開 N 28 SGL CTN 單曲 連續 播放切換按鍵 這個功能讓你切換音樂的播放是單曲播放還是連續播放 SGL 單曲播放 當目前播放的歌曲播放結束 播放器立即成為暫停的模式 CTN 連續播放 當整片CD或是檔案夾的歌曲播放完畢時 會切換成暫停的模式 29 播放時間顯示模式切換按鍵 切換顯示屏幕上時間的表示方式 ELAPSED 表示目前已播放的時間 REMAIN 表示剩餘多少時間 TOTAL REMAIN 表示整片光盤剩餘播放時間 30 Minus Button減少鍵 移動 時間分割 TIME DIVISION 指示 31 往左移動減少 31 時間分割TIME DIVISION指示 顯示時間分割的時間長短 可顯示音效節拍同步 FX BEAT ...

Page 20: ...的功能就會被關閉 37 回音 ECHO 音效 用來啟動與關閉回音音效 回音音效可為輸出的音樂增加回音 38 FLANGER音效 用來啟動與關閉FLANGER音效 FLANGER音效扭曲輸出訊號 產生一個類似於頻率相位互相交錯的效果 這 個改變頻率的特效類似Phase的效果 但是更協調 特別強調在頻率較高的部分 展現的音效令人聯想起由頭 頂飛過的噴射機 音效會與目前BMP值同步 可利用特效同步的增加32與減少鍵30來做精確的調整 你也可以手動來改變特效節拍的頻率 啟動X參數 36 透過轉盤來調整頻率值由0到9990毫秒 改變特效的強 度 按下Y參數40 轉動轉盤來調整強度由0到255 秘訣 將節拍同步設在4 1拍時 可以獲得最佳的效果 39 濾波 Filter 音效 這個按鍵用來啟動與關閉FILTER音效 FILTER音效扭曲了原來的聲音增加了不同音調的定義 播放器可使音 效與目前音樂的BM...

Page 21: ...N 開始 按下結束點 OUT 結束 循環會連續不斷的播放 循環播放時IN與OUT按鍵會不停閃動 直到再循環 離開 RELOOP EXIT 45 的按鍵被 按下 循環播放才會停止 循環的結束點 OUT 可以及時調整 當循環播放中按下結束點 OUT 屏幕顯示結 束點 OUT 的時間 同時只剩下結束點 OUT 的燈號閃動 此時轉動轉盤調整結束點 OUT 設定 再按一次結束 點 OUT 完成調整 音樂繼續循環播放 45 再循環 離開鍵 如果已經設定一個無縫循環 但是已經離開循環播放模式 按下此鍵立即啟動循環播放的模式 離開循環播放 再按此鍵一次 循環播放中 再循環播放 RELOOP 會顯示在屏幕上 46 轉盤模式Jog Wheel Mode切換按鍵 每按一次切換按鍵可切換轉盤的三種不同模式 模擬唱盤模式 VINYL 一般CDJ模式 CDJ 與自動回Cue點 刮盤模式 AUTO CUE SCRATC...

Page 22: ...件 當與電 腦連接時 不需要驅動程式 電腦系統會自動辨識 或可用來連接另一台Host USB播放器 49 數碼輸出插口 這個數碼訊號輸出需要S PDIF 75Ohm coaxial 連接線 用來與混音器或是任何數碼錄音設備相連接 50 交替播放RELAY PLAY 推子啟動FADER START控制線連接插口 透過交替播放插口 兩台播放器可以交替播放 如果與支援推子啟動的混音器相連接 可以透過混音器的交叉 推子來做控制播放 更清楚的操作細節請參考操做控制 如何使用交替播放與推子啟動章節 51 電源開關 這個開關用來開啟與關閉電源 部 件 名 稱 與 功 能 後背板 49 47 48 50 51 53 54 55 52 ...

Page 23: ...光盤放入時 此指示燈會亮 放入光盤讀取時 此指示燈閃爍 57 光盤載入槽 將光盤有標籤的一面朝上 平均地將光盤插入載入槽中 警告 當電源開關 51關閉時 切勿試圖將光盤強行插入載入槽中 會造成光盤或是載入的機構受到嚴重損害 56 57 前面板 52 電源線插口 這個插口用來連接電源供應 插頭只有一個方向能夠插入 若方向不符合時 切勿強制插入 53 RCA聲音輸出插口 這個類比輸出訊號需要一對左右通道的RCA線去連接混音器或是功率放大器 54 1 4英吋監聽耳機插口 使用1 4英吋耳機插頭來連接監聽耳機 55 監聽耳機音量控制 這個控制旋鈕可控制監聽耳機的音量輸出大小 ...

Page 24: ...示燈亮會閃爍 61 觸控指示 當轉盤表面被觸摸時 此指示燈會立即亮起 62 資料夾顯示 顯示目前資料夾的編號 資料夾的編號方式是以光盤或U盤中資料結構為主 由根目錄開始編輯 63 點矩陣訊息顯示列 當播放有ID3標籤的MP3檔案 或是有文字的音樂光盤時 顯示資料夾名稱 音樂的表演者名稱 檔案名稱 專輯名稱 音樂類別與音樂名稱等 切換不同的顯示方式按歌曲選擇旋鈕 22 做切換 64 BPM 顯示 顯示目前播放歌曲BPM Beat per Minute每分鐘節拍數 數值 當AUTO BPM 顯示時表示自動節拍計算器運作 中 58 59 60 61 62 63 64 65 66 67 68 69 70 71 72 73 74 75 顯示屏幕 ...

Page 25: ...分比 69 播放位置 這個長條提供視覺音樂播放位置的顯示 當音樂快播放結束時 長條開始閃爍 70 時間顯示 提供目前音樂詳細的分 秒與幀 顯示的方式由時間顯示功能所決定 可顯示已播放時間 ELAPSED 剩餘時 間 REMAIN 整片光盤剩餘播放時間 TOTAL REMAIN 71 時間顯示模式指示 指示目前顯示時間的模式 ELAPSED已播放時間 REMAIN剩餘播放時間 TOTAL REMAIN整片光盤剩餘播 放時間 使用播放時間顯示模式切換按鍵 29在不同模式之間做切換 72 音樂編號顯示 指示目前音樂的編號 73 播放模式指示 指示播放器在單曲播放模式或是連續播放模式 在單曲播放模式顯示SINGLE 在連續播放模式不做任何顯 示 74 再循環指示 指示目前已儲存有循環設定 可按下RELOOP EXIT鍵 45 再次播放循環 當循環在播放時 此指示呈現閃爍的 狀態 75 自動起始 C...

Page 26: ...亮 2 Playlist 音樂播放清單排序模式 設定音樂播放清單排序方式 可依 一般Normal 無資料庫 刪 音樂名稱Title 音樂表演者名稱Artist 專輯名稱 Album 音樂類型Genre 只有USB才有 播放時的排序方式 DATABASE BUILDER 軟件能夠針對U盤產生 音樂播放清單 PLAYLIST 可以依照需求而篩選不同的播放 清單排序的方式 旋轉 音樂TRACK選擇旋鈕22 去選擇播放清單依照何種方式排序 選擇確定按下ENTER 鍵 儲存並離開 一般模式Normal 這是內定值 播放清單是依照檔案階層架構所排序 音樂名稱Title 播放清單依照依 音樂名稱Title 按英文字母順序排序 音樂表演者名稱Artist 播放清單依照依 音樂表演者名稱Artist 按英文字母順序排序 專輯名稱Album 播放清單依照依 專輯名稱Album 按英文字母順序排序 音樂類型Ge...

Page 27: ...給不同控制器一個編號名稱由B H A MIDI NOTE EDIT 編輯MIDI NOTE值 請參照MIDI MAP B MIDI LED EDIT 編輯由電腦端所傳送的LED燈號控制訊息 請參照MIDI MAP C Repeat Mode 重複播放模式 當選擇重複播放時 只在同一檔案夾下連續播放 D Bit Rate MP3壓縮率 是否顯示MP3的壓縮率 可設定顯示ON 關閉OFF E Version 韌體版本資訊 CON VerXX Control 版本 SER VerXX Servo 版本 BUF VerXX Buffer 版本 DSP VerXX DSP 版本 F Load Default 載入預設值 按下音樂選擇旋鈕 22 載入預設值 儲存記憶信息 改變後會記錄的信息 PITCH ON OFF PITCH RANGE SGL CTN AUTO CUE TIME MODE HOLD...

Page 28: ...I控制設定 選項 3 旋轉轉盤直到USB LINK 出現 再按下Enter 鍵 21 記憶並離開選單 4 現在插入外接USB 設備到主要播放器的USB 1插口 2 或是USB 2插口 47 注 意 選擇USB 1插口 2 或是USB 2插口 47 取決於在功能選單中的設定 在功能選單中的 MIDI SETUP LINK 設定讀取那一個插口 5 連接主要播放器USB MIDI 插口 48 到第二播放器的USB插口 6 第二台播放器就可以進入到主要播放器上的外接USB設備 注 意 共享外接USB設備前須先經由主要播放器讀取過 注 意 透過這個連接方式 可以連接數台播放器 但可能會造成讀取資料速度減慢 造成播放操控不順暢與 不可預期的錯誤 強烈建議只連接兩台播放器 USB 1 USB MIDI PORT USB 2 第二台播放器 第二台播放器 主要播放器 ...

Page 29: ... 在音樂播放時 按下Cue鍵 音樂會立即暫停並回到Cue點 當再按下播放暫停 PLAY PAUSE 鍵時 音樂開始從Cue點播放 也可以回到Cue點立即播放 按住不放Cue 鍵 再按下播放暫停 PLAY PAUSE 音樂就會回到Cue點並立即播 放 或是簡單的按下Cue Play鍵18 相同操作的動作也可以運用在Hot Cues Bank Pads中13 步驟 1 在播放中 當音樂播放到你所想要的時間點 按下PLAY PAUSE播放暫停鍵 16 暫停音樂播放 步驟 2 精確的搜尋Cue點的位置 使用Search鍵 19 或是使用轉盤可以做一幀一幀精確搜尋 步驟 3 找到你所想要的播放點 按下Cue鍵 17 IN 鍵 43 會閃動表示Cue點的設定完成 新設定的Cue點會 覆蓋原有的 即時設定Cue點 在播放模式下 在你所希望設定的時間點 按下IN鍵 43 Cue點立即被儲存 只要稍做練習 ...

Page 30: ... 使用轉盤調整速度 24 轉盤也可作為暫時調整速度用 當音樂播放時 順時針轉動轉盤增快播放速度 逆時針轉動轉盤減慢播放速 度 改變速度的幅度會依照你所轉動轉盤的速度而定 建議使用轉盤的外沿來做速度調整的控制 因為在模擬 唱盤 Vinyl 與自動回Cue點刮盤 Auto Cue Scratch 模式下 觸摸到轉盤表面會讓播放暫停 音調鎖定KEY LOCK功能 這項功能讓音樂的速度改變時不影響音樂的音調 當音調鎖定功能的按鍵亮時 音調是保持原音調不變的 無縫循環 Seamless Loops 創造一個無縫循環 LOOP 步驟 1 按下播放鍵 Press the PLAY PAUSE 16 開始播放 步驟 2 播放至要求的循環起始點 按下起始點 IN 鍵 43 步驟 3 按下結束點 OUT 鍵 44 設定循環的結束點 播放立即回到先前所設定的起始點 IN 並開始播放到結 束點 OUT 反覆播放 ...

Page 31: ...鍵保持閃爍 步驟 2 旋轉轉盤到需求的起始點 此時轉盤轉動增減以幀 frame 為單位 步驟 3 再按下起始點 IN 鍵 43 儲存新的起始點並離開修改循環的模式回到正常循環播放的模式 設定自動循環AUTO LOOP 自動循環的功能 只要設定循環的起始點 BPM計算器會依照目前音樂的節拍數與所設定循環的長度來決定循環 的結束點 舉例說明 假設音樂的速度是120BPM 每分鐘120拍 時間長度1 1小節 4拍 一個循環長度2 秒 設定自動循環 步驟 1 設定自動循環長度 切換特效同步或是為自動節拍切換鍵33 到自動節拍循環設定 使用增加減少按鍵 32 30 來選擇循環長度 有11種長度可選擇1 64 1 32 1 16 1 8 1 4 1 2 1 2 4 8 16單位為小節 1小節等於4拍 長度的燈號指示只到1 2 但是屏幕顯示會依照所選擇長度顯示 步驟 2 啟動自動循環模式 按下自動循環 ...

Page 32: ...oops 按下清除鍵 C LEAR 15 啟動清除內存的功能 再按下所要清除資料的按鍵從儲存按鍵組中 被清除資料的按 鍵 燈光會熄滅 讓你知道已經沒有資料儲存在其中 再按下清除鍵 C LEAR 15 離開清除記憶模式 儲存所記錄的Hot Cues Loops 每首歌曲可儲存4個Cues或Loops 播放器能夠儲存並叫回在光盤上的Hot Cues及Loops達2000個 如果是USB周 邊 數量取決於U盤空間的大小 一般來說 所記錄的資料量很小 可以不用擔心儲存的多寡 按住記錄鍵REC button 14 直到屏幕顯示SAVING 儲存中 就可以將設定的Hot Cues及Loops儲存下來 否則 只是暫時記憶在內存中 被覆蓋或是關機後就不再存在 重新將儲存的Hot Cues及Loops叫回 光盤 U盤操作方式 插入光盤或U盤 先按下REC鍵 14 啟動叫回的功能 旋轉選擇旋紐 22 選擇要播...

Page 33: ...若所儲存的是Hot Cue 樣本會以Hot Cue 為起點 播放5秒的長度 樣本播放結束 離開樣本模式 只要再按下樣本鍵SAMPLE 12 燈號熄滅 注 意 若是所儲存的Loop 超過5秒 在樣本模式下最多只能播放5秒 改變樣本的播放速度及音量大小 啟動樣本模式 並觸發播放樣本 樣本的播放速度及音量大小可獨立被調整 調整樣本的播放速度 當樣本播放時 按下X鍵 36 然後旋轉轉盤調整播放速度 屏幕會顯示調整的數值 按下HOLD鍵 35 可以保 持調整的數值 否則一放開轉盤就會回到原本的數值 調整樣本的播放音量 當樣本播放時 按下Y鍵 37 然後旋轉轉盤調整播放音量的大小 屏幕會顯示調整的數值 按下HOLD鍵35 可以保持調整的數值 否則一放開轉盤就會回到原本的數值 注 意 調整樣本的Picth時 若不按下Hold鍵 旋轉轉盤 可當做Pitch Bend使用 Pitch會因轉盤的轉動暫時 增加...

Page 34: ... 4拍音效與原本音樂同步調節 1 2代表1 2拍 以此類推 調整X參數 時間 Y參數 大小強度 深度 按下X Time 鍵 36 再轉動轉盤去調整時間參數 Y參數可控制音效的深度 回饋或是等級大小 會依不同音 效的特性而設定 按下Y DEPTH 參數鍵 40 再轉動轉盤去調整參數數值 每一次只能調整X或Y的參數數 值 注 意 只要音效啟動時 並且參數調整鍵X參數 36 或Y參數40被觸發時 轉盤就做為參數調整的功能 刮盤 模式會暫時停止作用 直到參數調整取消為止 模擬黑膠唱盤模式與刮盤 在模擬黑膠唱盤模式 Vinyl Mode 或是自動回Cue點刮盤模式 Auto Cue Scratch 下 轉盤將模擬傳統唱盤機的操作行為 轉盤的表面是觸動控制的 手一觸及轉盤表面 播放立即暫停 就像傳統唱 盤機一樣 一旦播放暫停 前後轉動轉盤可以產生刮盤的音效 自動回Cue點刮盤模式 AUTO CUE S...

Page 35: ...以一首接著一首交替播放 連線兩台播放器 兩台播放器的播放模式必須切換成單曲播放 使用SGL CTN切換開關 28切換 屏幕顯示SINGLE 第一台播放器 播放 另一台播放器必須在暫停的模式 當第一台播放器播放完第一首音樂 播放器會變成暫停的狀態 此時 另一台播放器開始播放 如此 兩台播放器會交替播放 技巧 可以先設好在準備狀態下播放器的Cue 點 可直接跳到所設定的Cue點播放 推子啟動 連接具有推子啟動功能的混音器 交叉推子的移動就可以控制播放器的播放 當交叉推子推到左邊 左邊的播 放器就會開始播放 推子推到右邊 右邊的播放器就會開始播放 啟動的功能會依照交叉推子的線性調整 技巧 在準備中的播放器可以先設定好Cue點 當推子切換時 就可立即由Cue點的位置播放 ...

Page 36: ...建立音樂資料庫 當外 接USB 儲存設備接上播放器時 播放器就可立即取 並且可以依照音樂檔案的名稱 表演者 專輯名稱及類別做 立即的搜尋 系統需求 處理器 英特爾奔騰4 1 GHz 處理器 Intel Centrino Mobile Technology 1 6 GHz 或更高等級 內存 512 MB 硬盤空間 100MB 可使用的硬盤空間 作業系統 Microsoft Windows XP SP3 Vista SP2 或更新的版本 安裝軟件 請參照下列步驟安裝資料庫建立軟件在計算機中 步驟 1 執行資料庫建立軟件安裝程式 步驟 3 準備好安裝 步驟 2 選擇要將軟件安裝在計算機的那個資料夾 步驟 4 安裝進行中 ...

Page 37: ... 資 料 庫 建 立 軟 件 步驟 5 安裝完成 按下Finish 結束 離開安裝程式 如何使用資料庫建立DATABASER BUILDER軟件 資料庫建立DATABSER BUILDER軟件可以一次性掃描所有在外接USB儲存設備中所有的檔案 並且建立檔案資料 庫去確定音樂檔案在資料庫中的位置 這使得播放器在讀取外接USB儲存設備時 更迅速更容易找到你所要播放 的音樂 步驟 1 雙擊在計算機桌面的 DATABASE BUILDER程序 步驟 2 選取所要建立資料庫的外接USB儲存設備 然後按 下建立Build鍵 ...

Page 38: ...驟 解決此問題 在 Windows Vista作業系統下 會造成出現 Failed to open device 打開設備失敗 的錯誤訊息 步驟 4 完成資料庫建立 顯示建立的訊息 注 意 每次外接USB儲存設備的內容有做更動時 請重新執行DATABASE BUILDER去更新最新的資料 庫 1 主要原因來自於 使用者帳號管理控制 User Account Control 的限制 而造成無法執行DATABASE BUILDER 2 在執行 DATABASE BUILDER時 必須先按鼠標右鍵 然後選擇Run as administrator 3 授權允許DATABASE BUILDER 在 Windows Vista作 業系統下執行 就能解決無法執行的問題 ...

Page 39: ...E JOG 轉盤 24 CW CCW 35 36 74 75 CC TYPE NOTE 23 ENC CENTER 31 0F 70 4E CC TYPE ABSOLUTE 24 ENC CENTER 33 15 72 54 CC TYPE ABSOLUTE Pitch Slider 速度推子 9 VR CENTER PITCHBEND 18 76 57 START 啟動旋鈕 4 VR 27 66 BRAKE 煞車旋鈕 5 VR 2D 6C 播放 暫停鍵 16 SW LED 02 02 41 02 CUE Cue鍵 17 SW LED 2E 2E 6D 2E NEXT TRACK 20 SW LED 10 10 4F 10 HOLD 35 SW LED 11 11 50 11 FX TIME 36 SW LED 0B 0B 4A 0B FX DEPTH 40 SW LED 2F 2F 6E...

Page 40: ...LED 4 1 12 12 51 12 WHEEL ODE 46 SW LED VINYL 24 24 63 24 TEMP RANGE 7 SW LED 10 2A 2A 69 2A 1 13 SW LED LED2 14 14 31 53 14 31 2 13 SW LED LED2 1 A 1A 32 59 1A 32 3 13 SW LED LED2 20 20 33 5F 20 33 4 13 SW LED LED2 26 26 34 65 26 34 1 2 RED 31 LED 35 35 1 LED 31 LED 36 36 2 LED 31 LED 37 37 4 LED 31 LED 38 38 8 LED 31 LED 39 39 16 LED 31 LED 3A 3A 1 2 GREEN 31 LED 3B 3B 3 4 GREEN 31 LED 3C 3C 1 1...

Page 41: ... 07 46 PITCH BEND 10 SW 03 42 PITCH BEND 10 SW 09 48 CC ABSOLUTE絕對 VR 0xXX代表16進制 控制改變 Control Change 信息被送出狀態0xBn n代表通道給指定的CC控制器 因此控制器的 MIDI ID 用通道 編號與CC編號表示 數值從0x00 到0x7F 直接對應到控制器的位址 CC RELATIVE相對 ENC 控制改變 Control Change 信息被送出狀態0xBn n代表通道給指定的CC控制器 因此控制器的MIDI ID 用通道 編號與CC編號表示 數值從0x40到控制器的標示改變 0x40是補償標識 信息0x43表示 正的 改變3 信息0x31表示 負的 改變15 開關SWITCH ON OFF SW CENTER CW CCW 針對開關所使用的信息 控制改變 Control Change ...

Page 42: ...B 3 頻率響應 CD 1 7 2 0 K H z 0 4dB 1 7 2 0 K H z 1dB 0dB OUTPUT USB1 2 1 7 1 6 K H z 0 2dB 1 7 1 6 K H z 1dB 4 信号還原 CD 20dB 0 2dB 20dB 1dB 16KHz 20dB 5 頻道分隔 2 CD USB1 2 91dB 85dB 1KHz 0dB 6 總諧波失真加噪音 1 CD 0 006 0 01 1KHz 0dB USB1 2 0 007 0 01 1KHz 0dB 7 雜訊比 2 126dB 90dB 1KHz 0dB TCD 782 TRK 2 8 8 PHONES輸出範圍 CD 0 35V 0 5dB 0 35V 1dB 1KHz 20dB TCD 782 TK16 9 數碼輸出範圍 0 5 0 03V P P 0 5 0 1V P P 75 ohm load...

Page 43: ... 軌 m o n o 與 雙 音 軌 stereo 編碼取樣率32 44 1 與 48kHz 32 40 48 56 80 96 112 128 160 192 224 256 32 0 kbps Xing VBRI VBR 標準MPEG 2 Layer 3 ISO IEC 13818 3 提供類似的編碼取樣率16 22 05 and 24 kHz 32 40 48 56 64 80 96 112 144 160 Kbps Xing VBRI VBR 標準MPEG 2 5 Layer 3提供類似的編碼取 樣率8 11 025 and 12 kHz 32 40 48 56 64 80 96 112 144 160 Kbps Xing VBRI VBR 光盤寫入方式 Disc at Once and Track at Once 多重區段 If the 1st session is CDDA y...

Page 44: ...me 14 Refer all servicing to qualified service personnel Servicing is required when the apparatus has been damaged in any way such as power supply cord or plug is damaged liquid has been spilled or objects have fallen into the apparatus the apparatus has been exposed to rain or moisture does not operate normally or has been dropped 15 When the mains plug or appliance coupler used as the disconnect...

Page 45: ...lades to all exposed metallic parts The resistance should be more than 100 000 ohms 23 Non use Periods The power cord of the appliance should be unplugged from the outlet when left unused for a long period of time 24 Object and Liquid Entry Care should be taken so that objects do not fall and liquids are not spilled into the enclosure through openings 25 Damage Requiring Service The appliance shou...

Page 46: ...rformances In order to satisfy DJs requirement the P70 is also designed to interface and control a variety of popular DJ software applications that support USB MIDI interface DJs can assign virtually every button on the control panel to trigger functions of various DJ software programs Moreover The A B deck switch design can expand one play deck control to two deck control Memo Points with 4 Trigg...

Page 47: ...traditional turntable A C P Active Cue Point Innovative design for the P70 makes DJs have ability to control up to five cues including one normal cue and four hot cues DJs can use this cues to generate creative perform The Active Cue Point A C P is visual indicator located in the 12 o clock position of the jog wheel to help DJs to find the cue point and scratching Every time DJs active a cue from ...

Page 48: ... from cue point Fader start to control playback on fader move Relay play function Single and Continuous play modes Vinyl emulation with adjustable Start Brake Speed Reverse play mode for special effects Cue Play function can back to cue and play instantly Data search Track and folder searching system Search Scan via large jog wheel Frame search for precisely searching DATABASE BUILDER software for...

Page 49: ...ck Jog Wheel illumination with 9 different modes Multifunctional jog wheel for frame search pitch bend sample adjustment and effects adjustment 3 modes for jog wheel Normal CDJ Scratch Auto Cue Scratch A Cue Scratch mode touch wheel return to cue function Effects 3 superb beat synchronized DSP digital effects Build in Effects Echo Flanger Filter Effect parameters Time and Depth adjustable via Jog ...

Page 50: ...s Be sure plugs and jacks are securely fastened Loose connections cause hum noise or intermittence that could damage your speakers 4 Connect the RCA pin cords to the inputs on your mixer CAUTION Be sure to use the supplied control cord Using another type of cable may result in damage Connecting to a Computer Support computer operating systems include Windows Vista Window XP and MAC OS X or later C...

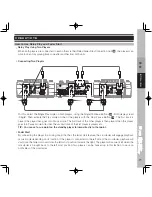
Page 51: ...P70 Digital Media Player Controller 51 中 文 E N G L I S H CONNECTIONS Basic Connection USB Connection Analog Audio Connection Headphones CD MP3 USB Player Mixer Headphones CD MP3 Player ...

Page 52: ... Controller Connection USB Connection Analog Audio Connection USB Connection Analog Audio Connection Amplifier Powered Speakers Headphones CD MP3 USB Player Mixer CD MP3 USB Player Headphones Computer MIDI Controller Deck A B USB Audio Interface VOXOA A30 ...

Page 53: ...ion Analog Audio Connection MIDI Controller Deck A Mixer with Audio Interface Powered Speakers Computer Headphones VOXOA M60 MIDI Controller Deck B Amplifier MIDI Controller Deck A Mixer without Audio Interface VOXOA M10 MIDI Controller Deck B VOXOA A30 Amplifier Powered Speakers Computer USB Audio Interface ...

Page 54: ...54 中 文 E N G L I S H PART NAMES AND FUNCTIONS TOP PANEL 1 2 3 9 20 21 11 12 10 13 14 15 16 17 18 19 22 23 6 5 7 8 4 26 25 24 ...

Page 55: ... Start Dial determines the acceleration speed until full playback speed is reached when the jog dial is backspin or the Play Pause button is pressed When the Start Dial is rotated counterclockwise play accelerates to full speed quickly when the dial is rotated clockwise play accelerates more slowly before reaching full speed 5 Vinyl Speed Adjust Break Dial When in the VINYL and A Cue Scratch mode ...

Page 56: ...Button Press this button then press the desired BANK button to set the sample loop mode LED is on When sample mode is set then sampler will mix the music together And press the SAMPLE button again to set the sample single mode LED is flash Press the SAMPLE button again to cancel sample function 13 Bank Pads 1 2 3 4 These buttons are used to store either four cue points or four samples Each Bank Bu...

Page 57: ...PADS Press CLEAR button the button is lighted up and then select the BANK buttons 1 4 you would like to clear Press the button again to quit the clear function 16 PLAY PAUSE Button Each press of the button to change from play to pause or from pause to play 17 CUE Button A Cue Point is self defined starting point usually at the beginning of a beat Pressing the cue button during playback immediately...

Page 58: ... Utility setup menu 22 Track Knob This knob has three functions 1 The knob is used to select a track Turning track knob will forward backward skip to next track 2 Holding down and turning track knob will rapidly forward backward skip through the tracks by 10 tracks per click 3 Press track knob to switch file name title ID3 artist ID3 Album ID3 Genre ID3 on the display screen 23 Folder Search Knob ...

Page 59: ...cate the playing point opposite on off off on when the Jog Wheel is touched You can adjust the setting value range 1 of smallest indicator off to 23 of full circle off MODE 4 The indicator will show the playing point indicator around the ring and flash to the playing level in both sides You can adjust the setting value range 1 of smallest playing point indicator to 23 of full circle indicator MODE...

Page 60: ...ats and Loop Set in bars FX Beat SYNC Yellow LED This is used to select the delay time of an effect to the beat of music The beat delay ratios are 1 4 1 2 3 4 1 1 2 1 and 4 1 LOOP SET Red LED When the loop set function is activated select the loop length of 1 64 1 32 1 16 1 8 1 4 1 2 1 2 4 8 16 1 bar 4 beat at which you would like to start your desired loop 32 Plus Button Moves the Time Division I...

Page 61: ...y set the frequency To manually change the beat frequen cy of the effect press the X Parameter Time Button 36 and regulate the frequency value with the Jog Wheel from 0 9990 mSec To influence the intensity of the effect press the Y Parameter Depth Button 40 and set the volume with the Jog Wheel from 0 255 TIP The Flanger effect is best when set to 4 1 beat with the Beat Link Button 39 Filter Effec...

Page 62: ...set a CUE POINT without music interruption This button also sets the starting point of a seamless loop 44 LOOP OUT Button This button is used to set the ending point of a loop A loop is started by pressing the IN button pressing the OUT button set the loop ending point The loop will continue to play until the RELOOP EXIT button 45 is pressed once again During loop playback press the LOOP OUT butto...

Page 63: ...is exit JOG WHEEL can be used as pitch bend and frame search A CUE SCRATCH mode IN PLAYBACK MODE While in playback mode the JOG WHEEL can be used to return the unit to last IN point Simply touch the surface of the JOG WHEEL and unit will immediately return to the last set CUE point and playback without music interruption IN CUE MODE While in cue mode and when the touch sensitivity function is acti...

Page 64: ...ecial drivers Moreover this port can use to link with another Host USB player 49 Digital Output Hub This digital output signal requires one S PDIF 75Ohm coaxial cable to be connected to a S PDIF input on your mixer or any other digital recording device 50 Relay Fader Start Connection Hub Via the relay socket two CD MP3 players can RELAY PLAY If you connect with a mixer which supporting FADER START...

Page 65: ... 1 4 Headphones Connection Attach your headphones with a 1 4 jack cable for monitoring to this output 55 Volume Control for Headphones This control knob is to control the volume of the headphones 56 Disc loading indicator The indicator is on when the slot is empty Insert disc into the slot and the indicator flashes 57 Disc loading slot Hold the disc with label surface upwards and insert evenly int...

Page 66: ...tor This appears when you touch the surface of the jog wheel 62 Folder Display Indicates the number of the current folder 63 Dot Matrix Information Display Indicates the name of the folder artist file album genre and title while playing a CD MP3 with ID3 TAG or an audio CD with CD text To change between the name of a folder artist and title of a CD MP3 press the Track Knob 22 64 BPM Display Indica...

Page 67: ...al or remaining time of a track or the entire disc The display time will depend on the selected time function The selected time function will be displayed above the Time Display as total remaining remaining track time or elapsed track name 71 Time Mode Indicator Indicates if the player shows the elapsed time of a track the display reads ELAPSED the remaining time of a track the display reads REMAI...

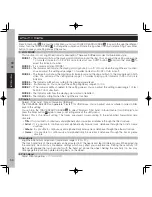
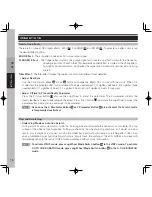
Page 68: ...o 100 of slow flash MODE 8 The indicator will show the playing point similar to trail effect MODE 9 The indicator will light when the Jog Wheel is touched 2 Playlist Normal Title Artist Album Genre for USB only The DATABASE BUILDER can generate Playlist for USB drives You can adjust various criteria in order to filter track in this setting You can turn the TRACK SEARCH KNOB 22 to select Normal Tit...

Page 69: ...N default value NAME MIDI B H 2 more devices connection A MIDI NOTE EDIT Edit the send MIDI NOTE code Please refer MIDI MAP B MIDI LED EDIT Edit the received MIDI LED code Please refer MIDI MAP C Repeat Mode Play FOLDER repeat D Bit Rate Display ON OFF E Version To display the firmware version CON VerXX Control version SER VerXX Servo version BUF VerXX Buffer version DSP VerXX DSP version F Load D...

Page 70: ...device into USB 1 port 2 or USB 2 port 47 NOTE Choosing USB1 2 Port or USB 2 Port 47 are depended on the Utility Setting You can setup this function via the Utility Menu MIDI SETUP LINK USB1 or USB2 5 Connect the MAIN PLAYER using the rear panel USB MIDI port 48 to the second player top panel USB 1port 2 6 You should now be able to access the main player loaded USB device using the second player c...

Page 71: ... the Play Pause button 16 to pause playback at the point you wish to begin playback Step 2 Search for the precise position of the cue point Using the jog wheel or Search button 19 to advance frames Step 3 Press the CUE button 17 when you reach the desired point Cue point memory setting is completed when the IN button 43 is flashing When a new cue point is stored in memory the previous setting will...

Page 72: ...face may cause interruption of playback in certain modes of operation Key Lock This function allows the tempo or BPM of the music to be altered without affecting the musical key While this button is illuminated the key will be locked at zero How to Set a Seamless Loop Creating a Seamless Loop Step 1 Press the PLAY PAUSE button 16 to begin playback The button illuminates solid green not flashing St...

Page 73: ...IN button 43 again to save the new IN point and exit the modifying loops mode to loop play mode How to Set Auto Loops Auto loop enables BPM determined sections to be recorded by only defining the in point of the loop The BPM engine determines the out point based on the selected Time Division For example if the tempo is 120 BPM and the time division is 1 1 a loop will be created that is 2 seconds i...

Page 74: ... the stored cue point but will only keep playing while the button is depressed just like the main CUE button 17 Clearing the stored Hot Cues Loops Press the CLEAR button 15 to active clear memory function While the button is on press the pad s you wish to clear and those pads will also flash The cleared pads light is off letting you know that there is no information stored in them Press the CLEAR ...

Page 75: ...er stored cues or loops as a sample In saved loop buttons the sample will continue playing In saved hot cue buttons the sample will play once The max for the sample is 5 sec Changing the Sample Pitch and Level The pitch and level of each sample can be adjusted individually In order to do so sample mode must be active and the sample you wish to adjust must be playing To adjust the pitch With the sa...

Page 76: ...ust X Time Y Level Depth Parameter Press the X Time button 36 and use the Jog Wheel to adjust the parameter The Y parameter controls the depth feedback or level depending on the effect Press the Y button 40 and rotate the Jog Wheel to adjust the parameter Each time you only can adjust one parameter NOTE As soon as the X Parameter Button 36 or Y Parameter Button 40 are activated the Scratch mode is...

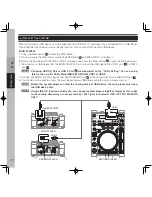
Page 77: ...e player then goes into Pause mode The first track of the other player is then played then this player goes into Pause mode After that the second track of the first player is played etc TIP You can set a cue point on the standby player to jump directly to that point Fader Start By connecting the player to a mixing board that has the fader start feature the crossfader will engage playback or cue mo...

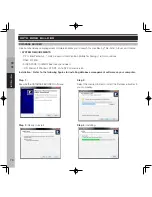
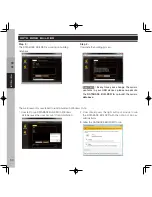
Page 78: ...el Centrino Mobile Technology 1 6 GHz or above RAM 512 MB DISK SPACE 100MB of free disk space need OS Microsoft Windows XP SP3 Vista SP2 or later version Installation Refer to the following figures for installing database management software on your computer Step 1 Execute the DATABASE BUILDER software Step 3 Ready to install Step 2 Select the desired folder to install the Database builder in your...

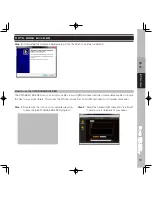
Page 79: ...BSER BUILDER can scan all of music files in your USB hard driver and then create database files to locate the files in your music library This makes the P70 read music files from USB hard drive much quicker and easier Step 1 Double click the icon on your computer desktop to execute the DATABASE BUILDER program Step 2 Select the desired USB driver and click Build to build a music database of your d...

Page 80: ... process CAUTION Every time your change the music contents in your USB deriver please re execute the DATABASE BUILDER to re build the music database 1 User fail to run DATABASE BUILDER in Windows Vista because the User Account Control limitation 2 User should press the right button of mouse to run the DATABASE BUILDER with the option of Run as administrator 3 Allow the DATABASE BUILDER to run ...

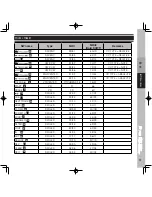
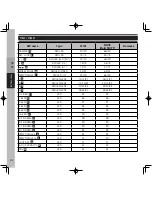
Page 81: ...E ABSOLUTE 24 ENC CENTER 33 15 72 54 CC TYPE ABSOLUTE Pitch Slider 9 VR CENTER PITCHBEND 18 76 57 START 4 VR 27 66 BRAKE 5 VR 2D 6C 16 SW LED 02 02 41 02 CUE 17 SW LED 2E 2E 6D 2E NEXT TRACK 20 SW LED 10 10 4F 10 HOLD 35 SW LED 11 11 50 11 FX TIME 36 SW LED 0B 0B 4A 0B FX DEPTH 40 SW LED 2F 2F 6E 2F ECHO 37 SW LED 05 05 44 05 FLANGER 38 SW LED 29 29 68 29 FILTER 39 SW LED 23 23 62 23 LOOP 41 SW LE...

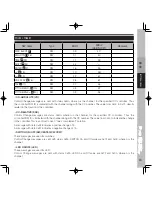
Page 82: ...2A 2A 69 2A 1 13 SW LED LED2 14 14 31 53 14 31 2 13 SW LED LED2 1 A 1A 32 59 1A 32 3 13 SW LED LED2 20 20 33 5F 20 33 4 13 SW LED LED2 26 26 34 65 26 34 1 2 RED 31 LED 35 35 1 LED 31 LED 36 36 2 LED 31 LED 37 37 4 LED 31 LED 38 38 8 LED 31 LED 39 39 16 LED 31 LED 3A 3A 1 2 GREEN 31 LED 3B 3B 3 4 GREEN 31 LED 3C 3C 1 1 GREEN 31 LED 3D 3D 2 1 GREEN 31 LED 3E 3E TEMP RANGE 6 6 LED 3F 3F TEMP RANGE 16...

Page 83: ... location of the controller CC RELATIVE ENC Control Change messages are status 0xBn where n is the channel for the specified CC controller Thus the controller MIDI ID is indicated with the channel along with the CC number The value from 0x40 to indicate the change in the controller This is an offset to 0x40 one s complement notation A message with data 0x43 indicates a positive change of 3 A messa...

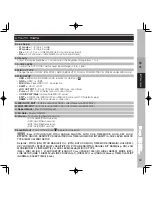
Page 84: ...Hz 0dB 3 FREQUENCY RESPONSE CD 17 20KHz 0 4dB 17 20KHz 1dB 0dB OUTPUT USB1 2 17 16KHz 0 2dB 17 16KHz 1dB 4 DE EMPHASIS CD 20dB 0 2dB 20dB 1dB 16KHz 20dB 5 CHANNEL SEPARATION 2 CD USB1 2 91dB 85dB 1KHz 0dB 6 THD N 1 CD 0 006 0 01 1KHz 0dB USB1 2 0 007 0 01 1KHz 0dB 7 S N RATIO 2 126dB 90dB 1KHz 0dB TCD 782 TRK 2 8 8 PHONES OUTPUT LEVEL CD 0 35V 0 5dB 0 35V 1dB 1KHz 20dB TCD 782 TK16 9 DIGITAL OUTPU...

Page 85: ... for single channel mono and two channel stereo coding at sampling rates of 32 44 1 and 48kHz 32 40 48 56 80 96 112 128 160 192 2 24 256 320 kbps Xing VBRI VBR MPEG 2 Layer 3 standard ISO IEC 13818 3 which provides for similar coding at sampling rates of 16 22 05 and 24 kHz 32 40 48 56 64 80 96 112 144 160 Kbps Xing VBRI VBR MPEG 2 5 Layer 3 standard which provides for similar coding at sampling r...

Page 86: ...Printed in China ...

Reviews: