background image

WARRANTY

18

This warranty covers the original consumer purchaser only and is not transferable.

This warranty covers products that fail to function properly UNDER NORMAL 
USAGE, due to defects in material or workmanship. Your product will be repaired 
or replaced at no charge for parts or labor for a period of one year.

What Is Not Covered by Warranty

Damages or malfunctions not resulting from defects in material or workmanship 
and damages or malfunctions from other than normal use, including but limited 
to, repair by unauthorized parties, tampering, modification or accident.

To Obtain Warranty Service and Troubleshooting Information:

Call (877) 444-0345 in the U.S. or visit our website at www.ridevoyager.com.

To receive Warranty service along with the name and address of an authorized product service 
center, the original consumer purchaser must contact us for problem determination and service 
procedures. Proof of purchase in the form of a bill of sale or receipted invoice, evidencing that 
the product is within the applicable Warranty period(s), MUST be presented in order to obtain the 
requested service. It is your responsibility to properly package and send any defective products 
along with a dated copy of proof of purchase, a written explanation of the problem, and a valid 
return address to the authorized service center at your expense. Do not include any other items 
or accessories with the defective product. Any products received by the authorized service 
center that are not covered by warranty will be returned unrepaired.

Summary of Contents for Radius Pro

Page 1: ...BIKE4050RP User s Manual R a d i u s P r o E l e c t r i c B i k e...

Page 2: ...____________ _______________________________________ __________________________________ ______________________________________ _______________________________________ _______________________________ _...

Page 3: ...r support WHILE RIDING 1 When riding your bike follow local traffic laws 2 Do not ride your bike while under the influence of alcohol or medication which can cause impairment 3 Do not attempt to do an...

Page 4: ...r that came with your bike SAVE THESE INSTRUCTIONS RECOMMENDED TEMPERATURES FOR USE 1 Charging temperature range 0 C 45 C 2 Operating temperature range 20 C 45 C 3 Storage temperature range 20 C 45 C...

Page 5: ...sure all parts are securely attached and in good condition before riding INTRODUCTION HARDWARE Motor Power 450W Rated 500W Max Charging Time 5 hours Battery Specifications 48V 7 5AH Lithium Ion Displa...

Page 6: ...2 3 4 5 6 7 8 9 10 11 12 Stand Reflector Charging Port Rear Fender Shock Absorber Chain 13 14 15 16 17 Foot Pedal Front Fender Kick Stand Frame Handbrake 1 2 3 17 4 6 8 7 9 10 5 11 12 13 14 16 A QUICK...

Page 7: ...ASSEMBLY GUIDE VIDEO 6 For more information on assembling and using your bike scan the QR code below for additional video tutorial content...

Page 8: ...position before pressing down on the latch locking the handlebar in place Line up the handlebar and front wheel so that the front wheel is aligned with the back wheel and the handlebar is perpendicula...

Page 9: ...ke or remove it You can also adjust the height of the seat for a more comfortable ride Once the seat is attached to the bike at the height of your choosing close and tighten the seat clamp so that the...

Page 10: ...attery for at least 5 8 hours before first using To maximize the lifespan of the battery unplug the charger once the battery is fully charged The charging port has a rubber cover Make sure that the po...

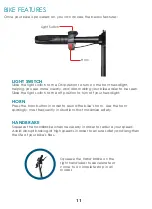
Page 11: ...the power button to power on or power off your bike DISPLAY SCREEN The display screen will show you a power meter which will let you know how much power remains in the battery Be sure to charge the b...

Page 12: ...d the bike s horn Use the horn sparingly most frequently in situations that maximize safety HANDBRAKE Squeeze the handbrake when necessary in order to reduce your speed Avoid abrupt braking at high sp...

Page 13: ...of purchase to replace your bike with a model that fits APPROPRIATE FRAME HEIGHT MEASUREMENT To ensure the safety and comfort of the rider there should be a minimum clearance of 1 inch between the top...

Page 14: ...xtra speed Squeeze the hand brake to decelerate or come to a complete stop FULL ELECTRIC Power on your bike to access full electric mode Twist the throttle on the right handlebar allowing the bike to...

Page 15: ...detergents to clean your bike and never submerge your bike in water BATTERY MAINTENANCE Keep your bike and its battery away from excessive heat fire flames physical shock or excessive water or moistur...

Page 16: ...15 NOTES...

Page 17: ...NOTES 16...

Page 18: ...nterference in a residential installation This equipment generates uses and can radiate radio frequency energy and if not installed and used in accordance with the instructions may cause harmful inter...

Page 19: ...visit our website at www ridevoyager com To receive Warranty service along with the name and address of an authorized product service center the original consumer purchaser must contact us for problem...

Page 20: ...2022 Sakar International Inc 195 Carter Drive Edison NJ 08817 USA...

Reviews: