background image

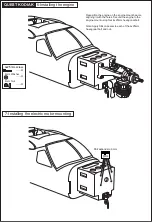
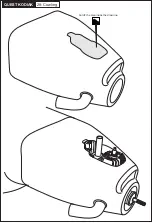
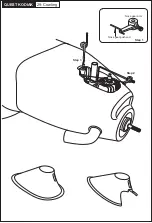
Put the cover back on the fuselage and secure it with 
two 3x12mm self-drilling screws.

3x12mm self-drilling screw

...........2

QUEST KODIAK

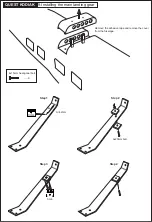
10-Installing the main landing gear

Summary of Contents for KING QUEST 100

Page 1: ...laps WARNING This radio controlled model is NOT a toy If modified or flown carelessly it could go out of controll and cause serious human injury or property damage Before flying your airplane ensure t...

Page 2: ...ncil Drill and Assorted Drill Bits Read through the manual before you begin so you will have an overall idea of what to do Symbols used throughout this instruction manual comprise Purchase separately...

Page 3: ...c tube ts across the front of the re wall The other end of the plastic tube leads to where the nose gear servo arm will be 2 Hold the end of the plastic tube rmly to re wall with thin CA glue 1 Thread...

Page 4: ...e gear nose gear arm 4 Installing the engine mount Hex wrench 6mm Drill expands to 6mm Attach the engine mount to the re wall using four of the 4x25mm hexagonal bolt washer and blind nut 4x25mm hexago...

Page 5: ...the prop hub to the fire wall is 139mm Mark the engine mounting plate where the four holes are to be drilled Remove the engine and drill a 4mm holes through the beam at each of the four marks made ab...

Page 6: ...eposition the engine on the engine mount beams aligning it with the holes Secure the engine to the engine mount using four 4x25mm hexagonal bolt Note Apply Silicon sealer to each of the 4x25mm hexagon...

Page 7: ...of the 6x100mm bolts washer and nuts to the fire wall as shown Secure the Motor to the wooden motor mounting plate using the four of the 3x20mm hexagonal bolts washer and nut 4 3x20mm screw 3mm Washe...

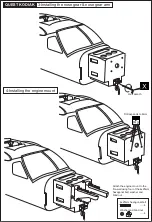
Page 8: ...Remove the adhesive tape and remove the cover from the fuselage 4x15mm hexagonal bolt 6 QUEST KODIAK 9 Installing the main landing gear 3mm A 42mm A 5 min Step 1 3x20mm bolt Step 2 Step 3 Step 4...

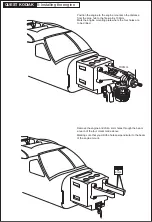
Page 9: ...Put the cover back on the fuselage and secure it with two 3x12mm self drilling screws 3x12mm self drilling screw 2 QUEST KODIAK 10 Installing the main landing gear...

Page 10: ...ic gear cover a litter on the narrow end Step 1 once it is in place you will glue the separated part with thin CA glue Step 2 Thin CA 3x20mm bolt Plastic landing gear cover view from the narrow end Ma...

Page 11: ...screw 4mm nut 4 6 4mm washer 75mm wheel 2 4mm nut 4x45mm screw Aluminum landing gear 4mm nut 2x8mm self drilling screw 12 1mm 1mm 2x8mm self drilling screw 12 QUEST KODIAK 12 Installing the main land...

Page 12: ...t a little more so that pushing the horizontal stabilizer into the fuselage is not too di cult NOTE Check the alignment of the horizontal stabilizer by measuring from a fixed point along the center li...

Page 13: ...es which were marked above Be cautious not to cut into the wood this will weaken the structure Securely glue together If coming off during fly you lose control of your air plane Apply CA glue both sid...

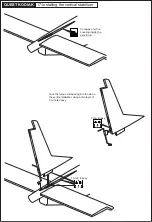
Page 14: ...QUEST KODIAK 15 Installing the horizontal stabilizer Cut away only the covering 16 Installing the verticaltal stabilizer Trial t the vertical stabilizer in position Ensure that the vertical stabilize...

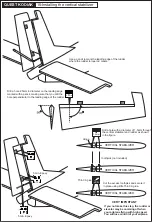
Page 15: ...Installing the vertical stabilizer Cut away only the covering inside the pencil line Glue the torque rod bearing into the slot in the vertical stabilizer using a thin layer of 5 minute epoxy 5 min Epo...

Page 16: ...e rod meets 5 min Epoxy 5 min Epoxy VERY IMPORTANT If you not make this step the rudder or elevator may be comming off when your airplane flying with high speed You will lose control of your airplane...

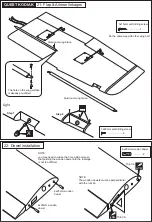
Page 17: ...AP AILERON SERVO HATCH BOTTOM VIEW 1 5mm 1 5mm 2x8mm 2x8mm AILERON FLAP SERVO HATCH TOP VIEW To be safe you must attach the four screws as shown in this picture IMPORTANT 1 5mm Thin CA CA Hard wood se...

Page 18: ...horn 1 2mm Thin CA QUEST KODIAK 20 Flap Aileron linkages 2x175mm rod with clevis one end 1 set 3x175mm rod with clevis one end 1 set AILERON LINKAGE 3x175mmm push rod 3mm connector FLAP LINKAGE 2x175...

Page 19: ...he wooden dowels must be perpendicular with the root rib 3x15mm self drilling screw 1 you may need to widen the hole a little more so that pushing the wooden dowel into the fuselage is not too di cult...

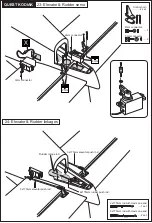
Page 20: ...d with clevis one end 1 set 3x175mm rod with clevis one end 2 set 2mm 2mm Rudder torque rod 3x175mm elevator push rod 3x175mm elevator push rod 2x175mm rudder push rod 3mm connector 2mm connector QUES...

Page 21: ...way with other side S1 S2 S1 S2 Throttle servo Nose gear servo Li po battery or Fuel tank area 2mm connector 2 1 2x500mm nose gear push rod 2x500mm throttle rod with clevis one end 1 1 QUEST KODIAK 2...

Page 22: ...ncer nose gear do not touch the cowling QUEST KODIAK 27 Cowling 140mm Remove the engine from the engine mount Attach the cowling to the fuselage so that the length from the re wall to the front of the...

Page 23: ...Cut o the area inside the draw line QUEST KODIAK 28 Cowling...

Page 24: ...QUEST KODIAK 29 Cowling Nose gear push rod Nose gear arm Step 1 Step 2 Step 3...

Page 25: ...QUEST KODIAK 30 Nose gear 2x8mm self drilling screw 9...

Page 26: ...4x40mm screw 1 4mm washer 2 4mm nut 3 QUEST KODIAK 31 Nose wheel...

Page 27: ...QUEST KODIAK 32 Nose wheel in case of Electric motor using...

Page 28: ...QUEST KODIAK 33 Nose wheel in case of Electric motor using 2x8mm self drilling screw 12...

Page 29: ...on the oor R R R R R Magnet Put the pilot seat in place Press the 4 ledges under the base of the pilot s seat into the 4 slots in the oor of the plane Gently push the seat back until it can t be push...

Page 30: ...Aluminum wing joiner Aluminum wing brace 3mm blind nut Cut away only the covering 7x70mm nylon bolt 2 3x15mm hexagonal bolt 2 3mm blind nut 2 QUEST KODIAK 35 Installing the wings...

Page 31: ...gnetic hatch CA 2mm QUEST KODIAK 36 Top hatch 37 Sticker IMPORTANT Please do not clean your model with strong solvent or pure alcohol only use kerosene to keep the colour of your model not fade Sticke...

Page 32: ...cult to control so remember more is not always better ELEVATOR 15mm 12mm 30mm 30mm 15mm 12mm FLAP 35mm THE CENTER OF GRAVITY IS LOCATED 92 97mm BACK FROM THE LEADING EDGE OF THE WING AT THE FUSELAGE B...

Reviews: