background image

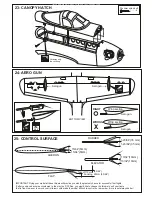
62~65 mm

8mm

10mm

10mm

Aileron /

Elevator /

8mm

Querruderausschlag

Hohenruderausschlag

15mm

Rudder

15mm

Seitenruderausschlag

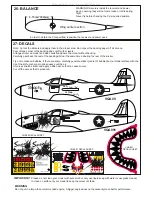
Do not try to fly an out-of balance model!

Uberprufen Sie vor dem Flug den Schwerpunkt.

IMPORTANT:

Please do not clean your model with pure alcohol, only use liquid soap with water or use glass cleaner 
to clean on surface of your model to keep the colour not fade.

All details are subject to change
without notice !

Technische Anderungen und Irrtumer
vorbehalten !

CG

CA

FUSELAGE TOP-VIEW

FUSELAGE BOTTOM-VIEW

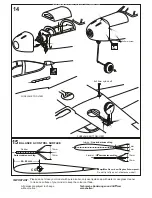
14

1mm

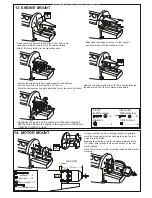
2x8mm screw

6x50mm nylon bolt

15

BALANCE & CONTROL SURFACE 

All manuals and user guides at all-guides.com

Summary of Contents for Airacobra P-39

Page 1: ...t f r fortgeschrittene Modellflugpiloten bestimmt die ausreichende Erfahrung im Umgang mit derartigen Modellen besitzen Bei unsachgem er Verwendung kann hoher Personen und oder Sachschaden entstehen F...

Page 2: ...y use a hair dryer to smooth out wrinkels Die Bespannung des Modells kann durch Temeratureinflusse erschlaffen oder Falten werfen z b bei zu starker Sonnenenstrahlung oder Hitze Stellen Sie das Modell...

Page 3: ...e using a generous amount of thin CA Note glue both the top and bottom of the horizontal 1 The rectangular hole for the vertical stabilizer installation Fuselage and horizontal stabilizer top view 1B...

Page 4: ...glue together If coming off during flights you lose control of your airplane which leads to accidents Cut away only the covering Cut away only the covering Thin CA 4 5 5A 5B CA VERTICAL STABILIZER ELE...

Page 5: ...OM VIEW Elevator linkage 6C 7 7A Square plastic Ply gear mount plate Gear mount hard wood Plastic strap 7B 7C 7D Square plastic 3X12mm screw 7A Using a ply gear mount plate as a template mark the squa...

Page 6: ...r mount and then remove it Using a sharp hobby knife cut away the covering and balsa along the lines Ply gear mount 8 CA WARNING Securely glue together If coming off during flights you lose control of...

Page 7: ...servo Nose gear retract FUSELAGE BOTTOM VIEW Aileron linkage Nose gear push rod AILERON LINKAGE 12 MOTOR NOSE GEAR 13 NOSE GEAR RETRACT 2mm Rudder push rod Nose gear push rod 12A 12B 13A 13B 13C 13D 1...

Page 8: ...Please do not clean your model with pure alcohol only use liquid soap with water or use glass cleaner to clean on surface of your model to keep the colour not fade All details are subject to change w...

Page 9: ...go out of controll and cause serious human injury or property damage Before flying your airplane ensure the air field is spacious enough Always fly it outdoors in safe areas and seek professional advi...

Page 10: ...l and Assorted Drill Bits Read through the manual before you begin so you will have an overall idea of what to do Purchase separately CONVERSION TABLE 1 0mm 3 64 1 5mm 1 16 2 0mm 5 64 2 5mm 3 32 3 0mm...

Page 11: ...cess epoxy with paper towel and kerosene Binder clip Nylon wing bolt Rubber band both the top and bottom IMPORTANT Please do not clean off the excess epoxy on the wing with strong solvent or pure alco...

Page 12: ...Note The head of servo should be positioned toward the rear of the wing Install the retract servo onto the retract servo mount and secure it in place with four screw included with radio set BOTTOM RET...

Page 13: ...xcess length each rod RETRACTED EXTENDED EINGEFAHREN AUSGEFAHREN RECEIVER ELECTRIC RETRACT LANDING GEAR ON OFF GEAR EXTENDED POSITION RETRACTED POSITION 2mm Main landing gear Gear mount 1 3x20mm Nylon...

Page 14: ...top and bottom engine mounts to the fire wall using a pencil or felt tipped pen mark the fire wall where the four holes are to be drilled A B B FRONT VIEW Engine thrust on balk head is already adjust...

Page 15: ...the engine mount using four 1 8x51 64 3x25mm screws 5mm 13 64 Remove the engine and drill a 1 8 3mm holes through the beam at each of the four marks make before 1 8 3mm 4 4 4x25mm screw Blind nut 3x20...

Page 16: ...lue Plywood nose gear plate Plastic nose gear mount Insert the nose gear pushrod into the fuselage with the Z bend in front Insert the Z bend into the hole on the nose gear control horn Struts purchas...

Page 17: ...glue CA CA Glue inside the slot where the horizontal stabilizer meet the fuselage Glue the top and bottom of the horizontal stabilizer where it meets the fuselage Note use the thin CA glue only CA Glu...

Page 18: ...m screw 6 Right elevator servo mini servo Left elevator servo Rudder servo mini servo Apply a thin layer of machine oil or petroleum jelly to only the top and bottom of the trailing edge of the elevat...

Page 19: ...throws will provide you with the greatest chance for successful first flights If after you have become accustomed to the way the P 39 flies you would like to change the throws to suit your taste that...

Page 20: ...er area Do not peel the backing paper off all at once Peel off one corner of the backing and cut off with scissors Arrange sticker on model and when satisfied adhere the corner without backing Careful...

Reviews: