4
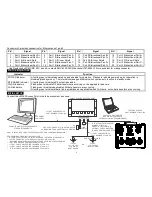
A. Ensure that test box POWER switch is in the OFF position,
RF ON/RF OFF switch is in the RF OFF position, and all
IP STRAPS switches are in the 1 position.
B. Power up:
1. Power up the desktop and laptop computers.
CAUTION:
nMAP2 input power is 134 VAC maximum or
32 VDC maximum connected to appropriate lines.
2. Connect the test cable AC or DC input lines to the power source
and apply power to the test cable. All the nMAP2 access point
indicators flash followed by each indicator flashing. When
indicator test is complete, POWER indicator will be flashing.
3. Place the test box POWER switch in the ON position. The
nMAP2 access point POWER indicator will light solid green.
WARNING:
The nMAP2 access point internal antennas radiate
radio frequency (RF) power. To avoid exceeding
Federal Communications Commission (FCC) radio
frequency exposure limits, human proximity to the
nMAP2 shall be no less than eight inches
(20 centimeters) while RF is enabled.
4. Place the RF ON/RF OFF switch in the RF ON position. After
up to 40 seconds, the nMAP2 access point RF ENABLE
indicator will light solid green.
C. Configure the desktop computer with an IP address of 192.168.1.67
and if necessary, reboot the computer. (Refer to operating system
user’s manual for network configuration.)
D. Wired LAN Test
1. On the desktop computer, open a Command Prompt window
and type
ping –n 25 192.168.1.1 <Enter>
(Windows) or
ping -c 25 192.168.1.1 <Enter>
(Linux). The nMAP2 access
point LAN1 indicator will flash indicating wired LAN activity.
2. Verify that no errors or timeouts are reported and
Reply from
192.168.1.1
is displayed 25 times in the Command Prompt
window. This confirms wired LAN communication between the
desktop computer and the nMAP2 access point.
E. Configure for simple wireless LAN test on Radio 1: Configure the
wireless adapter in the laptop computer for 802.11a (5 GHz)
operation with an IP address of 192.168.1.69. (Refer to the
wireless adapter user’s manual for configuration instructions.)
Associate the computer with wireless network (SSID) VTMiltope.
F. Test wireless LAN1:
1. On the laptop computer, open a Command Prompt window and
type
ping –n 25 192.168.1.1 <Enter>
(Windows) or
ping -c 25 192.168.1.1 <Enter>
(Linux). The nMAP2 access
point WLAN1 indicator will flash indicating wireless LAN activity.
2. Verify that no errors or timeouts are reported and
Reply from
192.168.1.1
is displayed 25 times in the Command Prompt
window. This confirms wireless communication between the
laptop computer and nMAP2 access point Radio 1.
3. On the laptop computer, type
ping –n 25 192.168.1.67 <Enter>
(Windows) or
ping –c 25 192.168.1.67 <Enter>
(Linux). The
nMAP2 access point WLAN1 indicator will flash indicating
wireless LAN activity.
4. Verify that no errors or timeouts are reported and
Reply from
192.168.1.67
is displayed 25 times in the Command Prompt
window. This confirms communication between the laptop
computer and the desktop computer.
G. Configure for simple wireless LAN test on Radio 2: Configure the
wireless adapter in the laptop computer for 802.11g (2.4 GHz)
operation. (Refer to the wireless adapter user’s manual for
configuration instructions.) Associate the computer with wireless
network (SSID) VTMiltope.
H. Test the wireless LAN2:
1. On the laptop computer, type
ping –n 25 192.168.1.1 <Enter>
(Windows) or
ping -c 25 192.168.1.1 <Enter>
(Linux) in the
Command Prompt window. The nMAP2 access point WLAN2
indicator will flash indicating wireless LAN activity.
2. Verify that no errors or timeouts are reported and
Reply from
192.168.1.1
is displayed 25 times in the Command Prompt
window. This confirms wireless communication between the
laptop computer and nMAP2 access point Radio 2.
3. On the laptop computer, type
ping –n 25 192.168.1.67 <Enter>
(Windows) or
ping –c 25 192.168.1.67 <Enter>
(Linux). The
nMAP2 access point WLAN2 indicator will flash indicating
wireless LAN activity.
4. Verify that no errors or timeouts are reported and
Reply from
192.168.1.67
is displayed 25 times in the Command Prompt
window. This confirms communication between the laptop
computer and the desktop computer.


