background image

Congratulations

on purchasing your new VTech product. Before 
using this telephone, please read Important safety 
instructions.
This manual has all the feature operations and 
troubleshooting necessary to install and operate your 
new VTech telephone. Please review this manual 
thoroughly to ensure proper installation and operation 
of this innovative and feature rich VTech product.

Summary of Contents for CS2000 Series

Page 1: ...CS 2000 2001 2002 2003 2050 2051 2052 2053 Scan the QR code or go to euphones vtech com support for support information...

Page 2: ...ase read Important safety instructions This manual has all the feature operations and troubleshooting necessary to install and operate your new VTech telephone Please review this manual thoroughlytoen...

Page 3: ...manufacturer will not be held liable for damage arising from such non compliance 12 Do not use third partycharging bays The batteries may be damaged 13 Please note the correct polaritywhile inserting...

Page 4: ...requirements and other relevant provisions of EU s Radio Equipment Directive 2014 53 EU and the UK s Radio Equipment Regulations 2017 The declaration of conformity may be viewed at https www vtech com...

Page 5: ...als or workmanship will replace the product at their discretion If the product covered by this warranty is damaged due to misuse modification or unauthori ed repair or because of faulty batteries batt...

Page 6: ...base 13 Connect the charger 14 Charge the battery 14 Check the battery level 15 Check for dial tone 15 If you do not hear a dial tone 15 Set date and time 16 Operating range 16 Handset Overview 16 Han...

Page 7: ...all Set up Menu navigation 20 In idle mode 20 Call list 20 Phonebook 20 Call blocker 20 BS settings CS2000 series 20 CS2050 series 20 HS settings 20 Registration 20 Default 20 Ans Machine CS2050 serie...

Page 8: ...a redial list entry 23 Delete all redial entries 23 Find handset 23 To start paging 23 To end paging 23 Use the phone menu 24 Phonebook 24 Add a phonebook entry 24 Review the phonebook entries 24 Chec...

Page 9: ...Edit a call block entry 29 Delete a call block entry 29 Retrieve voicemail 30 Answering system CS2050 series only 30 Message playback 30 Control the playback 30 Delete all messages 31 Record memo 31 T...

Page 10: ...e 36 Change length of flash time 36 Change the system PIN 37 ECO range and mode 37 Set ECO range 37 Turn on or off Full ECO 37 Register a handset 38 Reset phone settings 38 Answering system and settin...

Page 11: ...Configure Settings Avoid rough treatment 43 Avoid water 43 Electrical storms 43 Cleaning your telephone 43 Storage 43 Frequently asked questions 44...

Page 12: ...0 CS2051 CS2052 CS2053 CS2000 series CS2050 series IMPORTANT Please change the battery for a minimum of 16 hours prior to use WARNING DO NOT BURN OR PINCTURE BATTERIES IMPORTANT Please change the batt...

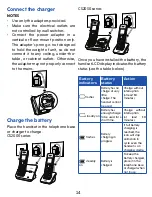
Page 13: ...ect and remove the battery to prevent possible leakage Connect the telephone base NOTES Use only the adapters provided Make sure the electrical outlets are not controlled by wall switches Connect the...

Page 14: ...series CS2050 series Once you have installed the battery the handset LCD displayindicates the battery status see the table below Battery indicators Battery status Action flashes Battery has no charge...

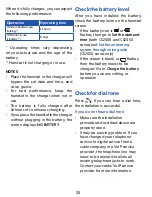
Page 15: ...alled the battery check the battery level on the handset screen If the battery icon is or flashes then go to Set the date and time both CS2000 and CS2050 series and Set the answering system through vo...

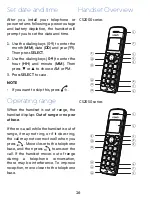
Page 16: ...u want to skip this press Operating range When the handset is out of range the handset displays Out of range or no pwr at base If there is a call while the handset is out of range it may not ring or i...

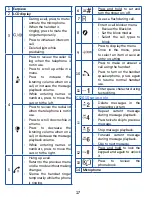
Page 17: ...ang up a call Return to the previous menu or idle mode without making changes Silence the handset ringer temporarily while the phone is ringing 6 Press and hold to set and turn the ringer on off 7 Use...

Page 18: ...cted Flashes when an incoming internal call On when the handset is within the range of the base Flashes when the handset is in marginal range to the base Off when the handset is out of the coverage ra...

Page 19: ...ging pole CS2050 series 3 4 5 1 2 6 7 8 1 X DELETE Delete message Fast forward next message Play message Stop message Reverse previous message 2 LCD Window Show number of messages recorded in the answ...

Page 20: ...WHITE LIST Under a selected Phonebook entry ADD ADD TO WLIST VIEW EDIT DELETE DELETE ALL PB STATUS Call blocker BS settings CS2000 series BLACK LIST SETTINGS BLOCK MODE CALL TYPE DELETE HS DIAL MODE F...

Page 21: ...he keypad lock on off Press and hold Share call You can use two cordless handsets at a time on an outside call To make a 3 way conversation 1 Press on the handset during a call 2 Press to select INTER...

Page 22: ...rvice or only call waiting service or You do not subscribe to caller ID or call waiting services There are fees for caller ID services In addition services may not be available in all areas Redial lis...

Page 23: ...L 4 Press twice to confirm Find handset This feature helps you find all system handsets CAUTIONS Do not press and hold for more than four seconds It may lead to handset deregistration If the handset d...

Page 24: ...isplays 3 Press to add entry NAME displays Press to select 4 Enter the name of the phonebook entry Press to confirm Press to delete NUMBER displays 5 Press and then enter the telephone number of the e...

Page 25: ...use 2 Press to choose PHONEBOOK and then press to select ALL CONTACTS displays 3 Press and then to choose PB STATUS 4 Press again to select e g 09 30 USED displays Dial a phonebook entry 1 Search for...

Page 26: ...to the entry You hear a confirmation tone Caller ID This feature is available if you have subscribed to the Caller ID service from your local service provider telephone company Review the caller ID lo...

Page 27: ...ct The screen displays NAME 4 Press and use dialing keys to enter name Press to save The number displays Use the dialing keys to edit the number if necessary You hear a confirmation tone Dial a caller...

Page 28: ...PE and then press to select 5 Press to choose UNAVAILABLE and then press to select You hear a confirmation tone Call block If you subscribe to caller ID service you can set the telephone to block unkn...

Page 29: ...entry 1 Search for the desired call block entry see Review a call block list 2 When the desired entry displays press to select The screen displays ADD 3 Press to scroll to EDIT Press to select Press...

Page 30: ...ter the last message the telephone announces End of messages NOTE Make sure you Set date and time correctly 1 Press when the phone is not in use 2 Press toscrolltoANS MACHINE and then press to select...

Page 31: ...Press when the phone is not in use 2 Press to scroll to ANS MACHINE and then press to select 3 Press to scroll to MEMO and press It will start recording Select and press to stop and save the recording...

Page 32: ...DATE TIME and then press to select 4 Press to scroll to DATE FORMAT TIME FORMAT SET TIME SET DATE Set date format 1 Follow Set date and time and reach DATE FORMAT Press to select 2 Press to choose DD...

Page 33: ...isplays Xdisplays next to the selection 4 Press to select your preferred ringtone from MELODY1to MELODY 10 5 Press to save You hear a confirmation tone NOTE If you turn off the ringer volume you will...

Page 34: ...r OUT OF RANGE 5 Press to select 6 Press to choose ON or OFF 7 Press to save Alarm Set alarm on or off and alarm time YoucansettheALARMalertwithhandset 1 Press when the phone is not in use 2 Press to...

Page 35: ...Press to choose HS SETTINGS and then press to select 3 Press to choose AUTO ANSWER and then press to select 4 Press to choose ON or OFF 5 Press to save Press to select and return to previous menu Sel...

Page 36: ...to touch tone dialing If you have pulse rotary service you need to change the dial mode to pulse dialing before using the telephone to make a call 1 Press when the phone is not in use 2 Press to choo...

Page 37: ...save power consumption and provide some reduction in transmission power and range Set ECO range 1 Press when the phone is not in use 2 Press to choose BS SETTINGS and then press to select 3 Press to...

Page 38: ...N USE light turns on PLEASE WAIT displays REGISTER displays if the handset did not find and register to the base sucessfully If handset is registered to the base sucessfully the base will assign next...

Page 39: ...e One is ANS REC and the other one is ANSWER ONLY ANS REC is the default setting and it answers the calls and allows callers to leave a message ANSWER ONLY on the other hand only answer the calls but...

Page 40: ...t and press OK to stop and save the recording and return to previous menu option Select and press to stop the recording without saving and return to previous menu option Maximum recording length is 3...

Page 41: ...the settings and return to previous menu option Press to return to previous menu option without changing and saving Set record time Use this feature to set the message recording time 1 Press when the...

Page 42: ...mote access code Default PIN is 0000 1 Press when the phone is not in use 2 Press toscrolltoANS MACHINE and then press to select 3 Press to scroll to TAM SETTINGS and then press to select 4 Press to s...

Page 43: ...near a sink bathtub or shower Electrical storms Electrical storms can sometimes cause power surges harmful to electronic equipment For your own safety take cautionwhenusingelectricalappliances during...

Page 44: ...l tone on that other telephone either then the telephone line cord may be defective Try installing a new telephone line cord If changing the telephone line cord does not help the wall jack or the wiri...

Page 45: ...45...

Page 46: ...tps euphones vtech com EU for the latest VTech product news Specifications are subject to change without notice 2021 VTech Communications Inc All rights reserved v1 1 12 21 CS2000_CS2050_UK_WEBCIB_v1...

Reviews: