background image

Summary of Contents for VT 1980

Page 1: ...GITAL SPREAD SPECTRUM CORDLESS PHONE MODEL VT 1980 n VT1980 __ ___I__ _ I _ I IMPORTANTBEFORE USING YOUR NEW i I PHONE WE STRONGLY RECOMMED YOU j READ THISMANUAL THOROUGHLY I A 1 i VTECH COMMUNICATIONSLTD ...

Page 2: ... MOUNTING 9 HANDSET FEATURES 11 Handset Diagram 11 PHONE LED 12 BATT LOW LED 12 ONlOFF KEY 12 FLASH KEY 12 MEM KEY 12 REDIAL KEY 12 HOLD KEY 12 EMGCY KEY EMERGENCY CALL 12 MUTE KEY 12 UP KEY 12 DOWN KEY 12 TONE KEY 12 BASE UNIT FEATURES 13 Base Unit Diagram 13 CHARGE LED 13 IN USE LED 13 POWER LED 13 DP TT TONEIPULSE SWITCH 13 ...

Page 3: ...NG EMGCY key 17 TO CHANGE OR REPLACEA SPEED DIAL NUMBER 17 STORING PAUSES IN MEMORY 18 USING REDIAL 19 TO PUTA CALL ON HOLD 19 THE MUTE FEATURE 20 VOLUME CONTROL 20 TO PRESETTHE RINGER VOLUME 20 HANDSET CHARGINGCRADLUSPAREBATTERY CHARGER 21 OPTlONALHEADSETINSTALLATION AND OPERATING INSTRUCTIONS 22 MAINTENANCE 24 IN CASE OF DIFFICULTIES 25 WARRANTY STATEMENT 28 FCCAND I C REGULATIONS 30 TECHNICAL S...

Page 4: ...onversation to prevent voice code leakage in the air This scrambling code is generated from 65 000 possible combinations OTHER SPECIAL FEATURESARE ONE TOUCHSPEED DIALING 20 NUMBER SPEED DIAL 20 CHANNELSOFOPERATION AUTOMATIC CHANNEL REDIAL FEATURE 4 PROGRAMMABLE RINGER FOR EMERGENCY MEMORY SEARCHAND SELECT TYPES LOW BATTERY OUT OF RANGE INDICATOR RECEIVER EASY ANSWER WHEN THE PHONE RINGS SIMPLY PRE...

Page 5: ...rgingCradleKpare Battery Charger Telephone line cord AC adaptor x2 Wall mounting adaptor Screws and Caps Handset Baseunit Battery pack x2 Telephone line cord AC adaptor x2 U Belt Clip Wall Mountingscrews and caps HandsetChargingCradleKpare Wall mountingadaptor BatteryCharger 2 ...

Page 6: ...ool 5 Do not placethis producton an unstable cart stand or table The product may fall causing serious damage to the product 6 Slots and openings in the cabinet and the back or bottom are provided for ventilation To protect it from overheating these openings must not be blocked by placing the product on the bed sofa rug or other similar surface This product should never be placednear or 8 Do not al...

Page 7: ...mally by following the operating instructions Adjust only those controls that are covered by the operating instructions because improper adjustment of other controlsmay resultindamage and w i l l often require extensive work to restore the product to normal operation E lf the product has been dropped and the cabinet has been damaged F If the product exhibits a d i s t i n c t c h a n g e i n perfo...

Page 8: ...ATTERIES The handset of your VT 1980 cordless telephone is powered by rechargeablebatteries The battery pack should be charged if The phone produces a double beep indicating a BATT LOW condition when you pressthe ONlOFF key The phone double beeps when you press ON OFF The BATT LOW indicatoris flashing The handsetseems completelydead and does not beep when you press the keys The BATT LOW indicatori...

Page 9: ...alk time or 5 days of standby After initial charging a typical maintenancecharge is 8 hours CAUTION To reducethe risk of fire or injury read and follow the instructions 1 Use only VTECH battery 2 Do not open or mutilate the battery Releasedelectrolyte is corrosive and may cause damage to the eyes or skin It may betoxic if swallowed 3 Exercisecare in handling batteries in order not to short the bat...

Page 10: ...one for the first time 3 Plug the AC power adaptorintoan electricaloutlet and the DC connector to the back of the base 4 Set the DP 77switchon the base unit If you have touch tone service on your phone line set the switch to TT If you have rotary service set the switch to DP 5 Once the battery pack is fully charged connectthe telephone line cord into the jack at the rear of the base unit Plug the ...

Page 11: ... hear a dial tone If not see IN CASE OF DIFFICULTIES CAUTION 1 Never installtelephone wiring during a lightingstorm 2 Neverinstalltelephonejacks ina wet locationunlessthejack is specifically designed for a wet location 3 Never touch uninsulated telephone wires or terminals unless the 4 Usecaution when installing or modifying telephone lines telephone line has beendisconnected at the network interf...

Page 12: ... holesyou started Tightenthe screwsuntilthe large end of the mounting sleeve is flat against the wall SLEEVESAND SCREWS 1 CHOOSE A SPOT NEAR AN ELECTRICALOUTLETAND A TELEPHONE JACK Your phone requires a modular telephone jack and a standard electrical outlet 120V AC The power cord is six feet long make sure there is an electrical outlet within reachof the base The outlet should not be controlledby...

Page 13: ...base Insert the other end of the plug into the wall jack 7 CONNECTTHE POWER CORD Plug the DC connector into the DCjack at the rearof the base unit Plugthe AC power adaptor into an electrical outlet 5 MOUNT THE BASE ON 8 SET THE OIAL MODE SWITCH ONTHE BASEUNIT THE WALL Position the base so the Ifyou havetouchtone service on Your Phone line Set the switch to TT IfYOU have rotary sewice set the switc...

Page 14: ...Handset Diagram n PHONE LED I 1 2 5 HEADSET JACK TONE KEY 11 ...

Page 15: ...in memory and perform speed number dialing dial the last number that was called on your phone It can also be used for a brief PAUSE when programming speed numbers HOLD KEY When using your phone press HOLD to put a call on hold To return to the call press PHONE or HOLD EMGCY KEY EMERGENCY CALL One touch speed dial number which can be programmedfor an emergency or any other frequently dialed number ...

Page 16: ...he handsetinthe basecradle the IN USE LED flashes one t i m e to i n d i c a t e that initialization assigning a new security code and channel is completed The INUSE LEDflashes quickty when the call is on hold POWER LED Lights when the base unit is powered on DPI TT TOMUPULSE SWITCH Sets the phoneto TT T0NE or DP PULSE dialing The INUSELEDflashes slowly when the handsetis beingused or an incoming ...

Page 17: ...G CALLS When an incoming call is ringing the INUSE LEDonthe base unitand PHONE LED on the handset will flash Toanswer a callwhen the handset is in the base just pick up the handset To answer a call when the handset is away from the base unit just press any key on the handset This isvery useful ina dark environment you do not have to fumble around looking for the ONOFF key to answer the call DISCON...

Page 18: ...hen press the numbers or symbols you need and your phone will send the proper signals To endthe call pressONlOFFor place the handset back in the base unit The phone will automaticallygo back to rotary dial pulse service 1 Dialthe call normally 2 Press TONE key 3 Phoneis now in TONE mode If you havetouch tone service DP T T switchset to TT just dial normally This feature is only for rotary service ...

Page 19: ...touch EMGCY key TO PROGRAMMING SPEED DIAL NUMBERS The Handset must be OFF 1 Press MEM The PHONE LED will blink to indicate that you are in the programmingmode 2 Usingthe dial pad enterthe number you want to store The number can be up to 16 digits long TO PROGRAM SPEED 3 Press MEM once more DIAL NUMBERS Press MEM Enterthenwnbef you want to store Press MEM again Enter the memofy location you wish to...

Page 20: ...her frequently dialed number It is importantto notethat yoUMUST PROGRAMTHE NUMBER which will be dialed when you press EMGCY VTECH DOES NOT PRE PROGRAMTHIS NUMBER To dial using the EMGCY key you can simply press EMGCY on the handset The phonewillautomatically accessdial tone anddial the number you have stored in the EMGCY location You can also dial the EMGCY number by pressing ON OFF in advance and...

Page 21: ... press RDUP two or more times Each press makes the pause 2 seconds longer and is treated as a stored digit If your phone is connected to a PBX you can store the PBX access number and a pause before the phone number For example to store 9 PAUSE 5551234 in memory location 18 do the following 1 Press MEM 2 Press 9 3 Press RDUP 4 Press 5551234 5 Press MEM 6 Press 1 8 W 18 ...

Page 22: ...ut a call on hold by pressing HOLD The PHONE LED on the handsetwill flash quicklyto show a call is on hold To return to the call press ON OFF or HOLD again If a call is on hold using the VT 1980 and the user picks up another phone on the same line the VT 1980will take itself off hold and turn off Therefore you do not have to go back taturn the phone off if you go to another extension It is done au...

Page 23: ...ress the UP or DOWN keys to increase or decrease the earpiece volume Three rapid beeps will be heard when you reach the highest or lowest volume level Press MUTE the caller can not hear your voice to the two wayconversation UP A and DOWN v keys control earpiecevolume during a call TO PRESET THE RINGER VOLUME The VT 1980 has two ringer volume levels To presetthe ringervolume the phone must be OFF P...

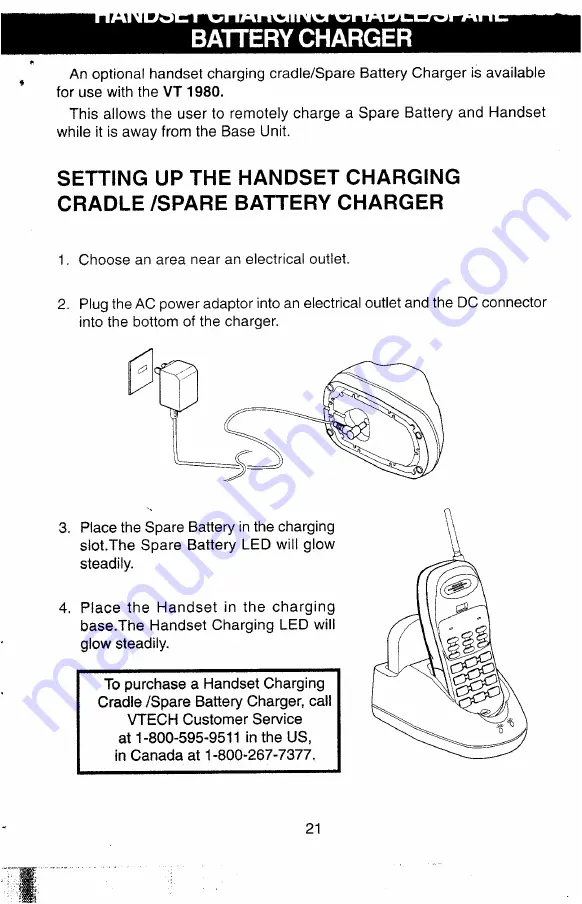
Page 24: ...G CRADLE SPARE BATTERY CHARGER 1 Choose an area near an electricaloutlet 2 Plugthe AC power adaptor intoan electrical outlet and the DC connector into the bottomof the charger 3 Placethe Spare Battery in the charging slot The Spare Battery LED will glow steadily 4 Place the Handset in the charging base The Handset Charging LED will glow steadily Cradle Spare Battery Charger call VTECH Customer Ser...

Page 25: ...the VT 1980 To purchasea Headset call VTECH Customer Serviceat 1 800 595 9511in the US in Canada at 1 800 267 7377 Once you have a compatible 2 5 Headset locate the Headset Jack on the Handset of your VT 1980 Connect the plug on the Headset to the jack on the cordless Handset The plugshould fit securely Do not force the connection See illustration OPERATION Note whenever a compatible Headset is co...

Page 26: ...conversation For maximum sound quality the flexible microphone should be positioned at the corner or your mouth about one inch from your face ON LEFT EAR ON RIGHTEAR The headband can be adjusted to fit the contour of your head Using both hands slide the headband up or down so that it restscomfortablyonyour headwith the speaker cushion centered against your ear 23 ...

Page 27: ...the handset outdoors in the rain or handle it with wet hands Do not install your base unit near a sink bathtub or shower ELECTRICAL STORMS Electricalstorms can sometimes cause power surges harmfulto electronic equipment For your own safety use caution when using electric appliances during storms CLEANING YOUR TELEPHONE Your telephone has a durable plastic casing that should retain its luster for m...

Page 28: ...n you press ON OFF you must charge the batteries If you recently installed a new battery pack make sure it is installedcorrectly NO DIALTONE First check all the suggestions above If you still don t hear a dial tone disconnect the base unit from the telephone jack and connect a different phone If there is no dial tone on that phone either the problem is in your wiring or local service Call your loc...

Page 29: ...hone line to allow them all to ring Try unpluggingsome of the other phones YOUR CALLER FADES INAND OUT You may be nearly out of range Move closer or relocate the base YOU HEAR OTHER CALLS WHILE USING YOUR PHONE YOU HEAR NOISE IN THE HANDSET AND NONE OF THE KEYS OR BUTTONS WORK Replacethe handset in the base cradle wait a few moments and try again Disconnect your base unit from the telephone jack a...

Page 30: ...then try puttingthe handsetin the cradlefor 5 to 10secondsto re initializethe unit If it still does not seem to respond perform the following steps in the order listed 1 Disconnectthe power to the base 2 Disconnectthe handset battery 3 Wait a few minutes 4 Connect power to the base 5 Connectthe handset battery 6 Putthe handsetinthe baseto re initialize 27 ...

Page 31: ...We recommend using the original carton and packing materials Include in the package a copy of the sales receipt or other evidence of date of original purchase if the unit was purchasedwithinthe lasttwelve mouths Print your name and address along with a description of the defect and include this in the package Include payment for any service or repair not covered by warranty as determined by VTECH ...

Page 32: ...erritories or Canada Products serviced by the owner or a service facility not expressly authorized by VTECH Communications Products purchased more than 12 mouths from current date Units purchased in AS IS condition or unitspurchased as Distressed Merchandise HOW DOES STATE LAW OR PROVINCIAL LAW RELATE TO THIS WARRANTY This warranty gives you specific rights You may also have other rights which var...

Page 33: ...ependon the location of the base unit and handset and layout of your home or office FCC PART 15 The equipment has been tested and found to comply with part 15 of the FCC rules These limits are designed to provide reasonable protection against harmful interference in a residential installation This equipment generates uses and can radiate radio frequency energy and if not installed and used in acco...

Page 34: ...The base unit contains no user serviceable parts The handset containsa user replaceablebattery pack If it is determined that your telephoneequipmentismalfunctioning the FCC requiresthat it notbe used and that it be unpluggedfrom the modularjack untilthe problem has been corrected Repairs to this telephone equipment can only be made by the manufacturer or its authorizedagentsor by otherswho may be ...

Page 35: ... loop may consist of any combination of deviceds subjectedonly to the requirement that the sum of the REM does not exceed five 5 0 Notice The Industry Canada label i d e n t i f i e s c e r t i f i e d equipment Thiscertification meansthat the equipment m e e t s c e r t a i n telecommunications network protective operational and safety r e q u i r e m e n t T h e Department does not guarantee the...

Page 36: ...ay vary according to environmental conditions at the time of use SIZE Handset 18 5cmx 6 3cm x 3 6cm Lx W x T maximum antennaexcluded 20 5cm x 18 5cmx 5 5cm Lx W x T maximum antennaexcluded Base ANTENNA LENGTH Handset 6 cm Base 12 cm WEIGHT Handset 250 grams Base 520 grams Batteries 50 grams POWERREQUIREMENTS Handset Self contained nickel cadmium rechargeable battery supply 3 6V nominal 6OOmAh capa...

Page 37: ...e Use this template when wall mounting your base unit To mark the positions of the mounting screws hold this template against the wall and press a pencil or pen point through the center of each crossmark NOTE Select a spot where you can screw into a wooden stud within the wall The mounting screws will not hold securely in plaster or wallboard alone ...

Reviews: