background image

HS 2000 System Administrator’s Handbook

Chapter 4.  Monitoring System Operation

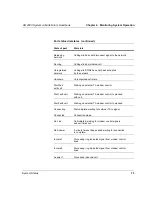
H.221/HDLC

85

H.221/HDLC

This section provides explanations of the parameters in the 
H.221/HDLC window.

Connection Status parameters

FEC Errors (fixed)

The number of incorrect Forward Error Correction (FEC) video data 
values that were fixed. 

The FEC is an 18-bit code that corrects any 2-bit errors in a
511-bit video frame. 

Summary of Contents for HS 2000

Page 1: ......

Page 2: ...ing translation to another language without prior written consent of VTEL Corporation Use duplication or disclosure by the Government is subject to restrictions set forth in subparagraph c 1 iii of the Rights in Technical Data and Computer Software clause at DFARS 252 227 7013 The information contained in this document is subject to change without notice VTEL assumes no responsibility for technica...

Page 3: ... operate to the user s satisfaction Before installing this equipment users should ensure that it is permissible to be connected to the facilities of the local telecommunications company An acceptable method of connection must be used to install the equipment The customer should be aware that compliance with the above conditions may not prevent degradation of service in some situations Repairs to c...

Page 4: ...ompatible modular jack which is Part 68 compliant This equipment cannot be used on telephone company provided coin service Connection to Party Line Service is subject to state tariffs If this equipment causes harm to the telephone network the telephone company will notify you in advance that temporary discontinuance of the service may be required If advance notice isn t practical the telephone com...

Page 5: ... customer install an AC surge arrestor in the AC outlet to which this device is connected This is to avoid equipment damage caused by local lightening strikes and other electrical surges Austel Notice For Use in Australia This equipment can be connected to a telecommunications service only by an Austel permitted terminal adapter ...

Page 6: ...tous les équipements accessoires ne doivent être effectuées que par un technicien biomédical connaissant les obligations et dangers présentés par l utilisation d équipements électroniques en milieu médical Auswahl und Integration von Zusatzgeräten Der Anschluß und oder die Installation von Zusatzgeräten darf nur von einem qualifizierten biomedizinischen Techniker durchgeführt werden der über die A...

Page 7: ...uld be realized that all video audio and other data transmitted through the HS 2000 is digitally encoded for transmission via the communication medium and decoded at the remote location The image quality is dependent on a number of factors including the type of telephony used The product uses electronic circuitry that emits electromagnetic radiation Compliance testing to European standard EN60601 ...

Page 8: ...wendung in der medizinischen Patientenpflege HS 2000 wurde für den Einsatz im Patientenpflegebereich in der Nähe des Patienten entworfen Dieses Produkt ist nicht für den elektrischen Anschluß zu einem Patienten gedacht Es wurde für Ärzte und Pfleger entwickelt um die Kommunikation zwischen anderen Ärzten und Pflegern und Patienten zu vereinfachen Dieses Produkt dient nicht zur Ferndiagnose sondern...

Page 9: ...un individuo en una ubicación remota El producto no está destinado de ninguna manera para el tratamiento de un paciente o para la modificación del ambiente del paciente El sistema HS 2000 no está destinado para medir ni suministrar datos cuantitativos relacionados con el cuidado del paciente Se debe comprender que todo el vídeo audio y demás datos transmitidos a través del sistema HS 2000 se codif...

Page 10: ...nt à l utilisation d équipements accessoires il faut considérer L utilisation de l équipement à proximité des patients La preuve que l homologation de l équipement accessoire a été effectuée en respect des normes nationales uniformisées IEC 601 et IEC 601 1 Sicherheitsüberlegungen für Zusatzgeräte Wenn Zusatzgeräte verwendet werden die nicht mit den Sicherheitsanforderungen dieses Gerätes übereins...

Page 11: ...stem as well as the accessory equipment to be added should be determined separately The total should not exceed the 3 Amp system rating L utilisation de réceptacles CA internes L alimentation des divers sous ensembles du VTEL HS 2000 se fait par l intermédiaire de câbles internes Les équipements accessoires peuvent être branchés sur n importe quel réceptacle CA disponible à condition de ne pas dép...

Page 12: ...o alert the user that liquids and other items should not be placed on the system This symbol also indicates that caution should be used to assure that the system is not located in proximity to overhead liquids Ce symbole est conçu pour avertir l utilisateur que les liquides et autres éléments ne doivent pas être présents sur le système Ce symbole indique également qu il faut prendre la précaution ...

Page 13: ...vertir l utilisateur que des instructions importantes sont fournies dans la documentation livrée avec le système Mit diesem Zeichen wird der Benutzer darüber informiert daß in der Dokumentation wichtige Anleitungen zum System zur Verfügung stehen Este símbolo indica al usuario la presencia de instrucciones importantes proporcionadas en la información impresa incluida con el sistema This symbol is ...

Page 14: ... V Symbol für Netzspannung V significa Voltaje A symbolizes ampereage A symbolise l intensité du courant A Symbol für Stromstärke A significa Amperaje Hz symbolizes Hertz Hz symbolise Hertz Hz ist das Zeichen für Hertz Hz simboliza Hertz symbolizes alternating current symbolise courant alternatif Zeichen für Wechselstrom significa corriente alterna symbol indicates type B equipment Ce symbole indi...

Page 15: ...e mise à la terre principal de l équipement Symbol für den Haupterdungspunkt des Gerätes Esto simboliza el punto de tierra primario del equipo indicates ground connection point Ce symbole indique le point de connexion à la terre Symbol für den Punkt der Erdungsverbindung Este símbolo indica el punto de conexión a tierra Grounding wires studs and terminals are an important safety feature of this eq...

Page 16: ...e este equipo y no deben alterarse Si usted cree que existe una conexión a tierra defectuosa u otro problema relacionado a la conexión a tierra discontinúe el uso y comuníquese con VTEL o con su suministrador de servicios symbolizes video input Ceci symbolise l entrée vidéo Symbol für Videoeingang Esto simboliza entrada de video symbolizes video output Ceci symbolise la sortie vidéo Symbol für Vid...

Page 17: ... from the ground pin on the AC plug to all parts of the metal chassis including drawers shelves and camera arm if provided Périodicité des tests de sécurité Mise en Garde Au moins tous les six mois le courant de fuite et l intégrité de la mise à la terre du châssis métallique devraient être testés par un personnel dûment formé à cet effet Si l équipement ne passe pas l un ou l autre de ces tests s...

Page 18: ...ich der Schubladen der Regale und des Kameraarms falls vorhanden Prueba de seguridad periódica Aviso El personal capacitado debe realizar una prueba de seguridad con regularidad por lo menos cada seis meses de la corriente de fuga a tierra y la integridad de la conexión a tierra del armazón metálico Si los resultados de cualquiera de estas pruebas no son los requeridos debe dejar de usar el equipo...

Page 19: ... this handbook xxvii Other HS 2000 system documentation xxviii Online documents xxviii Reading online documents with WordPad xxix Getting help xxix 1 System Overview Configuring the system 1 Guide to basic configuration tasks 2 Performing backups 3 ...

Page 20: ...bling diagram 12 2 Configuring AppsView Setting up AppsView for the first time 13 Accessing configuration windows 14 Identifying your site 16 Hardware and ISDN interface connections 17 Configuring a new system 17 Configuring additional hardware 19 Setting communications parameters 24 Selecting a default communications profile 25 Adding or customizing a profile for your site 32 Configuring camera m...

Page 21: ...ndow 44 Setting display options 45 Showing or hiding the Call Status window 46 Setting up icons to launch applications from the AppsView toolbar 47 Adding an application icon to the Launch window 47 Adding an application icon to the AppsView toolbar 48 Deleting a button from the AppsView toolbar 49 Removing an application icon 49 Specifying a folder for incoming file transfers 50 Specifying a fold...

Page 22: ...ng the Control Panel 59 Fine tuning audio settings 60 Changing the audio level 60 Setting audio delay adjusting lip sync 61 Fine tuning video settings 62 Quality balance 62 Chroma key color 63 Customizing AppsView toolbars 63 Specifying toolbar timeout length 63 Adding a function button to a toolbar 64 Adding a Windows application button to a toolbar 65 Deleting a button 65 Removing and restoring ...

Page 23: ...thm parameters 76 Audio 79 Communications 81 Line error summary parameters 82 Extended port status parameters 82 Comm Data parameters 83 Modem control line parameters 84 H 221 HDLC 85 Connection Status parameters 85 Port Status parameters 90 Video Status parameters 94 Port History 95 Error Log 96 5 Troubleshooting Video problems 99 Audio problems 105 Camera problems 108 ...

Page 24: ...ication 113 Running diagnostics 114 Interpreting the results of diagnostics tests 115 Accessing the diagnostics program online help 116 Stopping diagnostic tests 116 Exiting the diagnostics program 117 Restarting AppsView 117 Running a loopback test 118 A Connecting to the Internet 121 Requirements for Internet connection 122 Internet browsing software 123 Setting up Internet access 123 Setting up...

Page 25: ...ocol 138 Installing a Web browser 142 Installing Netscape Navigator 142 Installing Microsoft Internet Explorer 143 Launching browsers from AppsView 143 VTEL s Web site 144 Connecting to VTEL s Web site 145 Setting up an automatic link to the VTEL Web site 145 Setting up a link from Netscape Navigator 145 Setting up a link from Microsoft Internet Explorer 146 B Specifications 147 Standards complian...

Page 26: ...Contents HS 2000 System Administrator s Handbook xxvi Error tolerance rates 160 C Symbol Legend 161 Glossary 169 Index 173 ...

Page 27: ...TEL s HSTouch touch screen user interface controls the videoconferencing functions of the system Who should use this handbook This handbook is for people who configure and manage an Enterprise Series HS 2000 system at the site where the system is located This handbook assumes that you are familiar with basic telecommunications connectivity terms and concepts and that you know how to use Windows 95...

Page 28: ...ne documents These online documents are included with the Enterprise Series HS 2000 System RS 366 Interface Description states doc Describes implementation of standards that apply to the connection between the Enterprise Series system and an external network interface via a DDM card The RS 366 interface controls call setup and dialing through the DDM card Use this document as a reference when work...

Page 29: ...then select Programs 2 Select Accessories then select WordPad 3 In WordView open the online document you need c vtel appsview states doc c vtel appsview isdnbri doc Getting help Contact your VTEL reseller or authorized service provider if you need to order replacement parts or optional hardware and software or if you have a technical question about the HS 2000 system the AppsView software or the H...

Page 30: ...About This Handbook HS 2000 System Administrator s Handbook xxx Getting help ...

Page 31: ...f typical VTEL system administration tasks Configuring the system This section lists configuration tasks you need to perform after your new system is set up To configure the system follow the instructions in Chapter 2 Configuring AppsView then complete the configuration by performing the procedures described in Chapter 3 Preparing for Videoconferences ...

Page 32: ...but the following steps describe basic configuration tasks 1 Perform all the procedures described in Chapter 2 Configuring AppsView including setting up a default communications profile Selecting a default communications profile on page 25 2 If necessary set up a communications profile for an atypical type of connection Adding or customizing a profile for your site on page 32 3 Set up Address Book...

Page 33: ...s It is a good idea to back up data files such as slide files at least once a week For more information see the section in the Windows 95 user s guide that discusses how to back up data files Troubleshooting If you encounter a problem when using the HS 2000 system first check the problems and solutions described in Chapter 5 Troubleshooting If you can t find the answer to the problem there call yo...

Page 34: ... If you need to power down the HS 2000 system 1 If a call is in progress hang up 2 Use the right mouse button to click the AppsView icon then select Exit AppsView Immediately 3 Shut down Windows by clicking the Windows 95 Start button then selecting the Shut Down option Note You cannot shut down Windows 95 until you close AppsView 4 Turn off the system by pressing the on off switch to the Off posi...

Page 35: ...HS 2000 System Administrator s Handbook Chapter 1 System Overview Software overview 5 Software overview This diagram shows the main software components of the HS 2000 system ...

Page 36: ...s Includes an electronic tablet pen and tablet overlays Chair Optional VTEL software that facilitates Control multiway conferences SmartView Optional VTEL motion detection software for dual monitor ESA systems SmartView automatically captures a document sends it to the remote site and returns control to the local camera Phone Add Optional VTEL software that enables telephone caller to participate ...

Page 37: ... Administrator s Handbook Chapter 1 System Overview Hardware overview 7 Hardware overview These are the main hardware components inside the cabinet of the HS 2000 system expansion unit Pentium PC enhanced master box ...

Page 38: ...d d d d d d d d d d d d d d d d d d d d d d d d d d d d d d d d d d d d d d d d d d d d d d d d d d d d d d d d d d d d d d d d d d d d d d d d d d d d d d d d d d d d d d d d d d d d d d d d d d d d d d d d d d d d d d d d d d d d d d d d d d d d d d d d d d d d d d d d d d d d d d d d d d d d d d d d d d d d d d d d d d d d d d d d d d d d d d d d d d d d d d d d d d d d d d d d d d d d d d d d ...

Page 39: ...e RAM and other standard PC components as well as the proprietary VTEL board set described in the next section Enterprise Series system board set The following illustration shows the VTEL boards located inside the PC network adapter codec and audio daughterboard video and optional video daughterboard VGA modem LAN sound serial ...

Page 40: ...deo The video daughterboard includes an additional video input and video output to enable the use of dual monitors Codec board The codec board and audio daughterboard is a PCI board that incorporates a video codec an audio subsystem a communications protocol and a framing processor The codec board includes a video input and performs Px64 video encoding The codec board also incorporates a communica...

Page 41: ...terprise Series HS 2000 system to support a number of different networking solutions and protocols Expansion unit The expansion unit is a rack mountable chassis that contains components that route peripheral video and audio equipment to system resources The unit provides five video inputs and four video outputs for general purpose uses It also provides video and audio connections to the system s c...

Page 42: ... 01 605 1563 02 605 1543 02 605 1066 04 605 1067 02 605 1067 01 605 1545 01 605 1546 01 605 1563 03 605 1563 01 605 1543 01 LAN CABLE FOR FUTURE UPGRADE STORED IN CABLE BOX OUT IN AUDIO VIDEO MIC 2 LAN PHONE SET PHONE WALL RS 232 RS 449 S VIDEO MAIN COMPOSITE PREVIEW IN OUT SONY PTZ CONTROL TO 005 113 01 POWER SUPPLY 605 1567 01 SONY PTZ ARM CAMERA EM 232 BOX RS232 RS232 422 PWR AXlink MINI TOUCH ...

Page 43: ...ew To complete the configuration perform the procedures described in Chapter 3 Preparing for Videoconferences Setting up AppsView for the first time If you are setting up AppsView for the first time when you turn on the system the Configuration program automatically opens to the Welcome tab Go to step 5 on page 15 ...

Page 44: ... windows Accessing configuration windows 1 Click the AppsView icon to display the AppsView toolbar 2 Click the System Tools button on the AppsView toolbar to display the Configuration toolbar 3 On the Configuration toolbar click the Set Configuration button The Advanced Interface Setup window opens ...

Page 45: ...Program button The Configuration window opens and displays the Welcome tab 5 Click the tab for the configuration window you need If you are setting up your system for the first time click the Next button to begin configuring the system The other options in the Appearance window are described in Setting up AppsView display options on page 44 ...

Page 46: ...nfo tab 2 Enter your location s site name in the Site Info window Note The Site Name is the identifier the optional Chair Control application will use for your site This is the name that identifies the site to participants in Chair Control videoconferences 3 If you are setting up your system for the first time click the Next button to continue configuring the system ...

Page 47: ...nections 17 Hardware and ISDN interface connections Configuring a new system If you are setting up a new system follow the steps in this section to configure the hardware If you are adding new hardware see Configuring additional hardware on page 19 1 From the Configuration window select the Hardware tab ...

Page 48: ... If you do not know the switch type check with the telephone company that provides your ISDN service If your ISDN connection requires the use of Directory Numbers DNs or Service Provider IDs SPIDs enter the DN or SPID for each ISDN line DNs and SPIDs are assigned by the telephone company that installs your ISDN line If you do not know these numbers contact the telephone company that installed the ...

Page 49: ...e VTEL Enterprise TC video card or the VTEL Enterprise TC codec card You do need to perform step 1 and step 2 if you are installing non plug and play ISA boards except for the VTEL teleconferencing network adapters which are automatically installed during AppsView installation If instructions are included with other vendors ISA boards follow the Windows 95 instructions included with those boards I...

Page 50: ...leshooter You may need to change settings for the existing hardware or for the new hardware or make additional resources available It is likely that you will need to change IRQ settings to allow for the new hardware If the system does not need to use a printer port disable LPT1 which frees IRQ 7 for use If the system does not use a secondary IDE controller disable it which makes IRQ 15 available Y...

Page 51: ...Parallel Port Under Advanced Plug and Play Configuration set IRQ 7 and or IRQ 15 to In Use by ISA or to Available If resources used by VTEL ISA boards must be changed select Basic Configuration 1 or Basic Configuration 2 which allows you to specify different Input Output Range and IRQ settings For the I O Range make sure the switch settings on the board match the beginning value you set in Windows...

Page 52: ...ections 3 From the Configuration window select the Hardware tab 4 Set the Interface type Interface Type Setting Description Quad BRI Network adapter for ISDN BRI networks Single BRI Network adapter for ISDN network 1 plug 2 lines DDM Network adapter that supports T1 switched dual 56 64 and ISDN BRI networks ...

Page 53: ...o not know the switch type check with the telephone company that provides your ISDN service 6 Enter the Directory Number and Service Provider ID SPID for each ISDN line DNs and SPIDs are assigned by the telephone company that installs your ISDN line If you do not know these numbers contact the telephone company that installed the ISDN line or contact your VTEL reseller ...

Page 54: ...ovided with AppsView Copy a default profile save it under a new file name then modify configuration parameters for your site s communications setup Create a new communications profile Note To configure communications settings you must know the types of external equipment to which your system is connected for example dialer MUX or IMUX You can also set up alternate profiles for use in atypical situ...

Page 55: ...ofile you ve selected are the best ones for your system If any property setting does not meet your needs do not change the setting Instead follow this procedure Return to the Communications tab Create a new profile by following the instructions in Adding or customizing a profile for your site on page 32 See Setting up AppsView for the first time on page 13 Do not change the properties of a default...

Page 56: ...Chapter 2 Configuring AppsView HS 2000 System Administrator s Handbook 26 Setting communications parameters 3 Click the Properties button to open the Editing Profile window ...

Page 57: ...communications setting for each call when the call is dialed If Auto Config is selected you cannot change Audio Algorithm or Comm Protocol settings Comm Protocol For communication with another VTEL system select VTEL HDLC For communication with another type of system select H 221 Audio Algorithm In North America selecting a low algorithm 16 Kbps allows more bandwidth for video In Japan select the ...

Page 58: ...istrator s Handbook 28 Setting communications parameters 4 Select the Line Speeds tab In the Line Speeds window make sure the options selected are suitable for your configuration as described in the following table then click the Dialing tab to proceed ...

Page 59: ...ct the line speed to use for the default profile Setup Prefix Setup Suffix Selecting certain line rates allows you to enter a dial out prefix or suffix to use only with that selected line rate AT T with an Ascend If you select the AT T with an Ascend option you can enter a different prefix to replace the default 011 prefix For example if a user enters the number for your UK office which begins wit...

Page 60: ...elect the dial mode appropriate for your system s type of dialing interface Single Port Calls Select Port A or Port B Two communications ports are on the back of the PC For calls that use high line rates such as 384 Kbps or 768 Kbps only one port is required Use this field to select which port you will use Calls that use 112 Kbps or 128 Kbps line rates typically require both ports in which case no...

Page 61: ...ct Follow the steps in the next section Adding or customizing a profile for your site on page 32 to create a new profile Option Description Dial Out Enter a prefix or a suffix if necessary For example if your system is connected to a PBX you may need to enter the prefix 9 to dial out Auto Answer Video Call Place a check mark in this box if you want AppsView to always automatically answer every vid...

Page 62: ...these steps 1 From the Configuration window select the Communications tab 2 If the settings for a profile in the Profiles list match many but not all of the settings required by your system select the profile then press Copy If you cannot find a profile in the Profiles list with settings that closely match the settings required by your system select Add 3 Enter the name of your new profile 4 Highl...

Page 63: ...tup To use the new profile as the default Select the new profile in the Default Profile field on the Communications tab page 25 In the Address Book window select the Use Default profile option See Entering a new site in the Address Book on page 55 To use the new profile as an alternate profile See Entering a new site in the Address Book on page 55 8 If you are setting up your system for the first ...

Page 64: ... HS 2000 System Administrator s Handbook 34 Configuring camera monitor and VCR settings Configuring camera monitor and VCR settings 1 Select the Cameras tab from the Configuration window 2 Select the type of cameras your system uses ...

Page 65: ...ppropriate camera manufacturer from the Camera 1 PTZ Camera drop down list then select Same as Camera 1 from the other PTZ Camera drop down lists If your system includes a Canon camera that camera is the only PTZ camera your system can include Canon cameras cannot be connected in a daisy chain 3 Select the type and number of monitors your system includes 4 Select the video format standard your sys...

Page 66: ...the audio even if they choose to view the VCR instead of the camera source you are sending If the option is enabled and the remote site changes the video source to the VCR the VCR stops recording the conference When you play the VCR during a conference With this option enabled audio always matches video If the option is disabled audio continues to come from the VCR no matter what video source the ...

Page 67: ...ries according to these factors line rate amount of motion in the video The more motion the longer the delay the less motion the shorter the delay If you need to change the HS 2000 system default audio delay settings specific for each line rate to improve lip sync follow these steps 1 Select the Audio Delays tab from the Configuration window 2 Select a line rate Video and audio synchronization is ...

Page 68: ...system for the first time click the Next button to continue configuring the system Setting preferences for auto configuration settings Even if auto configuration is enabled you can specify which audio video and communications algorithms you want the HS 2000 system to use The HS 2000 system will always try to use the settings you specify and will use the default auto configuration settings only if ...

Page 69: ...guration window 2 Select the Cut off Line Rate 3 Select your preferences from the Cut Off and Below drop down lists 4 Select your preferences from the Above Cut Off drop down lists Note To return the delays to the factory default values click the Reset button 5 If you are setting up your system for the first time click the Next button to continue configuring the system ...

Page 70: ...evice settings Configuring pointing device settings Select the Pointing Devices tab from the Configuration window 1 Click the VTEL CommandTouch box to select it 2 Click the No Tablet box 3 If you are setting up your system for the first time click the Next button to continue configuring the system ...

Page 71: ...apter 2 Configuring AppsView Completing system configuration 41 Completing system configuration Viewing system configuration settings From the Configuration window click the Finish tab The Finish window shows your system s current configuration ...

Page 72: ...e Finish window click the OK button to save the configuration Notes If the system is currently in a call when you click the OK button the new configuration is not saved until after the call is completed To exit without saving changes click Cancel Next configure other AppsView settings as described in Chapter 3 Preparing for Videoconferences ...

Page 73: ...43 Preparing for Videoconferences 3 This chapter explains how to set up the system so users will be able to easily communicate with remote sites and use all the AppsView videoconferencing features ...

Page 74: ...ndow to configure settings that affect the appearance of the video image on your monitors and that enable or disable certain AppsView functions Accessing the Advanced Interface Setup window 1 Click the AppsView icon to display the AppsView toolbar 2 Click the System Tools button on the AppsView toolbar to display the System Tools toolbar 3 On the System Tools toolbar click the Set Configuration bu...

Page 75: ...is option to turn on Tool Tips This causes a pop up to display the name of the toolbar button when the cursor is on the button Toolbar Timeout The number of seconds AppsView toolbars stay on the screen after you move the cursor off the toolbar Display Preset Toolbar Select this option to show the camera preset toolbar as one of the rotations of the AppsView toolbar Launch Advanced Config Program S...

Page 76: ... options Showing or hiding the Call Status window To show the Call Status window 1 Click the System Tools button on the AppsView toolbar to display the configuration toolbar 2 On the configuration toolbar click the Call Status button To hide the Call Status window Click the Hide button on the Call Status window ...

Page 77: ...lbar This section explains how to set up an icon so users can launch a Windows 95 application from the AppsView toolbar First add the application s icon to the AppsView Launch window Then add the application s icon to an AppsView toolbar Adding an application icon to the Launch window 1 Open the Advanced Interface Setup window See Accessing the Advanced Interface Setup window on page 44 2 Select t...

Page 78: ...e path for the Excel application or use Browse to locate it Select the Excel application Hold down the right mouse button and drag the application icon to the Launch tab Adding an application icon to the AppsView toolbar After you add the application to the Launch window add the application s icon to the AppsView toolbar 1 Display the AppsView toolbar to which you want to add the application butto...

Page 79: ...n you want select that icon drag it to the AppsView toolbar and drop it there Deleting a button from the AppsView toolbar 1 Display the toolbar containing the button you want to delete 2 Use a right mouse button click to select the button you want to delete then drag the button away from the toolbar Removing an application icon From the Launch tab of the Advanced Interface Setup window select the ...

Page 80: ...ns how to specify the folder for incoming files from remote sites By default transferred files will be placed in this folder c vtel files If you want to change the location 1 Open the Advanced Interface Setup window See Accessing the Advanced Interface Setup window on page 44 2 Select the File Locations tab 3 Enter the path for the folder in which you want incoming files to be located then click O...

Page 81: ...enPal slide trays By default PenPal slide trays are located in the c vtel slides folder If you want to change the PenPal slide location 1 Open the Advanced Interface Setup window See Accessing the Advanced Interface Setup window on page 44 2 Select the File Locations tab 3 Select the folder in which you want your slide trays to be located then click OK ...

Page 82: ...he slide is sent control is automatically switched back to the local camera To designate one or more local cameras as the video source for the document camera typically camera 3 1 Open the Advanced Interface Setup window See Accessing the Advanced Interface Setup window on page 44 2 Select the Document Camera tab The Document Camera window opens Your HS 2000 system must have more than one camera i...

Page 83: ...nd camera the camera you select does not have to be the document stand camera it can be any motion camera except a VCR If you do not select a camera from the Document window the document camera feature is disabled If your HS 2000 system has the SmartView option installed and enabled the document camera feature is disabled for Camera 3 To disable and re enable SmartView press the SmartView button o...

Page 84: ...tting up Address Book entries Setting up Address Book entries You can set up entries for videoconferencing sites in the Address Book to make it easy for users to call those sites Accessing the Address Book To access the Address Book press the Call button then select the Address Book tab ...

Page 85: ...Select the communications profile to use If you want to use the default profile select Use Default profile The default profile is the profile displayed in the Default Profile field in the Communications window See page 25 If you want to use a profile other than the default profile select Always use then select the profile name in the drop down list 6 Click Save to save the new entry The site name ...

Page 86: ...ight the site s name in the list 2 Click Delete Setting up Speed Dialer site buttons This section explains how to set up Speed Dialer site buttons so users can dial frequently called sites by clicking a single button After you set up a site in the Address Book that site name appears in the Speed Dialer window Drag the name of the site from the list to a site button ...

Page 87: ...et a local camera preset position 1 Select a local camera you ll use for sending video to the remote site The HS 2000 Installation and User s Handbook contains information about how to select a camera 2 Use the AppsView on screen cursors to adjust camera settings or use the Zoom Iris and camera movement buttons on the touch panel You must focus a document stand camera manually 3 Click the Rotate T...

Page 88: ...camera preset 1 Establish a videoconference call with the remote site 2 Select a remote camera The HS 2000 Installation and User s Handbook tells how to select a camera 3 If the camera is a PTZ pan tilt zoom camera use the AppsView on screen cursors to adjust camera settings or use the Zoom Iris and camera movement buttons on the touch panel 4 Select the Rotate Toolbars button to display the Local...

Page 89: ...reset positions for this camera or for other cameras by repeating steps 3 through 5 Remember to select a different preset button for each preset Fine tuning audio and video settings This section explains how to use the AppsView Control Panel to fine tune the system s audio and video Accessing the Control Panel 1 Click the System Tools button on the AppsView toolbar to display the configuration too...

Page 90: ...the audio level Move the control button on the vertical slide bars to increase or decrease volume levels as shown in the following table Setting Description Speaker Volume Audio level of the speaker at the local site VCR Play Volume Audio level of the sound from the VCR going to the expansion unit s VCR In port VCR Record Level Audio level of the sound going from the VCR Out port of the expansion ...

Page 91: ...e with the video because the video compression process requires additional time The compression time varies depending on the data rate and the amount of motion Audio delay is preset to the best value for each line rate In unusual circumstances you may need to adjust the audio delay The Rx receive and Tx transmit fields indicate the data reception and transmission rates in milliseconds Add 40 milli...

Page 92: ...ne tuning audio and video settings Fine tuning video settings To adjust video settings select the Video tab from the Control Panel Quality balance Adjust the quality of the video by moving the slider to attain the best balance between a higher faster frame rate and greater image clarity ...

Page 93: ...you do want to change the chroma key color click the Palette button and select a color from the palette or move the Red Green and Blue slider bars to create your own color Customizing AppsView toolbars This section describes how to customize the AppsView toolbars Note Before you can customize toolbars the Configurable Toolbars option must be selected in the Advanced Interface Setup window See Sett...

Page 94: ...which you want to add a function 2 Place the cursor on the border of the toolbar and click the right mouse button The Modify Toolbars window opens 3 Select the icon for the function you need then drag it to the toolbar To add a button for launching a Windows 95 application from the toolbar see Setting up icons to launch applications from the AppsView toolbar on page 47 border ...

Page 95: ... want to delete 2 Use a right mouse button click to select the button you want to delete then drag the button away from the toolbar Removing and restoring an AppsView toolbar You may find that your site does not need one of the AppsView toolbars This section explains how to remove and restore a toolbar Note You cannot remove all the AppsView toolbars One toolbar must always be available Removing a...

Page 96: ...k the Display Preset Toolbar check box Removing and restoring other AppsView toolbars 1 Display the toolbar you want to remove 2 Hold down the right mouse button while you drag the Rotate Toolbars button off the toolbar When you press the Rotate Toolbars button on the remaining toolbars the toolbar you removed no longer appears To restore a toolbar you remove other than a camera presets toolbar re...

Page 97: ...click the right mouse button The Modify Toolbars window opens 3 Click the New button 4 Enter a name for your new toolbar A new Rotate Toolbars button appears 5 Select an icon from the icons displayed in the Modify Toolbars window Hold down the left mouse button and drag the icon to the new Rotate Toolbars button Repeat this step for each icon you want to appear on your new toolbar Note The icons d...

Page 98: ...the new toolbar to change the orientation of the toolbar to a horizontal position 7 Place the cursor on the border of the new toolbar and hold down the left mouse button while you drag the new toolbar to the AppsView icon in the lower right corner of the screen When you click the Rotate Toolbars button your new toolbar now appears in the rotation cycle ...

Page 99: ... check the current status of various HS 2000 system operations Accessing System Monitor windows 1 Click the AppsView icon to display the AppsView toolbar 2 Click the System Tools button on the AppsView toolbar to display the System Tools toolbar 3 On the System Tools toolbar click the System Monitor button The System Monitor window opens ...

Page 100: ...m Administrator s Handbook 70 Accessing System Monitor windows 4 Click the appropriate button on the right side of the System Monitor window to display the type of system information you need For example to view the Error Log click the Error Log button ...

Page 101: ...HS 2000 System Administrator s Handbook Chapter 4 Monitoring System Operation System Status 71 System Status This section provides explanations of the parameters in the Main window ...

Page 102: ...ates the status of the port s The following table describes the dial state associated with the state of the port indicated in the Comm State field Port status dial states State of port Dial state Idle No call is in progress Dial tone Network indicates ready to call Ringing Network has sent alerting signal to calling site Busy Network has sent busy signal to calling site Connected Call is in progre...

Page 103: ... call Waiting on external TA modem control to proceed with call Dial2 with call Waiting on external TA modem control to proceed Connecting Connected Dial complete waiting for external TA to signal Connection made No Line Call initiated waiting for modem control signals and call times out No Answer 3 minute timeout has expired waiting for connection to complete Income1 Processing ring indicated sig...

Page 104: ...ll Disconnecting User has hung up or Terminal Adapter TA signals hangup from other site Disconnected completed InitIdle Hangup is complete external TA modem control signal Modem control signals are transitioning inactive Await H 221 The specified port to complete BAS exchange before proceeding with the call Interface Description ISDN Internal ISDN External All other interface types Port status dia...

Page 105: ...ent and protocol used Direct External terminal equipment modem control signaling to connect with external terminal adapter RS 366 External terminal equipment with RS 366 dialing protocol ISDN Internal Basic rate ISDN ISDN equipment automatically supports all the dialing services required to place the call Clock source Description Internal Used when an internal loopback test is performed External T...

Page 106: ... Auto Hangup Always set to On The terminal interface equipment automatically hangs up a call if the line drops Algorithm parameters Comm Protocol The current communication protocol H 221 VTEL HDLC Video Algorithm The current video algorithm H 261 Allows different vendors video codes for international audio video services to interoperate Enables the use of FCIF and QCIF video resolutions For an ISD...

Page 107: ...than G 711 and G 728 at lower for example 128 Kbps transmission rates The audio bandwidth is 7 0 KHz and the audio clarity is about twice that of a standard telephone 56 Kbps G 722 This algorithm uses 56 Kbps of bandwidth and provides better audio quality than G 711 and G 728 at lower for example 128 Kbps transmission rates The audio bandwidth is 7 0 KHz and the audio clarity is about twice that o...

Page 108: ...r a loopback test Off AutoConfig indicates that the system is set to automatically configure the audio algorithm and communications protocol On or not Off 64 Kbps G 722 This algorithm uses 64 Kbps of the video call with an audio frequency range of 7 0 KHz for higher fidelity than the G 711 and G 728 algorithms Although this is a standards based algorithm it may not be available on some non VTEL sy...

Page 109: ...in the Audio window The bar graphs displayed for some of the parameters indicate audio levels as follows Green and yellow low to mid range indicates that the audio level is acceptable When local participants are talking the level should be green mid range Red upper range indicates that the audio level is too loud Mic Audio level of the microphone ...

Page 110: ...rd via the comm channel Xmit Level of the audio transmitted by the audio board VCR Aux In Audio level play volume of the VCR VCR Aux Out Audio level record volume of the VCR Delays Recv delay is the number of milliseconds incoming audio is delayed to achieve synchronization with video Xmit delay is the number of milliseconds transmitted audio is delayed to achieve synchronization with video ...

Page 111: ...HS 2000 System Administrator s Handbook Chapter 4 Monitoring System Operation Communications 81 Communications This section provides explanations of the parameters in the Communications window ...

Page 112: ...ack on or not off Error Description CRC Errors Number of packets received with CRC errors Abort Chars Number of packets with abort characters Pkt Size Errors Number of packets in which the number of bytes in the packet do not match the number of bytes the packet should contain Bad Packets Number of packets that could not be accepted Pkts w o ACKS Number of packets not acknowledged RX Overrun Numbe...

Page 113: ...cted line errors above the error threshold The other system has made your port idle because of line errors Comm Data parameters Type of data Description Packets Kilopackets per second transmitted and received from Comm channel For HDLC Video Kilobits per second used for video Audio Kilobits per second used for audio Data Kilobits per second used for data ...

Page 114: ... control line parameters Control line Description CTS Clear to send on or off DSR Data set ready on or off RI Ring indicator on or off X 21 ASCII DCE data treated like modem control line on or off FFF Used in X 21 dialing When FFF is off the port is in an idle state When FFF is on the port is connected ...

Page 115: ... HDLC This section provides explanations of the parameters in the H 221 HDLC window Connection Status parameters FEC Errors fixed The number of incorrect Forward Error Correction FEC video data values that were fixed The FEC is an 18 bit code that corrects any 2 bit errors in a 511 bit video frame ...

Page 116: ...ate any data received by the system is immediately returned to the transmitting system The local system still manipulates the data as though it were a normal connection but only the data received is looped back to the transmitter Data processed for transmission is looped internally TEA Active Indicates whether the remote system has set its terminal equipment alarm TEA This value is 1 on when an in...

Page 117: ...unter that indicates the current state of the transmitting side of the bit allocation signal manager It changes as the BAS manager goes through its various states of capability exchange Xmit BASM State values are Xmit BASM State Description Idle The system is idle awaiting connection Capability Exchange The transmitting side is exchanging its audio and video capabilities with the remote system s r...

Page 118: ...es are Recv BASM State Description Idle The system is idle awaiting connection Capability Exchange The receiving side is exchanging its audio and video capabilities with the remote system s transmitting video Awaiting MFA The BAS manager is waiting for the receive synchronization to indicate that multi frame alignment has been achieved Established The receiving side has successfully exchanged capa...

Page 119: ...tricted Indicates whether one s density must be maintained by the system during a connection on or not off Recv Video State Description Idle The receiving video frame module RVFM is idle awaiting video input No Sync The RVFM is searching for a frame alignment word FAW Sync Shift The RVFM has found an FAW that requires shifting to be aligned in memory FAW Found Once The RVFM has found an FAW that i...

Page 120: ... channel connection We are MFA Indicates whether the port is currently multi framed aligned at the local site on or not off The H 221 standard requires that a certain number of frame alignment signals must be successfully received on each end before a connection is considered established This flag is set when the local system has received the prescribed frame alignment signals from the remote site...

Page 121: ...Recv Conn Each channel is assigned a connection number by the H 221 processing code This number is transmitted as part of the frame alignment word This field reflects the value assigned to the receive connection for an active port CRCs Active Indicates whether the 4 bit cyclic redundancy check CRC is being used by an active port on or not off This is an optional algorithm that helps provide end to...

Page 122: ...had to perturb the clock to optimize the frame alignment signal Normally this field indicates a value of 0 or 1 It may indicate some other small number the value should not change once the Sync State has reached 5 Sync State Description Idle A connection is not being processed None A connection has been made but the first frame alignment signal has not been detected FAW 1 The frame alignment word ...

Page 123: ...pabilities with the other end of the connection If the BAS Manager detects an erroneous capability or command it attempts to correct the value for example if the value receive does not match the CRC received If it is unable to correct the value it increments this counter This value can indicate the quality of the connection The value can be any number between 0 and 255 Xmit Err Count The number of...

Page 124: ...eters Xmit Recv Value Description 1 Sec Avg Bandwidth percentages transmitted for the last second 10 Sec Avg Bandwidth percentages transmitted for the last 10 seconds Value Description 1 Sec Avg Bandwidth percentages received for the last second 10 Sec Avg Bandwidth percentages received for the last 10 seconds ...

Page 125: ...rs in the Port History window The Port History window shows the amount of time that Port A and Port B have been in particular states since the system was restarted The time for each state is given in days hours minutes seconds and milliseconds from the time the system was restarted Note For an explanation of each state see Comm Status parameters on page 72 ...

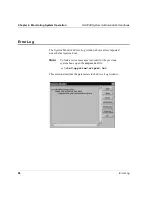
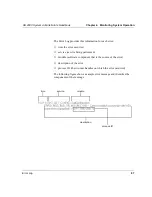
Page 126: ...r Log Error Log The System Monitor s Error Log window shows errors reported since the last system boot Note To look at error messages recorded for the previous system boot open the errprev txt file c vtel appsview errprev txt This section describes the parameters in the Error Log window ...

Page 127: ... error time the error occurred service service being performed module software component that is the source of the error description of the error process ID the window handles on which the error occurred The following figure shows a sample error message and identifies the components of the message time service module description process ID ...

Page 128: ...HS 2000 System Administrator s Handbook 98 ...

Page 129: ...n t Make a Connection Ensure that your Video PC is configured in the same manner as the CODEC you are trying to connect to Consult Making and Answering Calls on page 69 for assistance No local PC or camera video on a monitor Check these conditions Verify that the monitor is receiving AC power and that the monitor is turned on Use the remote control or power switch on the monitor ...

Page 130: ...tor instructions Verify that the monitor S Video cable is firmly seated at both the monitor and expansion Box For the 120 Volt monitor PVM 14N1U ensure that the A B switch on the front of the monitor is set to A For the 240 Volt monitor PVM 1450QM the switch is an A B C switch select A then C Make sure that the Brightness Level Control located on the front side of the Main Monitor is not turned al...

Page 131: ...ministrator s Handbook Chapter 5 Troubleshooting Video problems 101 Make sure all cables are firmly seated in the expansion box and the PC Video PC monitor touch panel main power switch enhanced master box expansion box ...

Page 132: ...ciated with an actual camera The camera AC adapter is plugged into an electrical outlet firmly plugged into the camera and the camera is turned on The lens cover is not on the camera The camera is not in Standby mode The camera is pointed at something other than a blank wall Check by pressing the Operate button on the camera s remote control Adequate local lighting is provided The camera s iris is...

Page 133: ...to a certified service representative No remote video but local video is good Ask the remote site to check these conditions The camera they selected to send video is an active camera The camera is plugged into an electrical outlet and is turned on The lens cover is not on the camera The SmartCam camera is not in Standby mode Check by pressing the Operate button on the camera s remote control The c...

Page 134: ...r to the camera from the system If this message appears when the remote site is using the document camera No Remote Video Input Check to be sure that the input selected on the document stand camera control panel is EV 308 in Europe EV 408 Also check to be sure the Positive Negative image switch is in the P position Remote video quality is poor but local video is good These are possible causes for ...

Page 135: ...eck the remote and local sites data rate and clock source for compatibility Both sites should have the same clock source which is typically the network or the network interface device Audio problems Audio not synchronized with video If mouth movements are not in sync with the words coming from the speaker the lip sync is incorrect To adjust audio delays for all calls at a specific line rate see Co...

Page 136: ...t their microphone is muted The microphone at the remote site may have been disconnected Ask someone at the remote site to test their microphone connections You can use the System Monitor application to check audio functions See Audio on page 79 Remote site cannot hear local site The remote site s speaker may be disconnected or not functioning Ask someone at the remote site to check their audio ca...

Page 137: ...ed up too high Ask someone at the remote site to turn down their volume If the remote site can t hear your audio when the volume is set at a normal level check the placement of your microphones and make sure everyone who speaks is within range of a microphone Objects such as books and briefcases can cause echoes if they are placed too close to a microphone ...

Page 138: ...ing See Touch panel is not illuminated on page 109 4 Turn the camera off for 20 seconds and then on again Keyboard problems Keyboard does not work Check the keyboard cable connection to be sure it is secure at both the keyboard and system ends If the cable is disconnected turn off the PC before reconnecting it Turn the PC off and substitute another known good keyboard Slide problems Slides can t b...

Page 139: ...System Monitor s Communications tab displays CRC errors message CRC cyclic redundancy check errors indicate that the systems are unable to verify that information is being accurately transmitted The problem may be caused by a failure within one of the VTEL systems or by a failure within the network interface equipment at either end This condition may also indicate a problem with the communications...

Page 140: ...e that no wires on the rear of the Enhanced Master Box or the touch panel are disconnected Enhanced Master Box does not have power Ensure that the main power switch in the Peripheral Storage Area is on Ensure that the Enhanced Master Box power cord is plugged in on the rear of the Enhanced Master Box ...

Page 141: ...camera s iris is open wide enough The camera s cables are all tightly connected If the camera is a document camera the camera s power cord is plugged into an electrical outlet Audio echo during conference 1 Have all the other sites mute their microphones 2 Bring each site back one at a time As each site is brought back check for echoing by talking 3 When you hear echoes have that site turn down it...

Page 142: ...terface problems Cannot see the AppsView icon 1 Press the Alt Tab key combination The AppsView icon appears 2 Place the cursor anywhere on the screen except on the AppsView icon then click the right mouse button 3 Make sure the Always on Top option has a check mark next to it 4 Make sure the resolution is set to 640 by 480 To check resolution go to Control Panels select Display and then select the...

Page 143: ...ystem components VTEL video board VTEL codec board VTEL expansion box board interconnections Note You cannot run diagnostics while a videoconference is in progress Accessing the diagnostics application 1 Before starting the diagnostics application exit AppsView Put the cursor on the AppsView icon and click the right mouse button Note If you try to run the diagnostics application while AppsView is ...

Page 144: ...Programs VTEL and Diagnostics Running diagnostics Click the Start button The system begins running tests Each box is filled with the color green or red as the tests are run All the tests are complete in less than five minutes Note While the video test is running the video is inaccessible at various times A message is displayed on the monitor that indicates when the video test is being run ...

Page 145: ...ded in the test When the test completes the Stop button changes to Start and one of the following two conditions exists All boxes appear as green which means that all tests passed Some boxes appear green others appear red and others have no color If a box has no color the associated test was not run due to a failing condition in another major subsystem For example if the codec box appears green an...

Page 146: ...p file About Displays the revision information of the four software modules in the diagnostics program Write down the software module revision number before calling your service representative Stopping diagnostic tests When the test starts running the Start button changes to Stop Click the Stop button to stop the current subsystem diagnostics tests Not all subsystems stop testing immediately The v...

Page 147: ... 117 Exiting the diagnostics program Press the Exit button in the Diagnostics window The diagnostic program closes Restarting AppsView To restart AppsView after you exit the diagnostics program 1 Press Ctrl Esc to display the Windows 95 taskbar 2 Click the Start button then select Programs VTEL and AppsView ...

Page 148: ...118 Running a loopback test Running a loopback test 1 Press the System Tools button on the AppsView toolbar to display the System Tools toolbar 2 Press the Control Panel button on the System Tools toolbar The Control Panel window opens 3 Select the Communications tab ...

Page 149: ...ocal signal is sent back to you and to the remote site This test must be performed when a call is not in progress Local Loopback valid only when in a conference Diagnostic test within the local ESA system Returns the remote site s communication signal to the remote site The remote site can put your local system into local loopback mode The local site sees the local site the remote site sees the re...

Page 150: ...uring a VTEL HDLC call the test functions regardless of whether auto configuration is enabled or not During H 221 calls The remote loopback test invokes digital loopback at the remote site The remote site returns the communications signal to the invoking site while continuing to process the invoking site s communication signal Both sites see and hear the invoking site Run the remote loopback test ...

Page 151: ...121 Connecting to the Internet A This appendix explains how to set up a connection that enables HS 2000 system users to access the Internet via the HS 2000 s modem or a network ...

Page 152: ...t an account with an Internet Service Provider ISP An ISP provides dial up Internet access via a modem for a monthly or an hourly fee connection to a Local Area Network LAN with TCP IP connection to the Internet If you use an Internet Service Provider the HS 2000 system must include a modem If your system is on a LAN that connects to the Internet the HS 2000 system must include a LAN board In orde...

Page 153: ...scape Navigator 3 01 Setting up Internet access This section describes the two main methods for setting up Internet access Setting up a dial up connection for Internet service provided by an ISP This section explains how to set up a dial up connection after you have established an account with an ISP Note You cannot use the instructions in this section to connect to large online service providers ...

Page 154: ...igned by the server your ISP will provide you specific numbers domain name Name that identifies the ISP s network on the Internet DNS IP Domain Naming System Internet Protocol address Converts email addresses such as bob io com to Internet addresses for transmission If the number is not automatically assigned by the server your ISP will provide you specific numbers primary and secondary POP Post O...

Page 155: ...etting up a new dial up networking connection 1 Click the Start button on the Windows 95 taskbar then click Settings and Control Panel 2 In the Control Panel window double click Add Remove Programs SMTP Simple Mail Transfer Protocol mail server name Server name for email message routing Information Description ...

Page 156: ...ecting to the Internet HS 2000 System Administrator s Handbook 126 Setting up Internet access 3 In the Add Remove Programs window select the Windows Setup tab then highlight Communications and click the Details button ...

Page 157: ... In the Communications window click the Dial Up Networking and Direct Cable Connection check boxes to place a check mark in the boxes then click OK If the boxes are already checked skip this step 5 In the Add Remove Programs window click the Apply button 6 When Windows prompts you to reboot the system reboot it ...

Page 158: ...andbook 128 Setting up Internet access 7 After the system reboots double click the My Computer icon on the Windows 95 desktop 8 In the My Computer window double click the Dial Up Networking icon 9 In the Dial Up Networking window double click the Make New Connection icon ...

Page 159: ...S 2000 System Administrator s Handbook Appendix A Connecting to the Internet Setting up Internet access 129 10 In the Make New Connection window type a name for the connection then click the Next button ...

Page 160: ...Appendix A Connecting to the Internet HS 2000 System Administrator s Handbook 130 Setting up Internet access 11 Type the dial up number for your ISP then click the Next button 12 Click the Finish button ...

Page 161: ...Connecting to the Internet Setting up Internet access 131 13 In the Dial Up Networking window click the new dial up connection icon to highlight it Hold down the right mouse button and move the mouse pointer to Properties 14 Click the Server Type button ...

Page 162: ...Appendix A Connecting to the Internet HS 2000 System Administrator s Handbook 132 Setting up Internet access 15 In the Server Types window click the TCP IP Settings button ...

Page 163: ...andbook Appendix A Connecting to the Internet Setting up Internet access 133 16 In the TCP IP Settings window specify the IP address and name server addresses then click OK See Obtaining information about your ISP account on page 124 ...

Page 164: ...cted to a LAN that accesses the Internet Follow the steps in the next two sections Evaluating TCP IP configuration on page 135 and Checking LAN board installation on page 136 Obtain the following information from your LAN administrator Information Description IP address Part of the TCP IP protocol that routes messages across the Internet WINS addresses primary and secondary Addresses in the Window...

Page 165: ...prompt type WINIPCFG then press Enter If the IP Address box displays a number other than 0 0 0 0 the Enterprise Series system is already set up to access the Internet You are now ready to install the Web browser software and can skip to Installing a Web browser on page 142 DNS Domain Naming System addresses primary and secondary Converts email addresses such as bob io com to Internet addresses for...

Page 166: ... 0 0 0 or is blank go to the next section Checking LAN board installation Checking LAN board installation To make sure a LAN board is installed in your HS 2000 system or to make sure the LAN board is configured correctly 1 Click the Start button then select Settings and Control Panel 2 In the Control Panel window double click the System icon ...

Page 167: ...ork adapters option If no devices are listed under Network adapters either the HS 2000 system does not include a LAN board or the LAN board drivers are not set up properly Contact your information services group or LAN system administrator to install and or to configure a LAN board If devices are listed under Network adapters follow the steps in Setting up the Microsoft TCP IP protocol on page 138...

Page 168: ...e Internet HS 2000 System Administrator s Handbook 138 Setting up Internet access Setting up the Microsoft TCP IP protocol 1 In the System window click the Cancel button 2 In the Control Panel window double click the Network icon ...

Page 169: ... Internet Setting up Internet access 139 3 In the Network window select the Configuration tab Look for an icon labeled TCP IP in the list window If the icon exists skip to step 8 If the icon does not exist continue to step 4 4 In the Network window click the Add button ...

Page 170: ...to the Internet HS 2000 System Administrator s Handbook 140 Setting up Internet access 5 In the Select Network Component Type window double click the Protocol option 6 In the Manufacturers list box select the Microsoft icon ...

Page 171: ...ct the TCP IP icon 8 Return to the Network window In the Configuration list box double click the TCP IP icon 9 Using the information you obtained from your LAN administrator enter TCP IP information as follows IP address Select the IP Address tab WINS addresses primary and secondary Select the WINS Configuration tab See Before you begin on page 134 ...

Page 172: ...Installing a Web browser Installing a Web browser This section explains how to install two popular browsers Installing Netscape Navigator 1 Insert Disk 1 into your diskette drive a or b 2 Click the Start button then click Run 3 Type a setup or b setup 4 Follow the instructions on the screen When the setup program asks if you want to use dial up networking select Yes When setup is complete a Netsca...

Page 173: ...the Add Remove Programs window select the Install Uninstall tab 5 Click the Install button 6 Follow the instructions on the screen When the setup program asks if you want to use dial up networking select Yes Launching browsers from AppsView After you install a browser you can set up a button for the browser so users can launch the browser from the AppsView toolbar See Adding a Windows application ...

Page 174: ...rces including an introduction to videoconferencing a videoconferencing tutorial and a videoconferencing needs assessment form The site also includes a list of other Internet sources of videoconferencing information VTEL s Web site includes topics such as these videoconferencing news and information VTEL industry solutions education health care corporate government military financial services manu...

Page 175: ...ting up an automatic link to the VTEL Web site This section explains how to set up a link to the VTEL Web site from Netscape Navigator and from Microsoft Internet Explorer Setting up a link from Netscape Navigator 1 Load Netscape Navigator 2 Select Options from the menu 3 Click General Preferences 4 Select the Appearance tab 5 In the Start Up box next to Start With click Home Page Location 6 In th...

Page 176: ...tting up a link from Microsoft Internet Explorer 1 Load Microsoft Internet Explorer 2 Select File from the top menu 3 Click Open 4 In the Address box type http www vtel com Then click OK 5 Click View from the top menu 6 Click Options 7 Select the Start Page tab 8 Click the Current button then click OK ...

Page 177: ...147 Specifications B This appendix provides information about the physical and electrical specifications of the HS 2000 system ...

Page 178: ...itted in FCIF format 352 pixels by 288 pixels at a maximum rate of 30 frames per second The system can also operate in QCIF format 176 pixels by 144 pixels at a maximum rate of 30 frames per second The FCIF and QCIF video images are actually captured and displayed in standard NTSC or PAL format Audio Audio standards supported include G 711 µ law and A law G 722 G 728 Multipoint ready The system is...

Page 179: ...Supports dual RS 449 V 35 electrical interface and RS 530 with dual RS 366 connections and supports these dialing protocols RS 366 direct connection direct connect for non dial modes to multiplexing equipment Capabilities single port with line rate range corresponding to option 56 128 Kbits per second 56 512 Kbits per second with HighSpeed 512 option 56 1536 Kbits per second with T1 option dual po...

Page 180: ...IMUX line rates up to 512 with the use of bonding mode 1 ISDN with 4 BRI ports 8 channels x 64 Kbps 512 Clock synchronization All internal communications operations are synchronized The HS 2000 system requires exact multiples of 56 and 64 Kbits in externally provided network clocks An external IMUX that uses proprietary bonding protocols must provide full bandwidth to the HS 2000 system in order f...

Page 181: ...ector specifications The DDM is supported by an HD Champ 80 pin connector Cables are provided that have the following standard network interfaces ISDN is supported by one or four RJ 45 connectors one for Single BRI or four for Quad BRI and has an S T interface Connector Specification DB37 RS 449 34 pin Winchester DB25 V 35 RS 366 DB25 DB37 RS 366 RS 449 HD44 HD44 Ascend MBT RS 366 V 35 DB25 DB25 R...

Page 182: ...dard S Video connectors are provided for all five video inputs for the VCR and for the document stand camera typically Camera 3 Composite or S Video signals are acceptable input sources for Camera 3 and for the VCR The system can be configured for NTSC or PAL video formats the expansion box accepts either video format Video input specifications Standard 75 ohm PAL NTSC video signals S Video compos...

Page 183: ...put can be either composite video or S Video The HS 2000 system makes use of the high resolution video output capability S Video pickup device 1 3 inch CCD total pixels 410 000 motorized pan tilt and zoom auto iris 350 vertical TV lines 460 horizontal TV lines video output signal level 1 VP P focal length 5 4 to 64 8 mm zoom range 12 1 pan tilt range horizontal 100º vertical 25º minimum illuminati...

Page 184: ... and the VCR output has an additional RCA connector to provide for direct composite video signal connection Video output specifications Standard 75 ohm PAL NTSC video signals S Video composite Camera and VCR outputs can be configured as S Video or Composite Cameras 1 3 must all be either S Video or Composite Audio Echo canceller TEC 96 The HS 2000 system includes a built in full duplex acoustic ec...

Page 185: ...unit handles 3 microphone inputs and one line level input Additional inputs are provided for VCR audio and Multimedia input These inputs are treated independently they are not mixed Audio line input mixer input The Line In audio source is intended for use with microphone mixers or for typical line level devices such as a tape deck CD player or additional VCR Input impedance 6 K ohms nominal throug...

Page 186: ... clipping level is 6 dBv Multimedia input Intended to be connected to a PC sound card For inband multimedia line input level 10 dB through 3 5 mm jack maximum input 0 dB Input impedance 10kOhms 300mv RMS with 3 5 mm jack Audio output Two line level audio output sources are available at the expansion unit Line Out is used to drive the VTEL audio amplifier and speaker s to provide system audio outpu...

Page 187: ...z to 7 0 KHz PC The system s PC is an IBM compatible computer The PC includes this equipment Pentium processor hard disk 1 44 MB 3 5 inch diskette drive 16 MB RAM factory optional additional 16 MB available for a maximum of 32 MB 4 speed CD ROM drive 2 MB PCI video board Microsoft PS 2 compatible mouse 1 parallel port uses a DB 25 connector 2 RS 232 serial ports use DB 9 connectors 4 additional av...

Page 188: ...Memory The computer has a base memory of 640 KB with available extended memory ranging from 16 MB to 32 MB Operating system The PC s operating system is Microsoft Windows 95 PC environmental specifications temperature operating non operating 10 to 35 C 50 to 95 F 40 to 70 C 40 to 158 F humidity operating non operating 80 RH 36 C 41 F 92 RH 36 C 50 to 95 F altitude operating non operating to 3 048 ...

Page 189: ...creen communications diagnostics and error reports communications line rate measurement noise at operator s position 41 dBA SPL maximum with peripherals idle electrostatic discharge expansion unit tested to 20 kilovolts AC power 100 to 120 V AC 50 Hz to 60 Hz USA Canada Japan 200 to 240 V AC 50 Hz to 60 Hz Europe Australia Asia South Africa height with feet installed 15 94 cm 6 25 inches width 43 ...

Page 190: ...nostics include video codec expansion box interconnect board serial number and revision remote access capability Error tolerance rates With normal audio and motion the system operates at error rates of 1 x 10 6 or less With limited audio and limited motion the system operates at error rates of 1 x 10 5 ...

Page 191: ...mbol Legend C This table gives you the meanings of symbols that appear on HS 2000 system hardware components Symbol Legend Symbol Meaning INPUT ENTRÉE EINGANG INPUT ENTRADA OUTPUT SORTIE AUSGANG OUTPUT SALIDA ...

Page 192: ...andbook 162 MICROPHONE MICRO MIKROFON MICROFONO MICROFONO AUDIO AUDIO TON AUDIO AUDIO VIDEO VIDÉO BILD VIDEO VIDEO VIDEO CASSETTE RECORDER MAGNÉTOSCOPE VCR VCR VCR VCR CONTROL S COMMAND_S STEUERUNGEN CONTROL_S CONTROL_S Symbol Legend continued Symbol Meaning ...

Page 193: ...RA KAMERA EINGANG INPUT TELECAMERA ENTRADA DE CAMERA MONITOR VIDEO OUTPUT SORTIE VIDÉO BILD AUSGANG OUTPUT VIDEO SALIDA DE VIDEO PERSONAL COMPUTER ORDINATEUR PERSONAL COMPUTER PERSONAL COMPUTER ORDENADOR PERSONAL POWER INTERRUPTEUR STROM ALIMENTAZIONE ENCENDIDO Symbol Legend continued Symbol Meaning ...

Page 194: ...HS 2000 System Administrator s Handbook 164 ...

Page 195: ...45 Mbps at 30 frames per second codec coder decoder A device that encodes an incoming analog signal into a digital signal for transmission to another codec which decodes the digital signal into analog format In videoconferencing a codec typically codes and decodes video and audio composite video A television signal where the chrominance signal is a sine wave modulated onto the luminance signal whi...

Page 196: ...uplex audio Audio that allows remote sites to speak simultaneously without losing audio contact Full duplex audio may be provided in a point to point or multipoint conference G 711 ITU T audio algorithm 64 Kbps 3 4 kHz G 722 ITU T audio algorithm 48 56 64 Kbps 5 7 KHz G 728 ITU T audio algorithm 16 Kbps 3 4 kHz H 221 A framing standard that is part of the ITU T s H 320 set of video interoperabilit...

Page 197: ...int Photographic Experts Group Worldwide standard for image compression kilobits per second Measure of rate of digital transmission often abbreviated Kbps MediaConferencing A conference in which information including video audio document and computer data can be exchanged multiplexer Electronic equipment that allows two or more signals to be transmitted over one communications circuit MCU Multiway...

Page 198: ... version of composite video See also composite video Switched 56 SW 56 Digital transmission at 56 Kbps typically over a 2 wire or 4 wire switched 56 line Switched 56 is primarily used in North America T1 Transmission system in which time division multiplexing is used to carry 24 digital voice or data channels at the rate of 1 544 Mbps over copper wire TA Terminal Adapter An adapter commonly used w...

Reviews: