For the dealer’s service technician only
Opening the protective cover:
Re-tubing your VTL amplifier requires
removal of the covers, which can expose potentially lethal voltages. Be sure to
only touch the tubes themselves, and do not allow any part of your body or hanging jewelry to touch
the inside of the amplifier.
1. Diagnose the tubes:
If you are not undergoing a complete retube for the entire amplifier,
then you must first decide how many tubes and which tubes should be
changed. Use the Tube Bias test to determine whether they are within
an acceptable range is strongly recommended. Write down the tube
number(s) that need to be replaced. (Go to Chapter 3 Advanced
Functions and read the Tube Bias test procedures.)
2. Power off the amplifier:
To change tubes in this amplifier you should first power the unit
down, turn off the Power rocker switch from the rear panel, amd
unplug the unit from the wall outlet. Let the amplifier stay powered off
for at least 15 minutes before working with it. Make sure the tubes are
cool before you touch them. Carefully remove the top cover and store
it in a safe place. (See the procedure in the previous page on how to remove the top cover if you
have never removed it before).
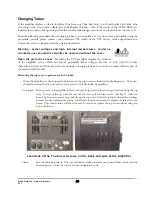
3. Removing Tubes:
Using the tube number that you have written down,
locate the tube you need to remove. You can refer to the following picture
for the tube numbering system on the amplifier’s deck. Hold onto the upper
portion of the tube towards its tip, and be careful not to bend the tube pins,
gently and in small amounts rotate and rock the tube with your fingers to loosen it from its
socket until its pins are completely disengaged from the socket. Take the tube out of the unit.
S-400 Amplifier Owner’s Manual
VTL
49


