background image


30 

Warranty 


90 Days Limited Warranty 


This product is warranted to be free from defects in material and workmanship for a period of 90 days. 
Warranty obligations are limited to replacement or repair of defective parts and components, at the 
option of the manufacturer. If the original model is no longer available, we will substitute with a model 
of equal or better value than the original item. The warranty of this product is null and void if the 
product is subjected to negligence, abuse, modification, misuse, accident or if the customer uses the 
product for a function it was not intended for. This warranty is only valid for the original purchaser of 
this product and will not be honored if the product is resold. This warranty gives you specific legal 
rights, and you may also have other rights which vary from state to state. 
 
The manufacturer will not be liable for incidental or consequential damages caused by the use of this 
product. The manufacture will not be liable for any costs such as lost profits or revenues, cost of 
temporary replacements, loss of data, loss of equipment or use of equipment or any claims by third 
parties. 
 
After 14 days from the purchase date of this product, please call the phone number mentioned below 
to obtain service. A customer representative will give you a return authorization (RA number) allowing 
you to ship the product to the service center. The purchaser must have a copy of the original receipt 
for proof of purchase within 90 days.  The purchaser of this product is responsible for any shipping 
charges to the repair facility. The manufacturer service center will repair or replace the unit in 
question and send it back to the purchaser. 
 
In order to contact the service facility, please call 

508-435-4830

 or 800-639-3803. 

The address for this facility is: 
 
Fourstar Group 
26840 Fargo Ave. Suite C 
Bedford Heights, OH 44146 
 
E-mail Support: techsupport@fourstari.com 


Summary of Contents for 11011225-A

Page 1: ...7 Portable DVD Player Item Number 11011225 A Installation User s Guide All brand names and trademarks are the property of their respective owners...

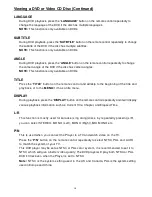
Page 2: ...11 Playing a Disc 12 Viewing a DVD or Video CD Disc 13 16 Playing a MP3 and Audio CD 17 Viewing a Picture CD 17 18 Using the Built in Card Reader 19 Using the Power Adaptor 19 Using the Battery 20 Se...

Page 3: ...ial electric shock Only a qualified technician should service this product 7 Do not apply pressure to the screen the LCD screen is very delicate 8 Keep the portable DVD player away from extreme heat e...

Page 4: ...R DVD R DVD RW DVD RW VCD CD HDCD Picture CD CD R CD RW MPEG4 MP3 and WMA The Portable DVD Player supports SD MS and MMC memory cards via the built in card reader You can play a picture SLIDESHOW wit...

Page 5: ...Align the frame stand to the back of the portable DVD so that the mounting hole lines up correctly Locate the securing screw packed with the unit and insert it through the stand and tighten the knob...

Page 6: ...6 Package Contents 7 Portable DVD Remote Control Frame Stand Power Adapter DC Car Adapter User s Manual Carry Case 7 Portable DVD Player Front View LCD Screen Power LED Indicator Remote Control Sensor...

Page 7: ...Side View Left Side View Right Side View 7 Portable DVD Player Top View Power Adapter Input Disc Tray Cover Easel Stand Volume Control 3 in 1 SD MMC MS Card Slot Headphones Audio Output Video Output O...

Page 8: ...pter cable into the DC IN port on the side of the unit and plug the AC end of the adapter into a normal AC outlet or cigarette adapter in your car 3 Slide the power On Off switch to the ON position 4...

Page 9: ...tween DVD and Card Mode STOP Stops the video music or slideshow REWIND Rewinds the video or music file FAST FORWARD Fast forwards the video or music file PREVIOUS Skips to the previous chapter or trac...

Page 10: ...Sets the DVD in Slow motion 15 LEFT Moves the cursor to the left when making a selection 16 PLAY PAUSE ENTER Play or Pauses the video music and slideshow Enters the function selected 17 RIGHT Moves t...

Page 11: ...control is up to 6 56 feet away from the Portable DVD Player Changing the Battery in the Remote Control 1 Open the battery compartment cover using a coin 2 Insert a 3V battery model CR2025 into the ba...

Page 12: ...of the adapter into a normal AC outlet or cigarette adapter in your car 2 Press the OPEN button on the back of the DVD player to open the disc cover Note Remove the protection plastic card inside the...

Page 13: ...E PLAYING From a short time interruption 1 Press the STOP button the player will remember where you stopped 2 To resume press the PLAY PAUSE ENTER button on the remote or the PLAY PAUSE button on the...

Page 14: ...e Repeat option may vary depending on the type of disc 2 To cancel repeat playback press the REPEAT button on the remote control repeatedly until no option appears on the screen MARK BOOKMARK The Mark...

Page 15: ...repeatedly during video playback to enlarge the image to x2 x3 x4 x1 2 x1 3 x1 4 times of the normal size 2 Press ZOOM and repeatedly press LEFT or RIGHT while displaying JPEG file from the memory ca...

Page 16: ...ginning of the title and playback or to the MENU if it has a title menu DISPLAY During playback press the DISPLAY button on the remote control repeatedly and it will display various playback informati...

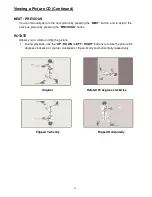
Page 17: ...In other cases the file manager appears Using the UP DOWN LEFT RIGHT buttons on the remote control or the JOYSTICK on the player select the picture and press the PLAY PAUSE button on the player or th...

Page 18: ...evious picture by pressing the PREVIOUS button ROTATE Allows you to rotate and flip the picture 1 During playback use the UP DOWN LEFT RIGHT buttons to rotate the picture 90 degrees clockwise or count...

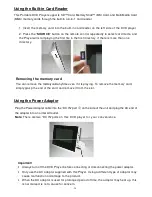
Page 19: ...rycard anytime even if it is playing To remove the memory card simply grasp the end of the card and remove it from the slot Using the Power Adaptor Plug the Power Adapter cable into the DC IN port on...

Page 20: ...lternatively When the battery is fully charged the power LED will stay lit green When using the Player with the battery the power LED will stay lit green if the battery power is low the LED will start...

Page 21: ...ote to enter the function TV Display Set the screen display aspect ratio Angle Mark Set Camera angle mark on off OSD Lang Set the OSD On Screen Display language Captions Displays the Closed Captions a...

Page 22: ...the Sharpness Brightness Contrast Hue and Color Saturation of the screen Panel Inverse Turn the image 180 degrees Password Setup Page Password Mode Enables or disable the password Password Change the...

Page 23: ...atedly to select the input from the DVD player Connecting Earphones You can attach an earphone not included with a stereo mini jack plug to the phone jack oftheDVDplayerfor private listening The volum...

Page 24: ...backwards 3 Zip close the case you have to reverse the flap to zip the case close 4 Insert the DVD player into the case 5 Press the left adhesive tape to avoid the unit being damaged from falling off...

Page 25: ...harging time to Full Capacity 7 4V 1 A 2 hours Slideshow Standard JPEG with MP3 WMA Background music Video Output Composite Video 1 Channel 1 0 Vp p Audio Output Channels Frequency S N Ratio Dynamic R...

Page 26: ...up lens of the DVD player might be dirty 4 Contact the service center for lens cleaning No Sound 1 Check the volume setting If set to zero turn up volume level 2 Check if the headphones are plugged i...

Page 27: ...monia non alcohol based glass cleaner Do not use harsh or abrasive cleaners such as ketene such as acetone ethanol toluene acetic acid methane chloride or other detergents to clean the portable DVD th...

Page 28: ...t occur in television reception which can be determined by turning the equipment on and off Interference may be corrected by one or more of the following measures Reorient or relocate the receiving an...

Page 29: ...gards to operation and installation of this item please call the toll free number below to obtain assistance A customer service representative will assist you and provide operating information on the...

Page 30: ...not be liable for incidental or consequential damages caused by the use of this product The manufacture will not be liable for any costs such as lost profits or revenues cost of temporary replacements...

Reviews: