9
OPERATING THE TOOL
1. The depth to which a fastener is driven is determined by both the supplied air pressure
and the drive depth setting.
1a. Test fire a fastener into a sample of the material you will be working on and check
depth.
1b. If a change is desired, adjust the drive depth thumbwheel below the trigger (part of
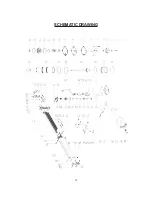
#29, the Safety bracket assembly; located on the Schematic Drawing between parts
#28 and #29). To increase the drive depth turn the thumbwheel to the left, to
decrease depth move it to the right.
1c. Test fire another fastener and check depth again.
1d. Adjust as necessary.
1e. To make adjustments beyond the range of the drive depth adjustment thumbwheel,
adjust the regulator to supply air at a higher or lower pressure.
1f. Drive depth settings will vary between staples and brads of the same length.
CAUTION
!
l
Keep tool pointed in a safe direction at all times.
l
Never attempt to drive fasteners into materials too hard to penetrate, at too steep an
angle, or too near the edge of the workpiece. The fastener can ricochet causing personal
injury.
l
Disconnect tool from air supply before loading fasteners, doing any disassembly,
maintenance, clearing a jammed fastener, leaving the work area, moving the tool to
another location, or handing the tool to another person.
l
Clean and inspect the tool daily. Carefully check for proper operation of trigger and safety
mechanism. Do not use the tool unless both the trigger and the safety mechanism are
functional, or if the tool is leaking air or needs any other repair.
2. Make sure the air pressure is within the limits mentioned in SPECIFICATIONS.
3. Hold the GUN BODY (24) and press SAFETY BRACKET ASSEMBLY (29) against the
work surface, being sure the tool is perpendicular to the surface.
4. Gently squeeze the TRIGGER (39) to drive the fastener.
5. Lift the tool off the work surface.
CLEARING A JAMMED FASTENER
1.
CAUTION
!
Disconnect the tool from the air supply.
2. Depress the LOCK (59) to release the MOVABLE MAGAZINE UNIT (57) and pull the
magazine out fully as shown in
LOADING THE FASTENERS
.
3. Release the quick-release latch and open the nose piece.
4. Remove any remaining fasteners from the tool.
5. Use a slender, soft steel rod to push the drive blade to its uppermost position.
6. Remove the jammed fastener with needle nose pliers.
7. Follow instructions in
LOADING THE FASTENERS
to reload fasteners
Summary of Contents for 404-7791
Page 14: ...14 SCHEMATIC DRAWING...


