31 vwr.com Instruction manual VWR
®
Imager Chemi Premium
5.
Install the Transilluminator into the runners. Connect the flying mains lead from the back of the
Darkroom to the socket on the back of the Transilluminator. Energise the Transilluminator -
ON/OFF switch on the front of the unit. Set the Transilluminator Power rocker switch on the
front of the unit to 100%.
6.
Start up the PC and install the Gl Doc image caqture software.
7.
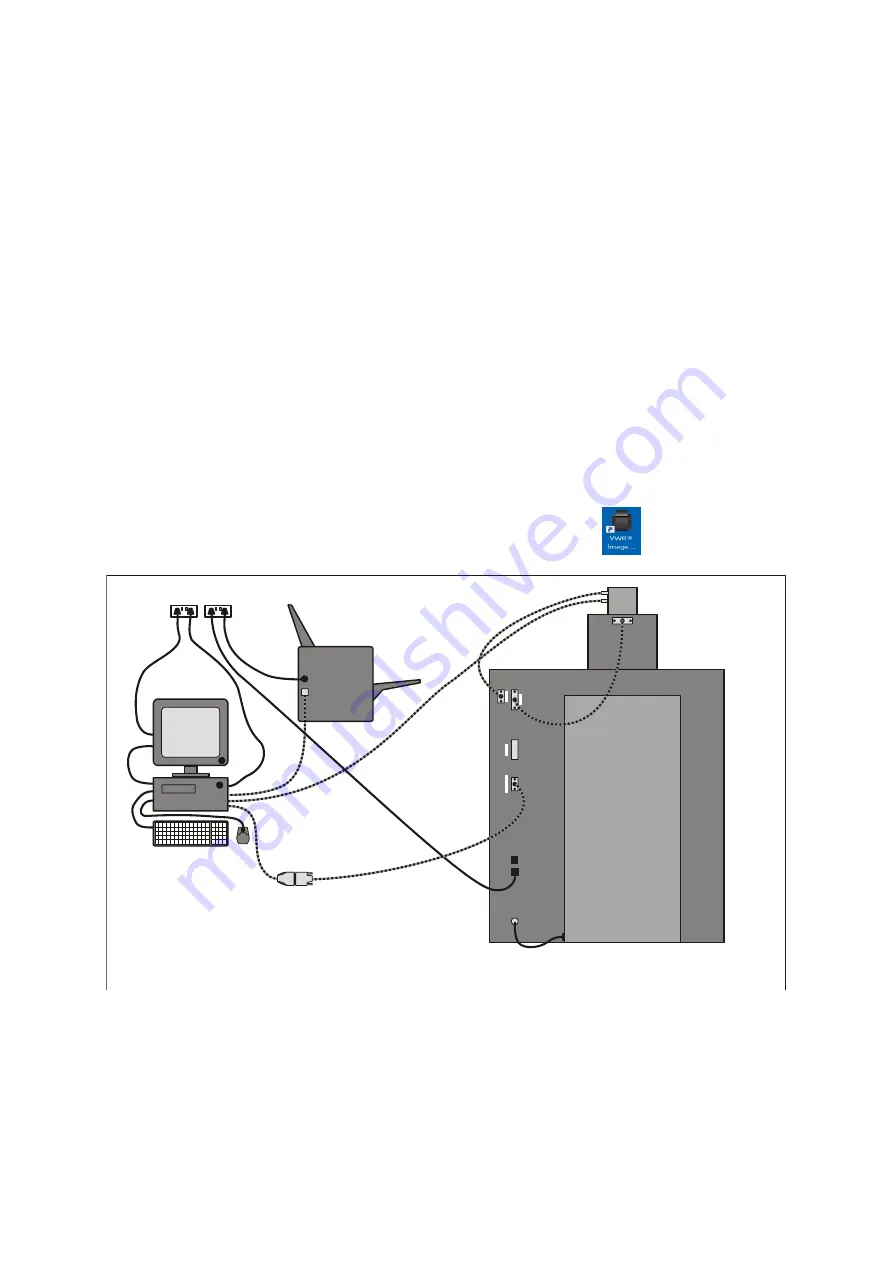
Connect the Camera to PC lead to a USB Type A connector on the PC. The Camera and PC
will automatically start to communicate and the Camera drivers will start to load onto the PC. If a
warning box appears on the PC monitor containing a message that the drivers are unsigned or
unverified, then choose the option to proceed with the installation.
8.
Connect the Darkroom to PC lead to the 9-way D-type connector on the Darkroom. Connect the
other end of the lead to the 9-way D-type connector on the serial/USB converter. Then connect
the converter to a USB Type A connector on the PC.
Note:
If the PC has a serial 9-way D-type male connecter, then the female 9-way D-type connector on
the Darkroom to PC lead may be connected directly to the PC, without attaching the converter.
Note:
The Gel Doc software requires the PC to be equipped with an OpenGL compatible graphics card
with a resolution of at least 1280 x 900 with true colour, with DPI set to normal size (96 DPI).
9.
The Gel Doc analysis software will install automatically.
10.
Double click the icon to start the Gel Doc image capture software
.
Desktop PC
Printer
Camera unit
Lens unit
Serial to USB
converter
G:BOX Instrument
(rear) - Hood removed for clarity
G:BOX INSTRUMENT - POWER AND
DATA CONNECTIONS
O
I
D
A
R
K
R
O
O
M
/P
C
N
O
T
U
SE
D
C
A
M
ER
A
LE
N
S
Stage cover
Darkroom
IMAGER CHEMI PREMIUM- POWER AND
DATA CONNECTIONS
Imager Chemi Premium Instrument
(rear)- Hood removed for clarity


